YellowSquared  /  Field notes

Notes from the workshop

29 posts, newest first. Choose an app to narrow the feed.

025 / 29

Why Are Photos Blurry at f/22? Finding Your Lens's Sharpest Aperture Sweet Spot

Almost every landscape photographer runs into the same baffling disappointment early on: you mount your camera on a sturdy tripod at golden hour, dial the aperture all the way down to f/22 to maximize depth of field from the foreground rocks to the distant horizon, and open the file on your monitor—only to find that the entire image looks muddy and slightly out of focus. Camera shake wasn't the culprit, and your autofocus didn't miss. You hit optical wave diffraction, a fundamental physical limit where squeezing light through a tiny aperture iris spreads every point of light into a soft circular blur known as an Airy disk.
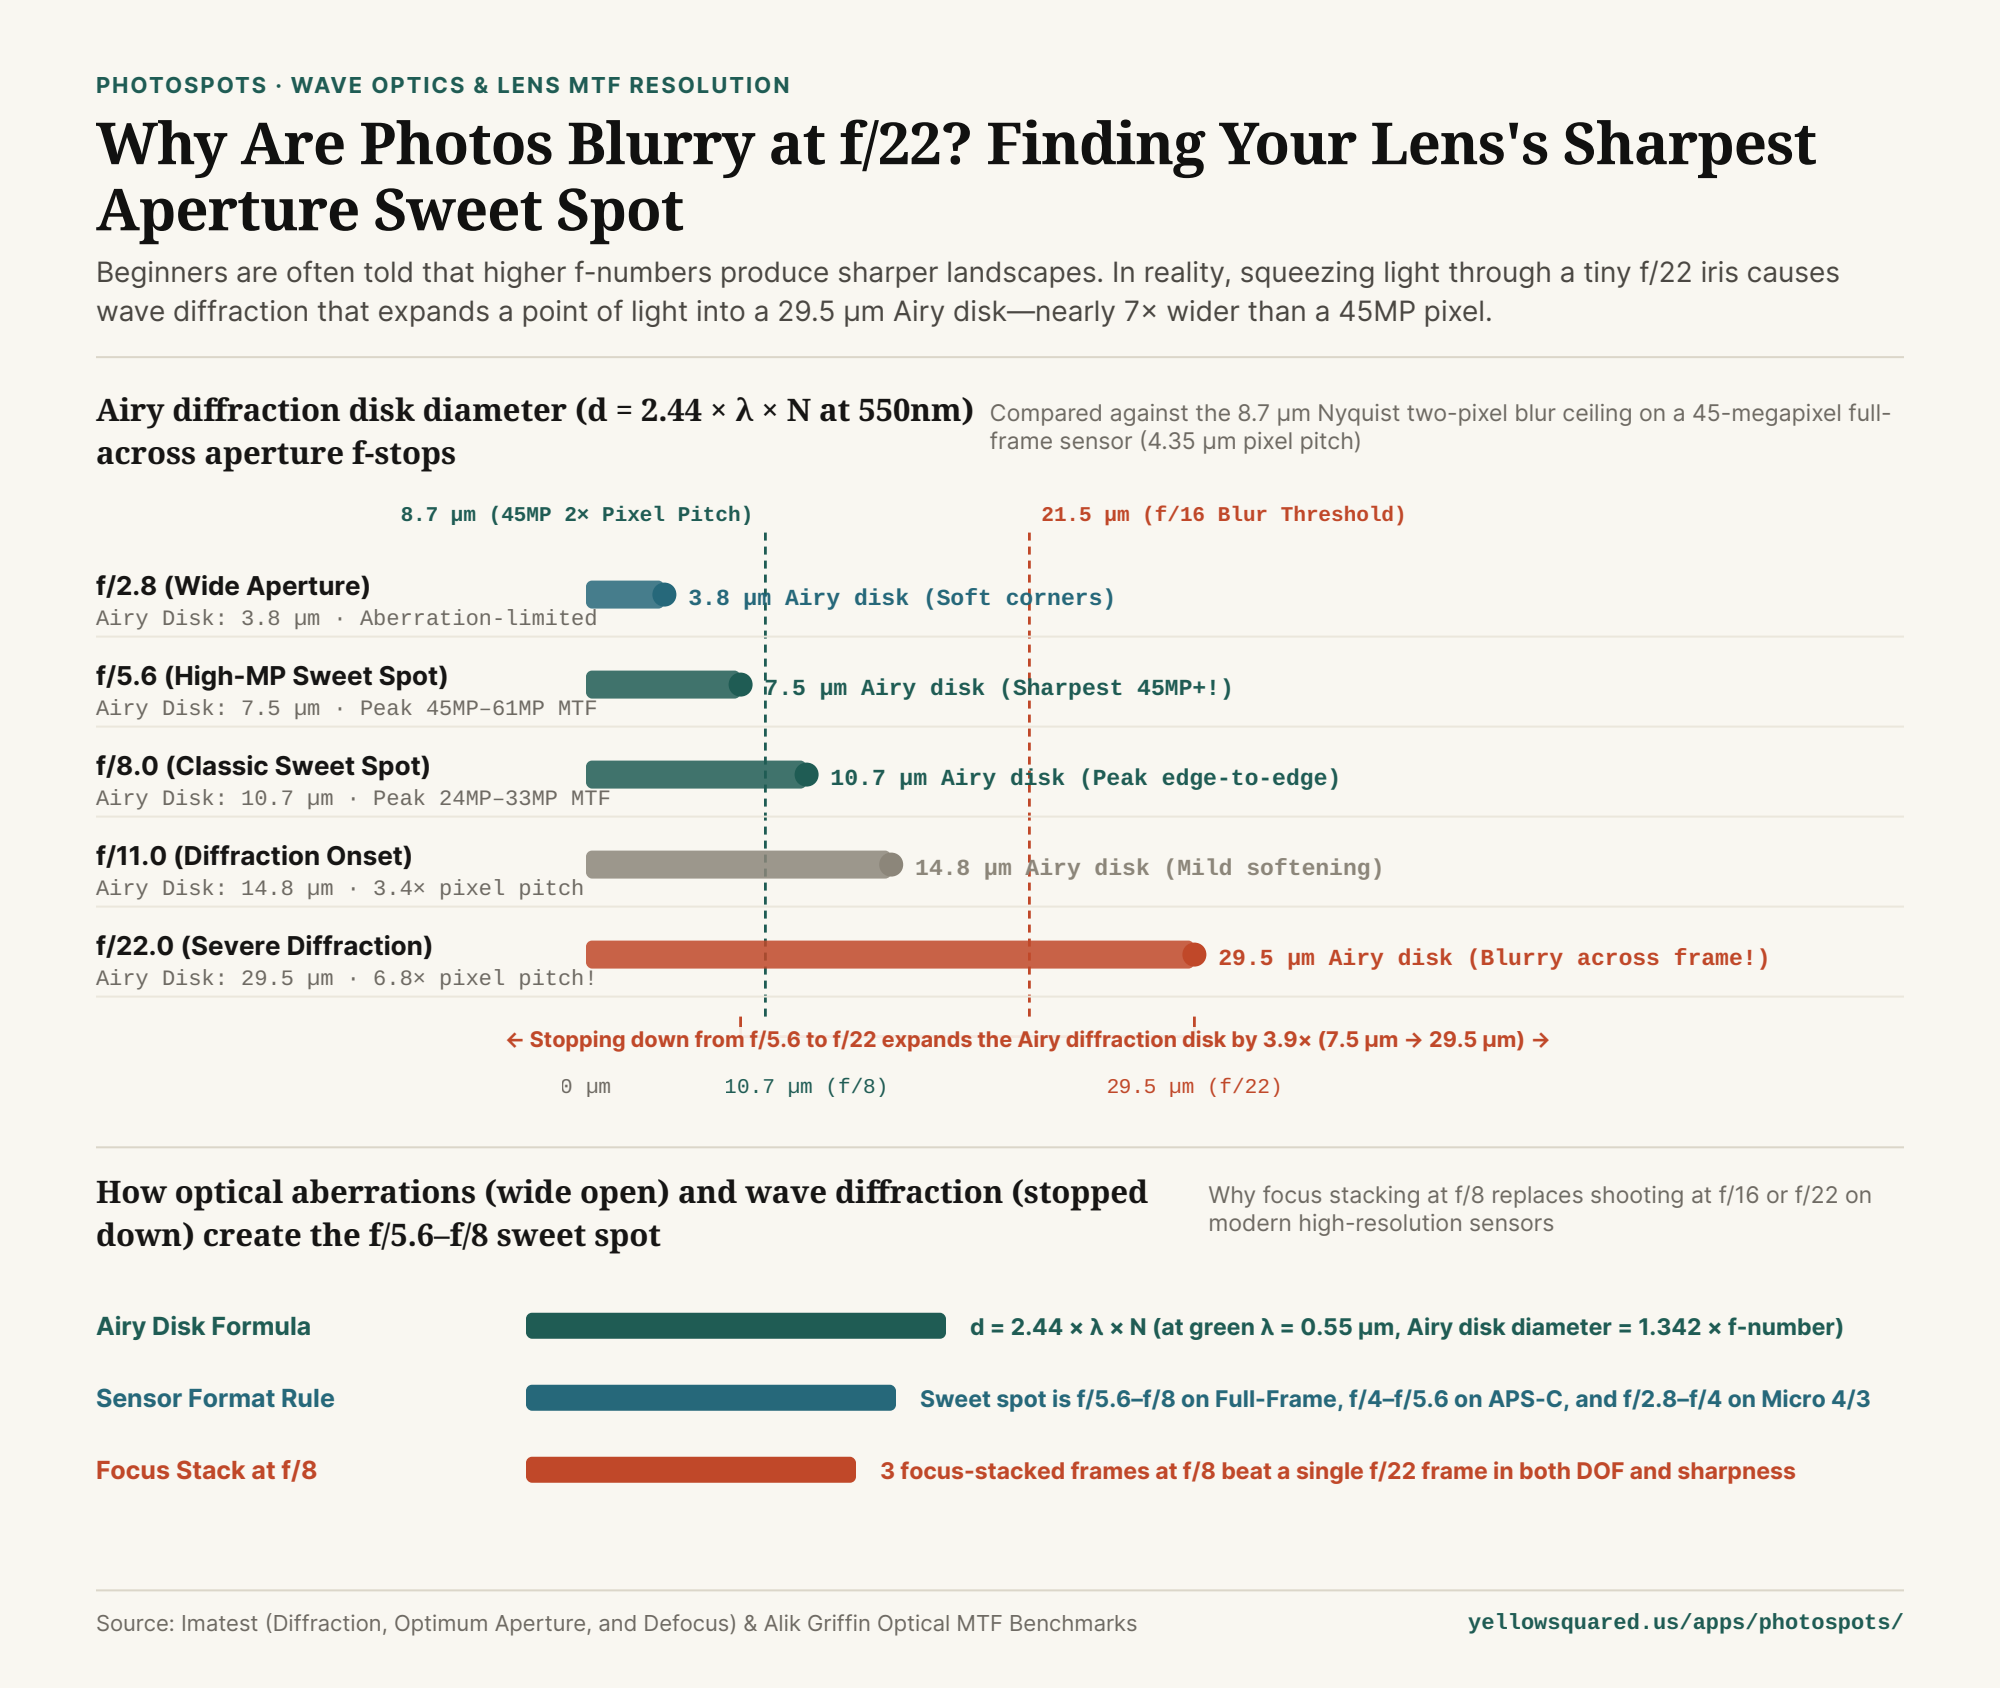
Chart comparing Airy diffraction disk diameter in micrometers from f/2.8 to f/22 against a 45MP full-frame sensor's Nyquist limit
Figure 1: Airy disk diameter (in micrometers at λ = 550 nm green light) across aperture stops from f/2.8 to f/22, plotted against the 8.7 µm two-pixel Nyquist blur threshold of a 45-megapixel full-frame sensor. Reproducible dataset: what-is-lens-diffraction-sharpest-aperture-sweet-spot-f8-vs-f22.csv.

1. The Physics of the Airy Disk: d = 2.44 × λ × N

When light waves pass through a circular opening, waves skimming the edge of the aperture blades bend outward and interfere with one another, creating a bright central spot surrounded by faint concentric rings. As derived in Imatest's optical engineering documentation on diffraction and optimum aperture, the diameter of that first dark ring—the Airy disk diameter (dairy)—depends strictly on the wavelength of light (λ) and the lens f-number (N):

dairy = 2.44 × λ × N

For green light in the middle of the visible human spectrum (λ = 0.55 µm, or 550 nm), this simplifies to dairy ≈ 1.342 × N micrometers. Notice what is missing from the equation: focal length and lens price do not appear anywhere. Whether you are shooting on a $200 kit lens or a $3,000 prime lens, a given f-stop produces the exact same physical diffraction spot size on your sensor:

  • At f/2.8: dairy = 3.8 µm (smaller than a single pixel on a 24MP full-frame sensor).
  • At f/5.6: dairy = 7.5 µm (matches the two-pixel Nyquist limit of a 45MP–50MP full-frame sensor).
  • At f/8.0: dairy = 10.7 µm (the classic equilibrium sweet spot for 24MP–33MP full-frame sensors).
  • At f/16.0: dairy = 21.5 µm (visibly softens fine foliage, feathers, and architectural brickwork).
  • At f/22.0: dairy = 29.5 µm (nearly 7 times wider than a 4.35 µm pixel on a 45MP sensor, smearing every fine detail across a 7×7 grid of pixels).
"No matter how expensive your glass is, an f/22 aperture projects a 29.5-micrometer diffraction blur circle onto your sensor—erasing over half of your camera's resolving power."

2. Why Lenses Have a Sweet Spot Between f/5.6 and f/8

If wider apertures produce smaller Airy disks, why isn't a lens sharpest wide open at f/1.4 or f/2.0? As shown in empirical MTF50 lens resolution benchmarks, wide-open apertures suffer from the opposite physical problem: optical lens aberrations (spherical aberration, coma, astigmatism, and field curvature) caused by light rays refracting through the thick outer perimeter of the glass elements.

Stopping a lens down by 2 to 3 stops from wide open physically blocks those outer peripheral light rays, causing optical aberrations to plummet while the Airy diffraction disk is still tiny. The intersection of those two curves is your lens's sharpest aperture sweet spot: typically f/5.6 to f/8 on Full-Frame, f/4 to f/5.6 on APS-C, and f/2.8 to f/4 on Micro Four Thirds (because smaller sensors pack smaller pixels into the same physical area).

3. Aperture Diffraction vs. Optical Aberration Table

Use this reference table to balance depth of field, optical aberrations, and Airy diffraction across f-stops on a modern full-frame camera (available in what-is-lens-diffraction-sharpest-aperture-sweet-spot-f8-vs-f22.csv):

Aperture f-Stop (N) Airy Disk (550nm) Optical Aberration Blur Combined Blur Spot 45MP Full-Frame Status Recommended Field Use Case
f/1.4 (Wide Open) 1.9 µm 14.5 µm 14.6 µm Soft corners & spherical glow Astrophotography & low-light isolation
f/4.0 5.4 µm 4.8 µm 7.2 µm Tack-sharp center; clean edges Handheld travel & environmental portraits
f/5.6 to f/8.0 (Sweet Spot) 7.5 to 10.7 µm 2.2 µm 7.8 to 10.9 µm Peak MTF50 edge-to-edge! Landscapes, architecture & focus stacks
f/11.0 14.8 µm 1.5 µm 14.9 µm Diffraction limit threshold Single-frame deep DOF landscapes
f/16.0 21.5 µm 1.1 µm 21.5 µm Visible micro-contrast loss Sunstars & waterfall motion blur
f/22.0 29.5 µm 0.9 µm 29.5 µm Severe global softening (6.8× px) Avoid except extreme sunstar bursts

4. Plan Golden Hour Angles and Sweet-Spot Shoots in PhotoSpots

Instead of stopping down to f/22 when shooting a close foreground wildflower against a distant mountain peak, lock your aperture at f/8 and capture 2 or 3 frames focused at progressive distances (foreground, midground, infinity) to blend in post-processing. You get infinite depth of field with peak f/8 optical acuity. To time your tripod sessions for golden hour, blue hour, and exact sun azimuth angles, Track lighting ephemeris in PhotoSpots before heading to your trailhead.

Verified Primary Sources

  1. Imatest LLC — Diffraction, Optimum Aperture, and Defocus (Airy Disk Formula & Sensor Pixel Pitch Limits) (Retrieved 2026-10-31).
  2. Alik Griffin — What Is Diffraction in Photography? (Empirical Lens MTF50 Sweet Spot Benchmarks) (Retrieved 2026-10-31).
026 / 29

What Is Hyperfocal Distance? Where to Focus for Front-to-Back Sharp Landscapes

Focusing a lens directly on the distant horizon wastes the rear half of your depth of field beyond infinity—whereas focusing at the hyperfocal distance (H = f² ÷ [N × c] + f) keeps everything acceptably sharp from half that distance (H ÷ 2) to infinity.

Stand on a rocky coastline at sunrise with a wide-angle lens (`24mm`), set your aperture to `f/8`, tap your autofocus point on the distant mountain peaks on the horizon, and take the shot. On the back of your camera's small LCD screen, everything looks sharp. Open that file on a 27-inch monitor at home, however, and the wet cobblestones and tide pools five feet in front of your tripod are noticeably soft and blurry.

To fix the blurry foreground, many photographers crank their aperture down to `f/16` or `f/22`—unaware that tiny aperture pinholes cause light waves to bend and interfere with one another (`optical diffraction`), softening the entire image from edge to edge. Instead of stopping down into diffraction, landscape photographers achieve tack-sharp front-to-back images at `f/8` or `f/11` by focusing at a specific mathematical sweet spot in the foreground: the hyperfocal distance (`H`).

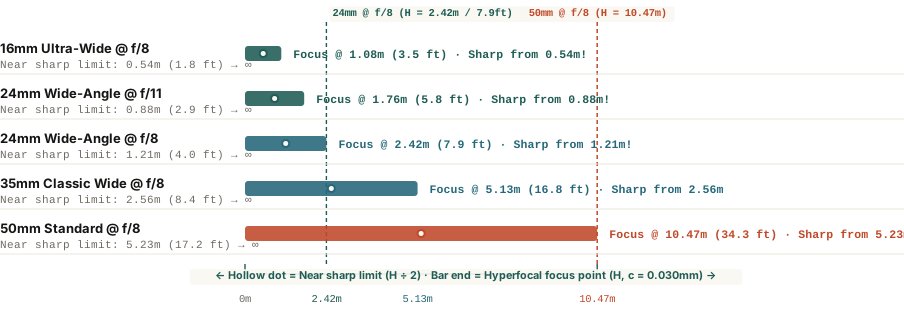
Hyperfocal focus distance H and near sharp limit H divided by 2 across 16mm, 24mm, 35mm, and 50mm lenses on full-frame sensors
Figure 1: Hyperfocal distance (`H`, bar end) and near sharp limit (`H ÷ 2`, hollow dot) across five full-frame lens and aperture combinations (`c = 0.030 mm`). Download optical table: what-is-hyperfocal-distance-landscape-photography-sharp-focus.csv.

The Optical Math: Why Focusing at H Gives You H ÷ 2 to Infinity

In geometrical optics, a lens can only focus light rays from a single exact plane into a theoretical point; everything closer or farther forms a tiny blurred disc called the circle of confusion (`c`). As long as that disc stays smaller than your sensor's perceptual threshold (`c = 0.029–0.030 mm` for standard full-frame viewing, or `0.018–0.020 mm` for high-acuity pixel peeping), the human eye perceives the zone as "in focus."

The **hyperfocal distance (`H`)** is the closest distance at which you can focus a lens while keeping the far boundary of acceptable sharpness just touching infinity (`∞`):

`H = f² ÷ (N × c) + f`

  • What Happens When You Focus at Infinity (`∞`): Your near limit of acceptable sharpness stops at exactly `H`. For a `24mm` lens at `f/8` (`c = 0.030 mm`), `H = 24² ÷ (8 × 0.030) + 24 = 2,424 mm` (`2.42 meters` or `7.9 feet`). Everything closer than `7.9 feet` goes blurry, and the entire rear half of your depth of field is wasted "beyond infinity."
  • What Happens When You Focus at `H` (`2.42m / 7.9 ft`): The far edge of your depth-of-field zone pulls back so it just kisses the horizon (`∞`), while the near edge of acceptable sharpness advances to `H ÷ 2 = 1.21 meters` (`4.0 feet`)—doubling your close-up foreground reach without changing your aperture!
  • Why Focal Length Squared (`f²`) Dominates: Because focal length `f` is squared in the numerator, switching from a `24mm` lens (`H = 2.42m`) to a `50mm` lens (`H = 10.47m`) at `f/8` pushes the hyperfocal distance more than four times farther away (`34.3 feet`).

Focusing on the horizon throws away half of your depth of field behind the mountains; focusing at the hyperfocal distance brings that sharpness into your foreground.

The 'Double-the-Distance' Field Shortcut (No Calculator Required)

You do not need to memorize tables or pull out a smartphone app in freezing dawn wind. Because focusing at the hyperfocal distance `H` always places the near limit of sharpness at exactly half that distance (`H ÷ 2`), you can invert the relationship using the Double-the-Distance Rule:

  1. Find Your Closest Foreground Element: Look at the bottom of your frame and estimate the distance to the closest rock, flower, or tide pool that must be sharp (say, `4 feet` away).
  2. Focus at Twice That Distance (`2 × 4 ft = 8 feet`): Place your autofocus point on an object roughly `8 feet` away (about one-third of the way into the scene) at `f/8` or `f/11`.
  3. When to Focus-Stack Instead: On modern `45MP–61MP` cameras (`c ≈ 0.018 mm`) or when your foreground flower is just `12 inches` from the front element, no single aperture can span `1 foot` to `infinity` without `f/22` diffraction blur. Instead, shoot two frames at your lens's sharpest aperture (`f/8`)—one focused on the foreground and one focused on the midground/horizon—and blend them in post.

To plan exact golden-hour sun azimuths, twilight elevation angles, and terrain sightlines for your next landscape shoot, you can Track lighting ephemeris in PhotoSpots before setting up your tripod.

027 / 29

What Is the Sunny 16 Rule? How to Meter Daylight Without a Light Meter

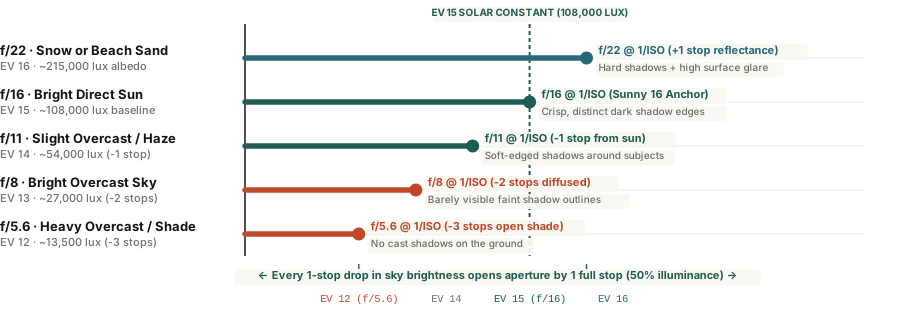
Because direct midday sunlight at sea level delivers a constant ~108,000 lux (EV 15 at ISO 100), setting your aperture to f/16 and your shutter speed to 1/ISO yields an exact incident exposure—scaling down one f-stop for each step of cloud cover.

Every modern digital camera packs a sophisticated multi-zone reflective light meter, yet experienced landscape, street, and film photographers still run into scenes where automatic metering fails dramatically. Point your camera at a bride in a white dress against a sunlit wall, a snowy alpine ridge, or a dark forest canopy backlit by the sun, and your camera's meter—programmed to force every world surface toward 18% middle gray—will systematically underexpose bright scenes and overexpose dark ones.

Before handheld light meters existed, photographers relied on an empirical law of atmospheric physics known as the Sunny 16 Rule. Because the sun is an unwavering nuclear fusion lamp located 93 million miles away, the amount of light hitting Earth's surface on a clear day is virtually constant—allowing you to calculate exact manual exposure settings in your head by glancing at the shadows on the ground.

Sunny 16 exposure rule chart showing aperture from f/22 to f/5.6 and EV 16 to EV 12 illuminance
Figure 1: Incident illuminance (lux), Exposure Value (`EV 100`), and aperture ladder at `1/ISO` shutter speed across daylight sky conditions. Download exposure table: what-is-the-sunny-16-rule-photography-exposure-guide.csv.

The Physics: Why Direct Sunlight Equals EV 15 (108,000 Lux)

Outside Earth's atmosphere, solar irradiance sits at a steady `1,361 W/m²` (the solar constant). After passing through a clean atmosphere when the sun sits at least 30 degrees above the horizon, direct sunlight plus blue sky scatter delivers an incident illuminance of roughly 100,000 to 108,000 lux (`10,000 foot-candles`). In standardized photographic sensitometry (ISO 2720 / ANSI PH2.7), that illuminance corresponds to exactly Exposure Value 15 (`EV 15`) at ISO 100.

The Sunny 16 Rule translates `EV 15` into a single sentence: On a sunny day, set your aperture to f/16 and your shutter speed to the reciprocal of your ISO (`1/ISO`).

  • At ISO 100: Set aperture to f/16 and shutter speed to 1/100s (or 1/125s on mechanical dials).
  • At ISO 200: Set aperture to f/16 and shutter speed to 1/200s (or 1/250s).
  • At ISO 400: Set aperture to f/16 and shutter speed to 1/400s (or 1/500s).

Once you lock in that `EV 15` baseline, the law of reciprocity lets you trade aperture for shutter speed stop-for-stop. Want shallow depth of field at **f/2.8** on an ISO 100 sunny day? Since opening from `f/16` to `f/2.8` lets in **5 stops more light** (`f/11 → f/8 → f/5.6 → f/4 → f/2.8`), simply make your shutter speed 5 stops faster (`1/125s → 1/250s → 1/500s → 1/1000s → 1/2000s → 1/4000s`).

Never judge outdoor brightness by squinting up at the sky; look down at the sharpness of the shadow edges cast on the ground.

The Shadow-Edge Ladder (f/22 to f/4)

Human pupils dilate and constrict automatically, making our eyes terrible gauges of absolute brightness. Instead of guessing how bright the clouds look, inspect the edge of your own shadow on the pavement while keeping your shutter speed locked at `1/ISO`:

  1. f/22 (`EV 16` — Snow or White Sand in Full Sun): High-albedo surfaces reflect an extra stop of light back onto your subject. Stop down 1 stop from `f/16` to `f/22`.
  2. f/16 (`EV 15` — Crisp, Hard-Edged Shadows): Clear direct sun. If your subject is backlit (sun behind their head), open up 2 stops to `f/8` so their shadowed face is properly exposed.
  3. f/11 (`EV 14` — Soft-Edged Shadows): High thin cirrus clouds or haze blur the outline of shadows on the ground (`~54,000 lux`).
  4. f/8 (`EV 13` — Faint Shadow Outlines): Bright overcast sky where you can barely see a diffuse dark patch beneath a car or person (`~27,000 lux`).
  5. f/5.6 (`EV 12` — Zero Ground Shadows): Heavy overcast cloud deck or open shade on the north side of a building (`~13,500 lux`).
  6. f/4 (`EV 11` — Sunset / Golden Hour): When the sun drops below `10°` elevation just before sunset, atmospheric path length cuts illuminance by 4 stops (`~6,750 lux`).

To check exact solar elevation angles, golden-hour timing, and directional shadow azimuths before arriving at a shoot location, you can Track lighting ephemeris in PhotoSpots for any coordinate worldwide.

028 / 29

What Causes Sunbeams? How to Photograph Crepuscular Rays

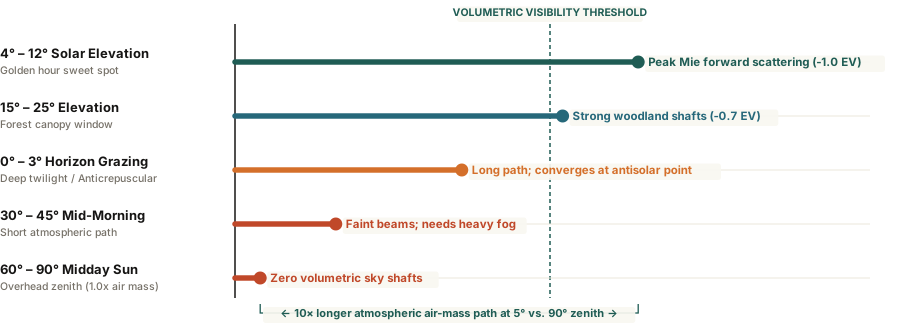
Crepuscular rays appear when low-angle sunlight (between 3° and 15° solar elevation) passes through broken cumulus clouds or forest canopies and scatters off atmospheric aerosols via Tyndall and Mie scattering.

Few natural lighting phenomena command attention like visible shafts of sunlight—colloquially called sunbeams, god rays, or Jacob's Ladder—streaming through a gap in storm clouds or slicing across a misty redwood forest. In meteorological optics, these volumetric beams are known as crepuscular rays (from the Latin crepusculum, meaning twilight), because they appear most frequently during the low-angle hours just after sunrise and just before sunset.

While spotting sunbeams often feels like luck, their appearance is governed by three predictable physical variables: solar elevation angle, aerosol particle size, and shadow occlusion geometry. Understanding how these three factors interact lets you forecast volumetric light conditions and expose them cleanly without blowing out your highlights.

Volumetric crepuscular ray contrast by solar elevation angle and Mie scattering
Figure 1: Volumetric sunbeam contrast score across solar elevation angles from 0° horizon grazing to 90° zenith. Download atmospheric optics table: how-to-photograph-sunbeams-crepuscular-rays.csv.

The Physics: Linear Perspective and Forward Mie Scattering

When you look at sunbeams fanning out from behind a cloud, the rays appear to diverge at steep angles like spokes on a wheel. In reality, because the sun sits 93 million miles (150 million kilometers) away, every shaft of sunlight entering Earth's atmosphere is virtually parallel. Their apparent divergence is pure linear perspective—the exact same optical illusion that makes parallel railroad tracks appear to meet at the horizon. Occasionally, on clear evenings, those parallel shafts continue across the entire sky vault and appear to converge again on the opposite eastern horizon as anticrepuscular rays.

For a sunbeam to become visible in mid-air, two conditions must occur simultaneously:

  1. Shadow Lanes (Occlusion): Broken stratocumulus clouds, jagged mountain ridges, or dense tree trunks must block sections of the sun's disk, carving alternating corridors of bright light and dark shadow.
  2. Forward Mie Scattering: Clean nitrogen and oxygen molecules (Rayleigh scattering) are too small to make distinct shafts pop at short distances. Visible beams require larger suspended aerosols—water micro-droplets, morning mist, sea spray, dust, or campfire smoke (1 to 10 micrometers in diameter)—which exhibit intense forward Mie scattering, deflecting sunlight brightly when you shoot within 15° to 30° of the sun's direction.

Sunbeams are not made of light alone; they are sculpted by the dark shadow corridors carved between clouds and tree trunks.

Camera Settings: Why You Must Underexpose by -1.0 EV

The optimal window for open-sky crepuscular rays occurs when the sun sits between 4° and 12° above the horizon (where the atmospheric path length is 5 to 11 times longer than at midday). Inside dense forests, where tree canopies provide overhead occlusion, the window extends to 15°–25° solar elevation.

  • Dial in -0.7 to -1.3 EV Exposure Compensation: Standard camera matrix metering sees the dark shadow corridors and automatically boosts exposure, turning the scene into a washed-out gray haze. Underexposing by one full stop preserves the deep dark shadows that give the bright shafts their 3D contrast.
  • Stop Down to f/8–f/11: Using a mid-range aperture keeps both foreground foliage and distant cloud edges crisp while preventing lens flare washout.

To check exact solar elevation angles and golden-hour azimuth windows before heading out to shoot, you can Track lighting ephemeris in PhotoSpots to time your arrival when sunbeams hit peak contrast.

029 / 29

How to Estimate Shadow Length From the Sun Angle

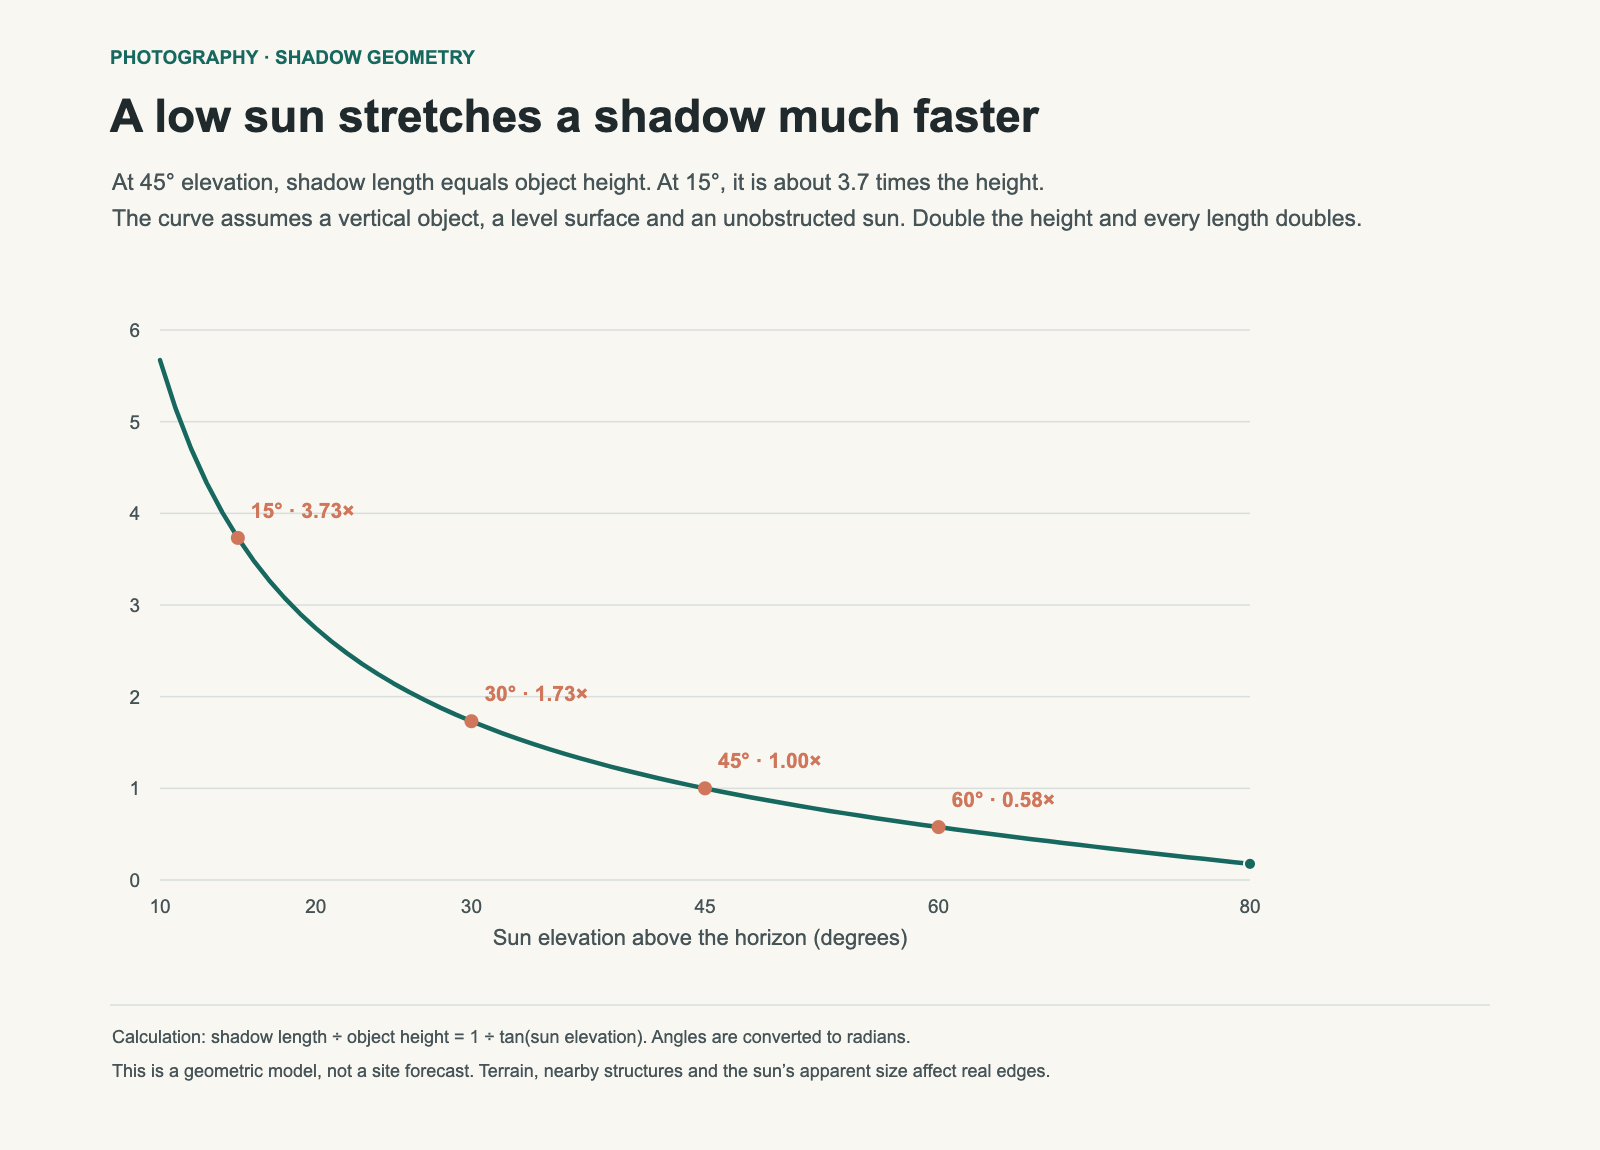
When the sun is 45 degrees above the horizon, an upright object's shadow is as long as the object is tall. At 15 degrees, the shadow is about 3.7 times its height. A modest change in a low sun angle can make a large difference on the ground.

Suppose you want a two-metre-tall subject's shadow to fit inside a four-metre patch of pavement. At 30 degrees, it is about 3.46 metres long and fits. At 15 degrees, it stretches to about 7.46 metres. The composition that works earlier in the afternoon may run out of room near sunset.

Shadow-to-height ratio rises sharply as sun elevation falls; it is 1 at 45° and about 3.73 at 15°.
Geometry model for an upright object on level ground. Multiply the value on the vertical axis by the object’s height. The line shows a calculation, not measured shadows at a particular location.

The formula in plain terms

shadow length = object height ÷ tan(sun elevation)

Use the same length unit throughout: metres produce metres, feet produce feet. Set a calculator to degrees when entering an angle such as 30°. In code that expects radians, convert first: radians = degrees × π ÷ 180.

Sun elevationShadow ÷ heightShadow for a 2 m object
15°3.737.46 m
30°1.733.46 m
45°1.002.00 m
60°0.581.15 m

Length and direction are separate questions

Elevation is the angle above the horizon. It determines the length in this model. The sun's compass direction, or azimuth, determines where the shadow points: approximately 180 degrees opposite the sun.

If the sun is to the southwest, the shadow falls toward the northeast. Knowing its length without its direction will not tell you whether it crosses the road, reaches a wall or enters your frame.

Why low angles deserve extra care

Near the horizon, the denominator becomes small and the calculated shadow becomes very long. A small angle error then creates a large length error. At exactly zero degrees this simple expression is undefined. It does not predict a visible, infinitely long shadow.

Atmospheric effects, an obstructed horizon and diffuse light can make the observed edge less clear. Use a low-angle estimate to allow extra space, then inspect the actual scene.

A location-planning workflow

I use this estimate when scouting whether a building's shadow will cross the patch I want to shoot. On location, I check the actual light because the model assumes level ground.

  1. Choose the subject and ground. Estimate its upright height and check whether the surface is level.
  2. Check the date and time. Solar position changes through the day and across the year.
  3. Estimate length and direction. Mark the rough endpoint on a map or scout photograph.
  4. Check obstructions. Buildings, trees and overhangs may block direct sun before the astronomical sunset.
  5. Confirm on location. Keep a note of the time, camera position and usable patch of light for a return visit.

Where the model stops working

The formula assumes an upright object, level ground and direct sunlight. A hillside changes the receiving surface; stairs interrupt it; a leaning object changes the triangle. A building can put the whole scene in shade even when the sun is high enough for the calculation.

For photography, a rough estimate is often enough to decide where to stand. For surveying or engineering, the missing geometry matters and should be included.

Method and further reading

The curve uses 1 ÷ tan(angle) from 10° to 80°. Download its calculated values. NOAA's solar calculator describes elevation and azimuth; its page states that the tool is no longer actively maintained, so confirm the solar-position source you use.

I built Photowalks to help me save places and plan a return when the light is right. Pair the time estimate with a scout visit and a photograph of the actual obstructions.