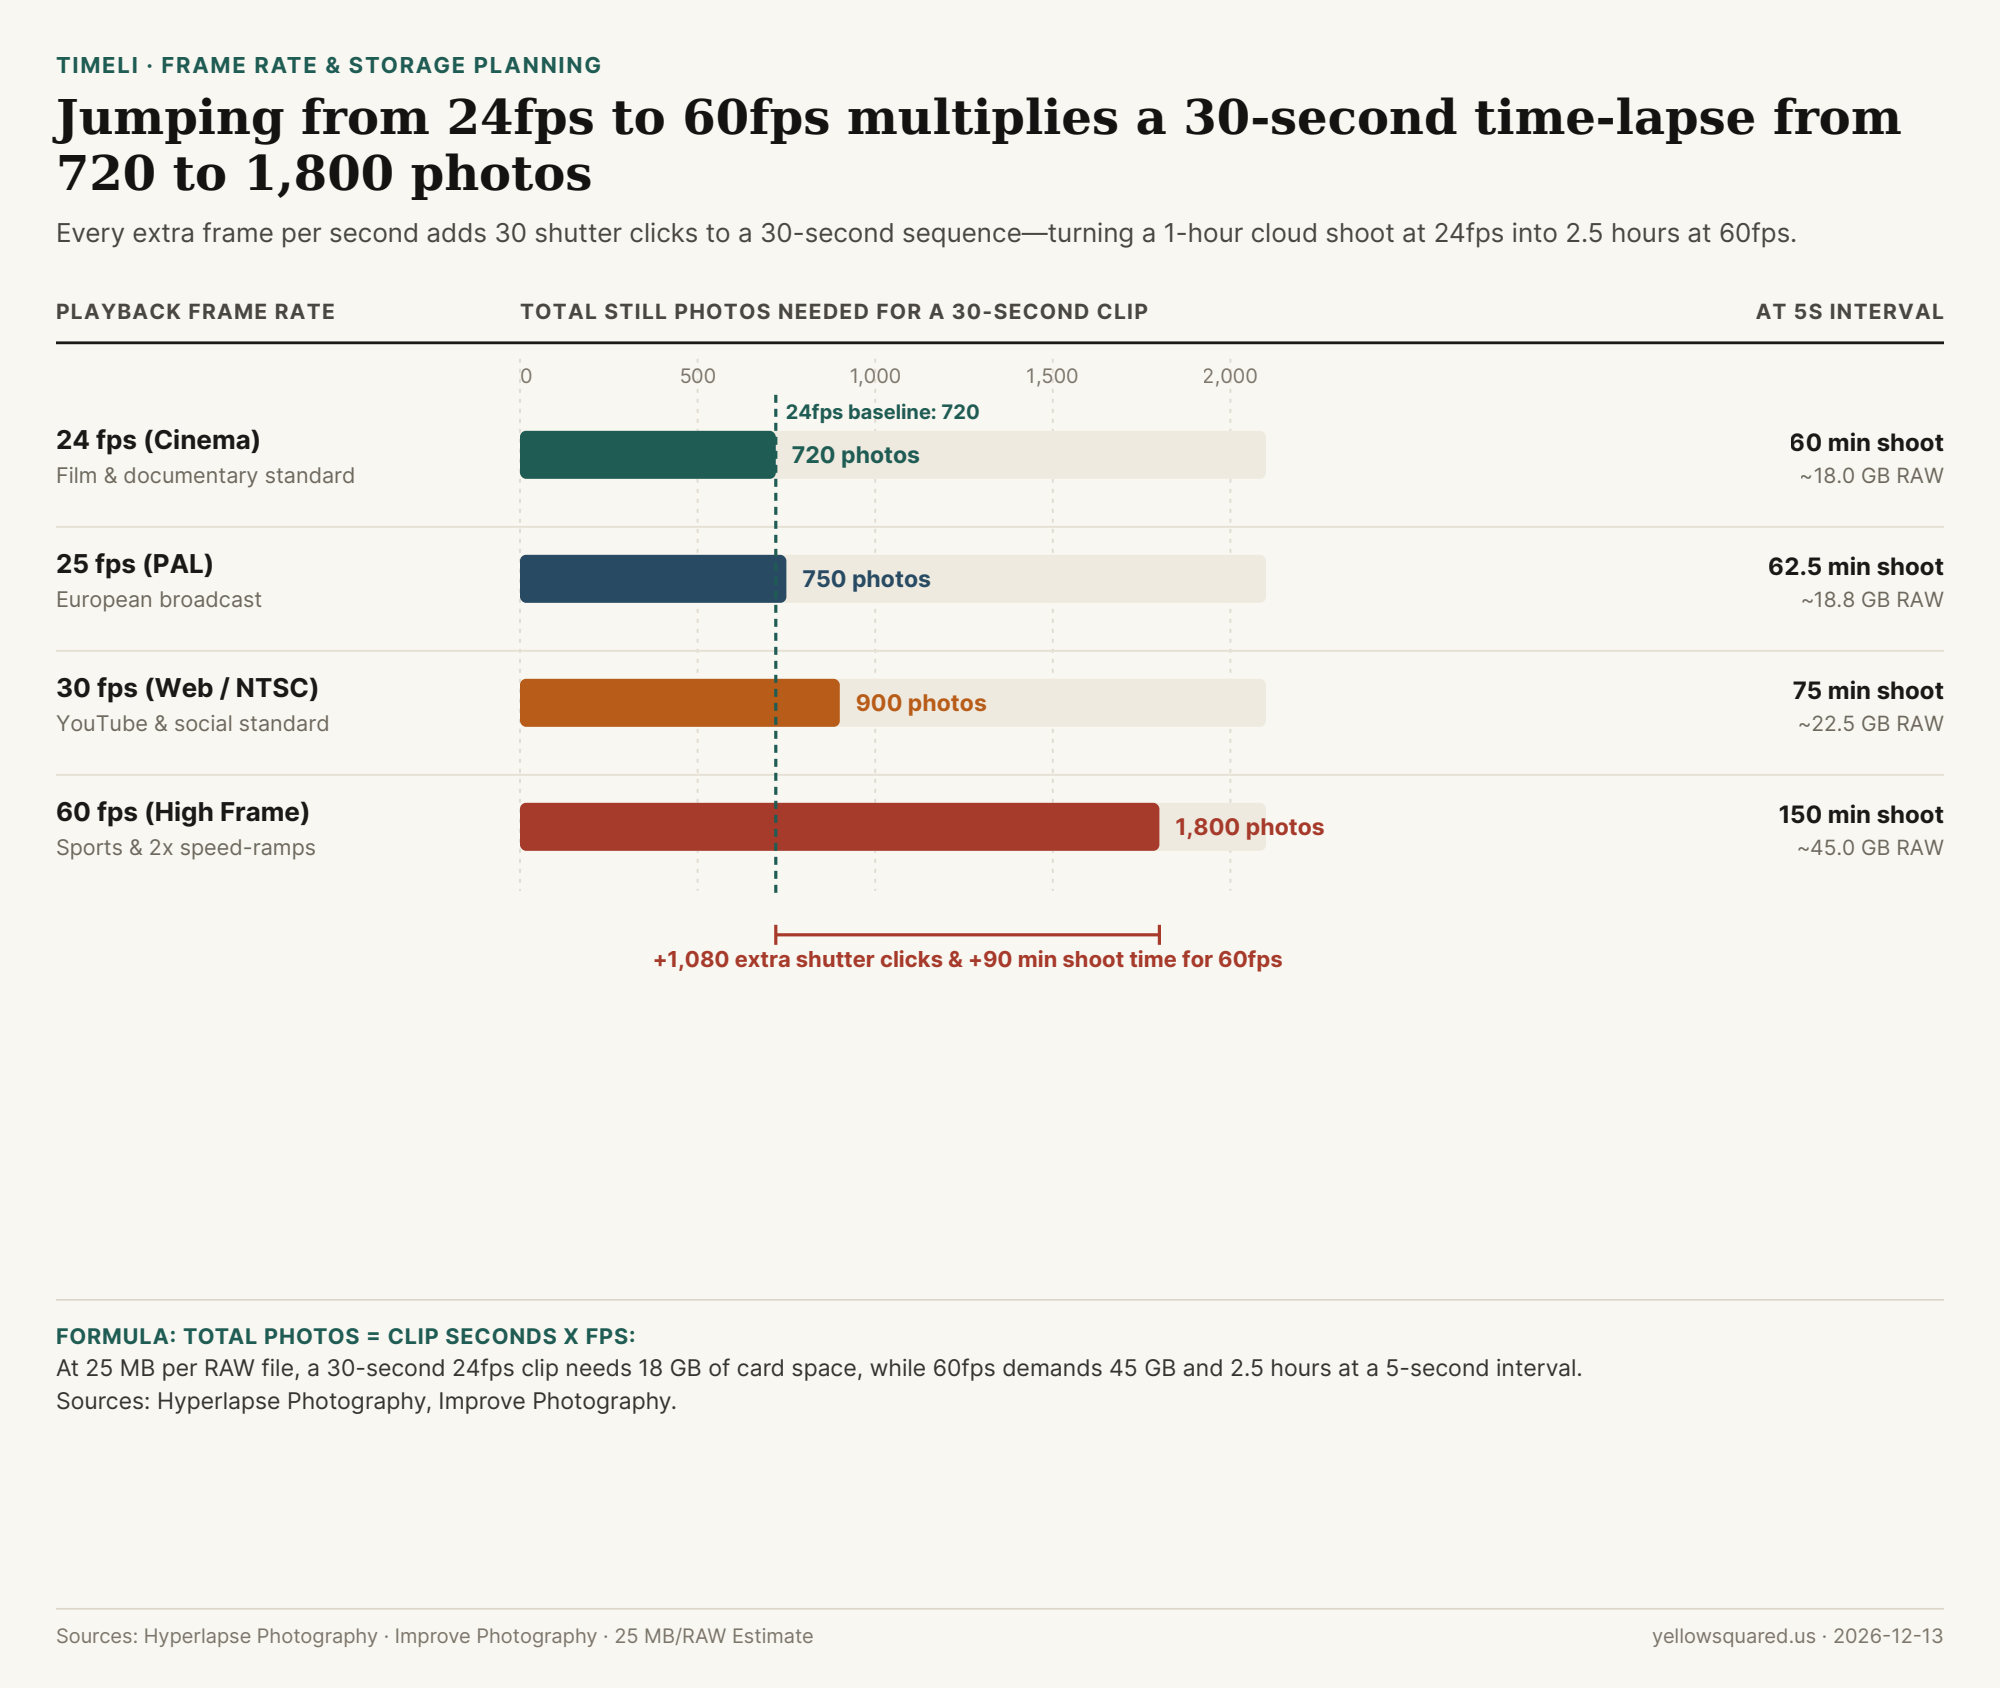
Most beginner time-lapses end up too short—only four or five seconds long—because photographers underestimate how many still frames video playback consumes. At 24 frames per second (fps), a full 30-second sequence requires 720 individual photos; bump your timeline to 60fps, and that same 30-second clip demands 1,800 photos.
Still frame requirements, 5-second-interval shooting durations, and estimated 25 MB RAW storage for a 30-second clip. Data: Download CSV.
The Frame-Rate and Storage Trade-Off
As Hyperlapse Photography and Improve Photography note, 24fps and 30fps remain the sweet spot for time-lapses because they preserve natural motion blur while keeping battery and SD card budgets manageable:
Playback Rate
Photos for 30s Clip
Time at 5s Interval
RAW Space (at 25 MB/file)
24 fps
720 photos
60 minutes
18.0 GB
25 fps
750 photos
62.5 minutes
18.8 GB
30 fps
900 photos
75 minutes
22.5 GB
60 fps
1,800 photos
150 minutes (2.5 hrs)
45.0 GB
"Every extra frame per second adds 30 shutter actuations to a 30-second clip—turning a 1-hour cloud session at 24fps into 2.5 hours at 60fps."
Even if you drive two hours to a pristine Bortle 2 dark-sky site—escaping the artificial light pollution that blocks the Milky Way for nearly 80% of Americans—a bright moon can still erase the galactic core. Moonlight acts like natural light pollution, scattering through the atmosphere and flattening faint dust lanes.
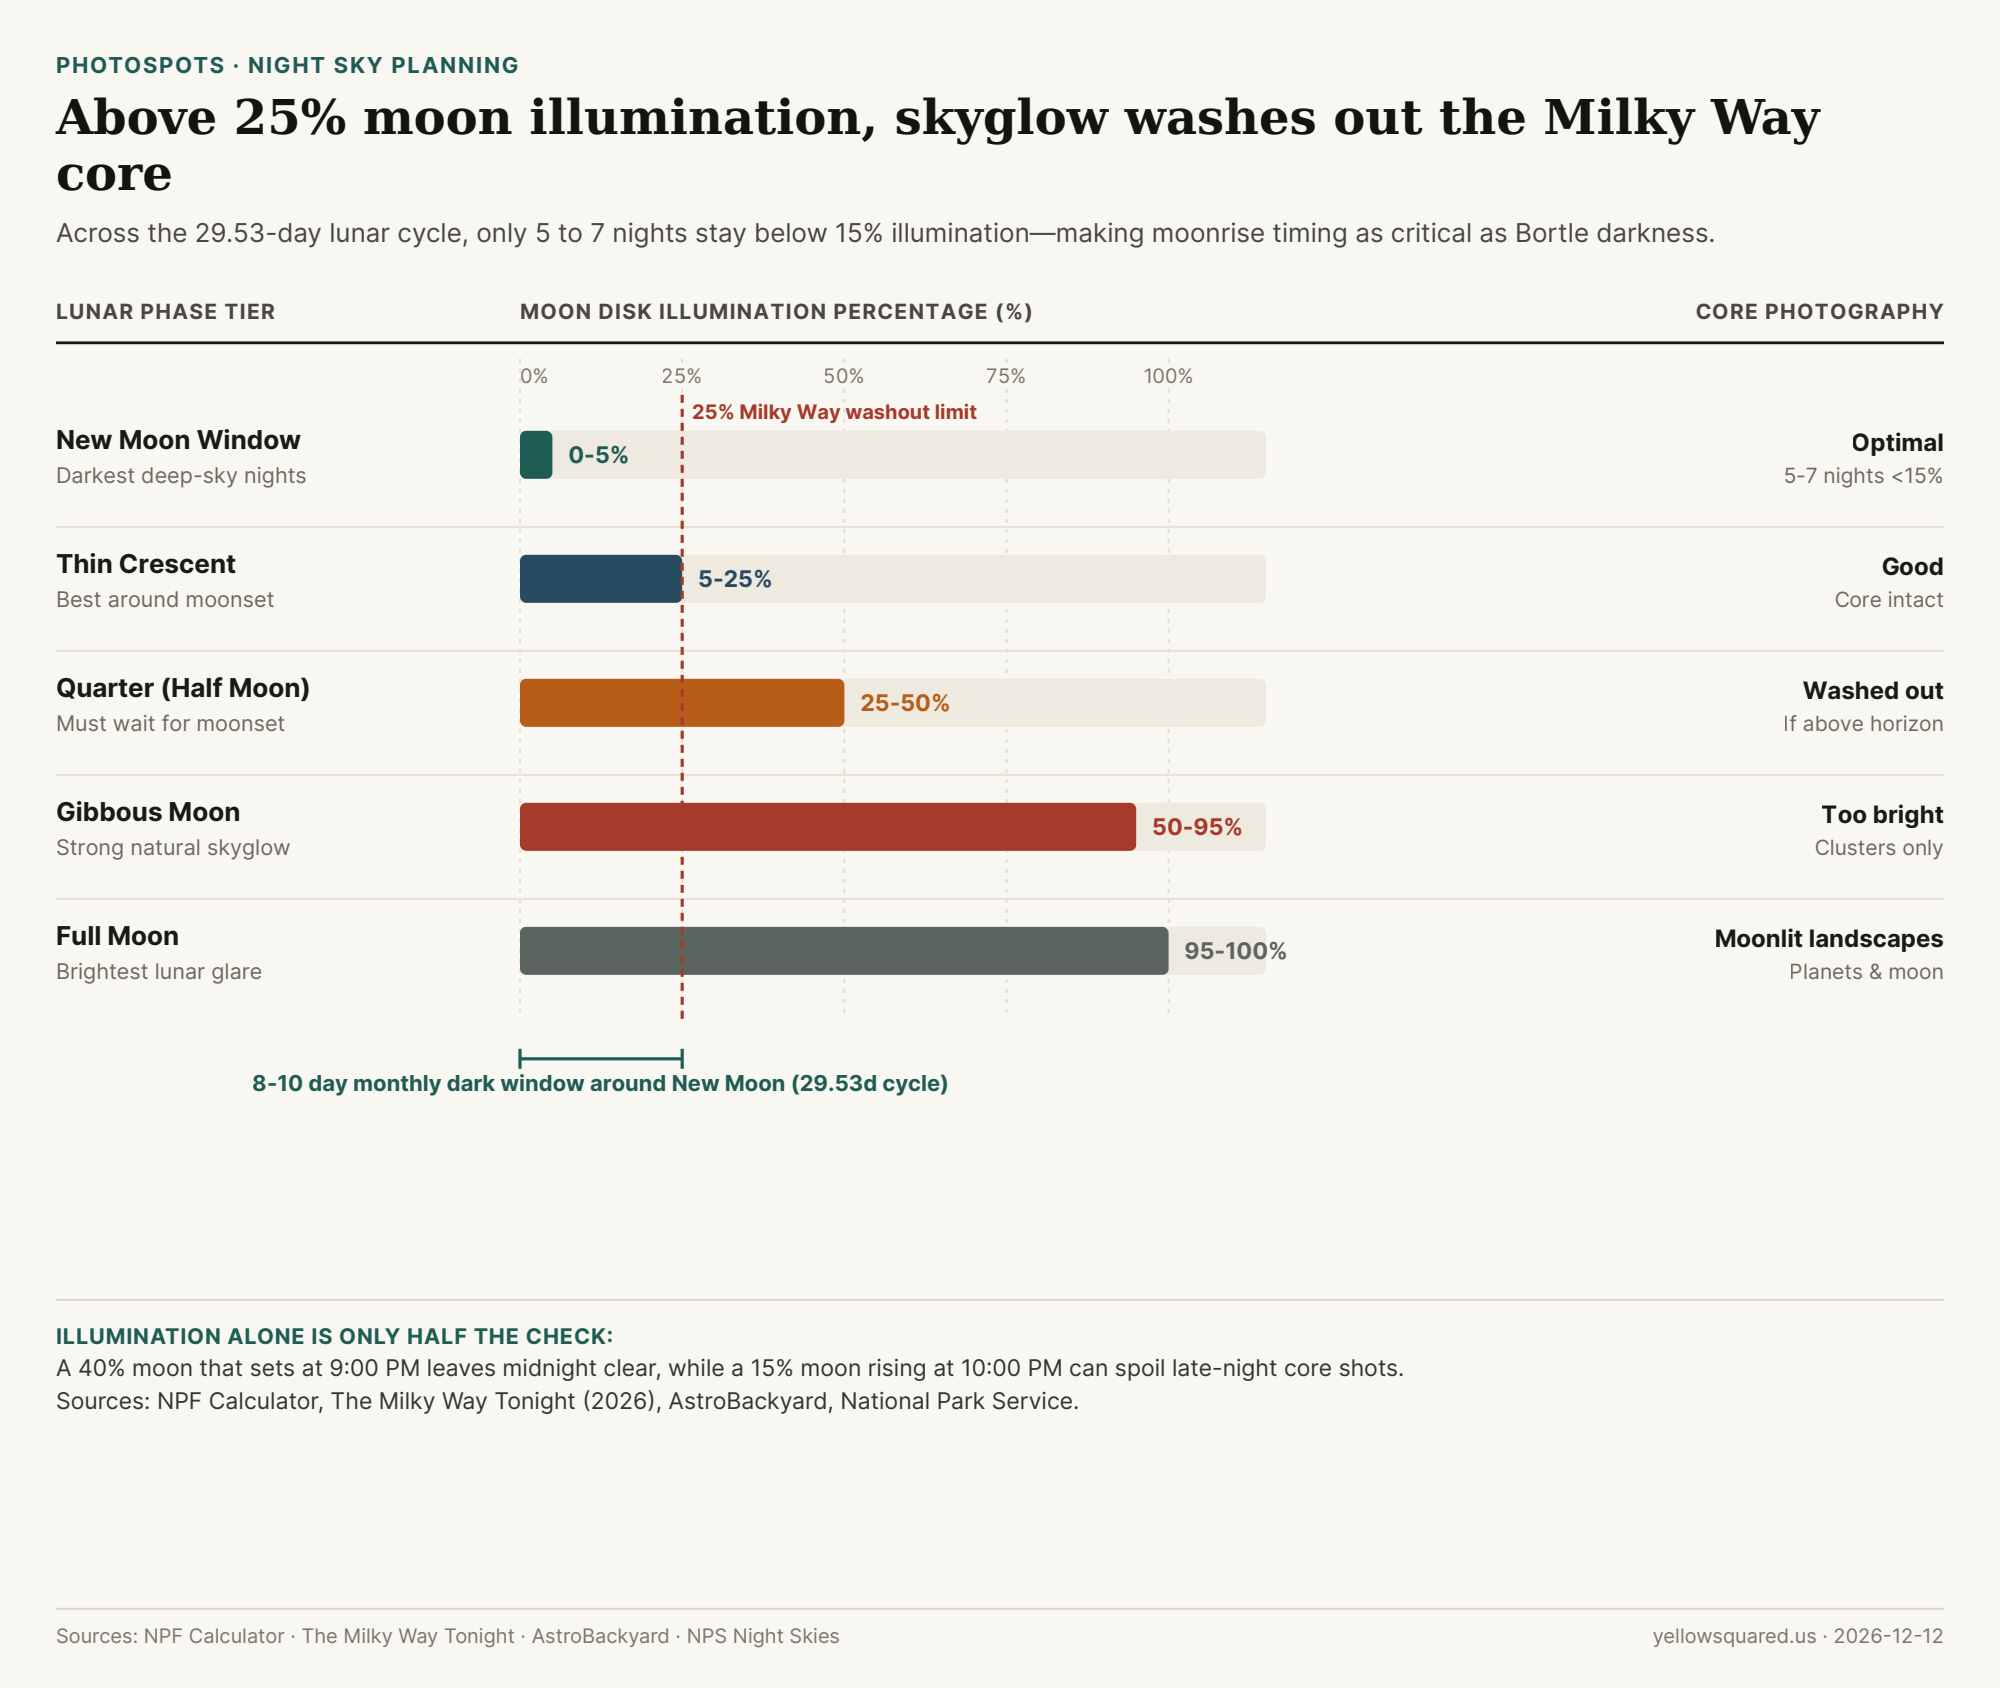
Lunar illumination tiers across the 29.53-day synodic month and the 25% threshold where the Milky Way core begins washing out. Data: Download CSV.
The 25% Illumination Rule—and Why Moonrise Time Matters
According to NPF Calculator's astrophotography calendar and The Milky Way Tonight, only 5 to 7 nights per month stay below 15% moon illumination (and 10–14 nights stay under 35%). Once a moon exceeds roughly 25% illumination while above the horizon, it washes out the delicate galactic core, and a 50% half moon makes it virtually invisible except at the highest, driest sites.
"What matters is not just the percentage but whether the moon is above the horizon during your specific viewing window. A 40% moon that sets at 9 PM is fine." — The Milky Way Tonight (2026)
What to Shoot During Brighter Phases
As AstroBackyard's moon phase guide notes, bright gibbous and full moons are not wasted nights: planetary imaging and moonlit mountain foregrounds thrive on natural moonlight, while deep-sky core shoots belong in the 8-to-10-day window centered on the New Moon.
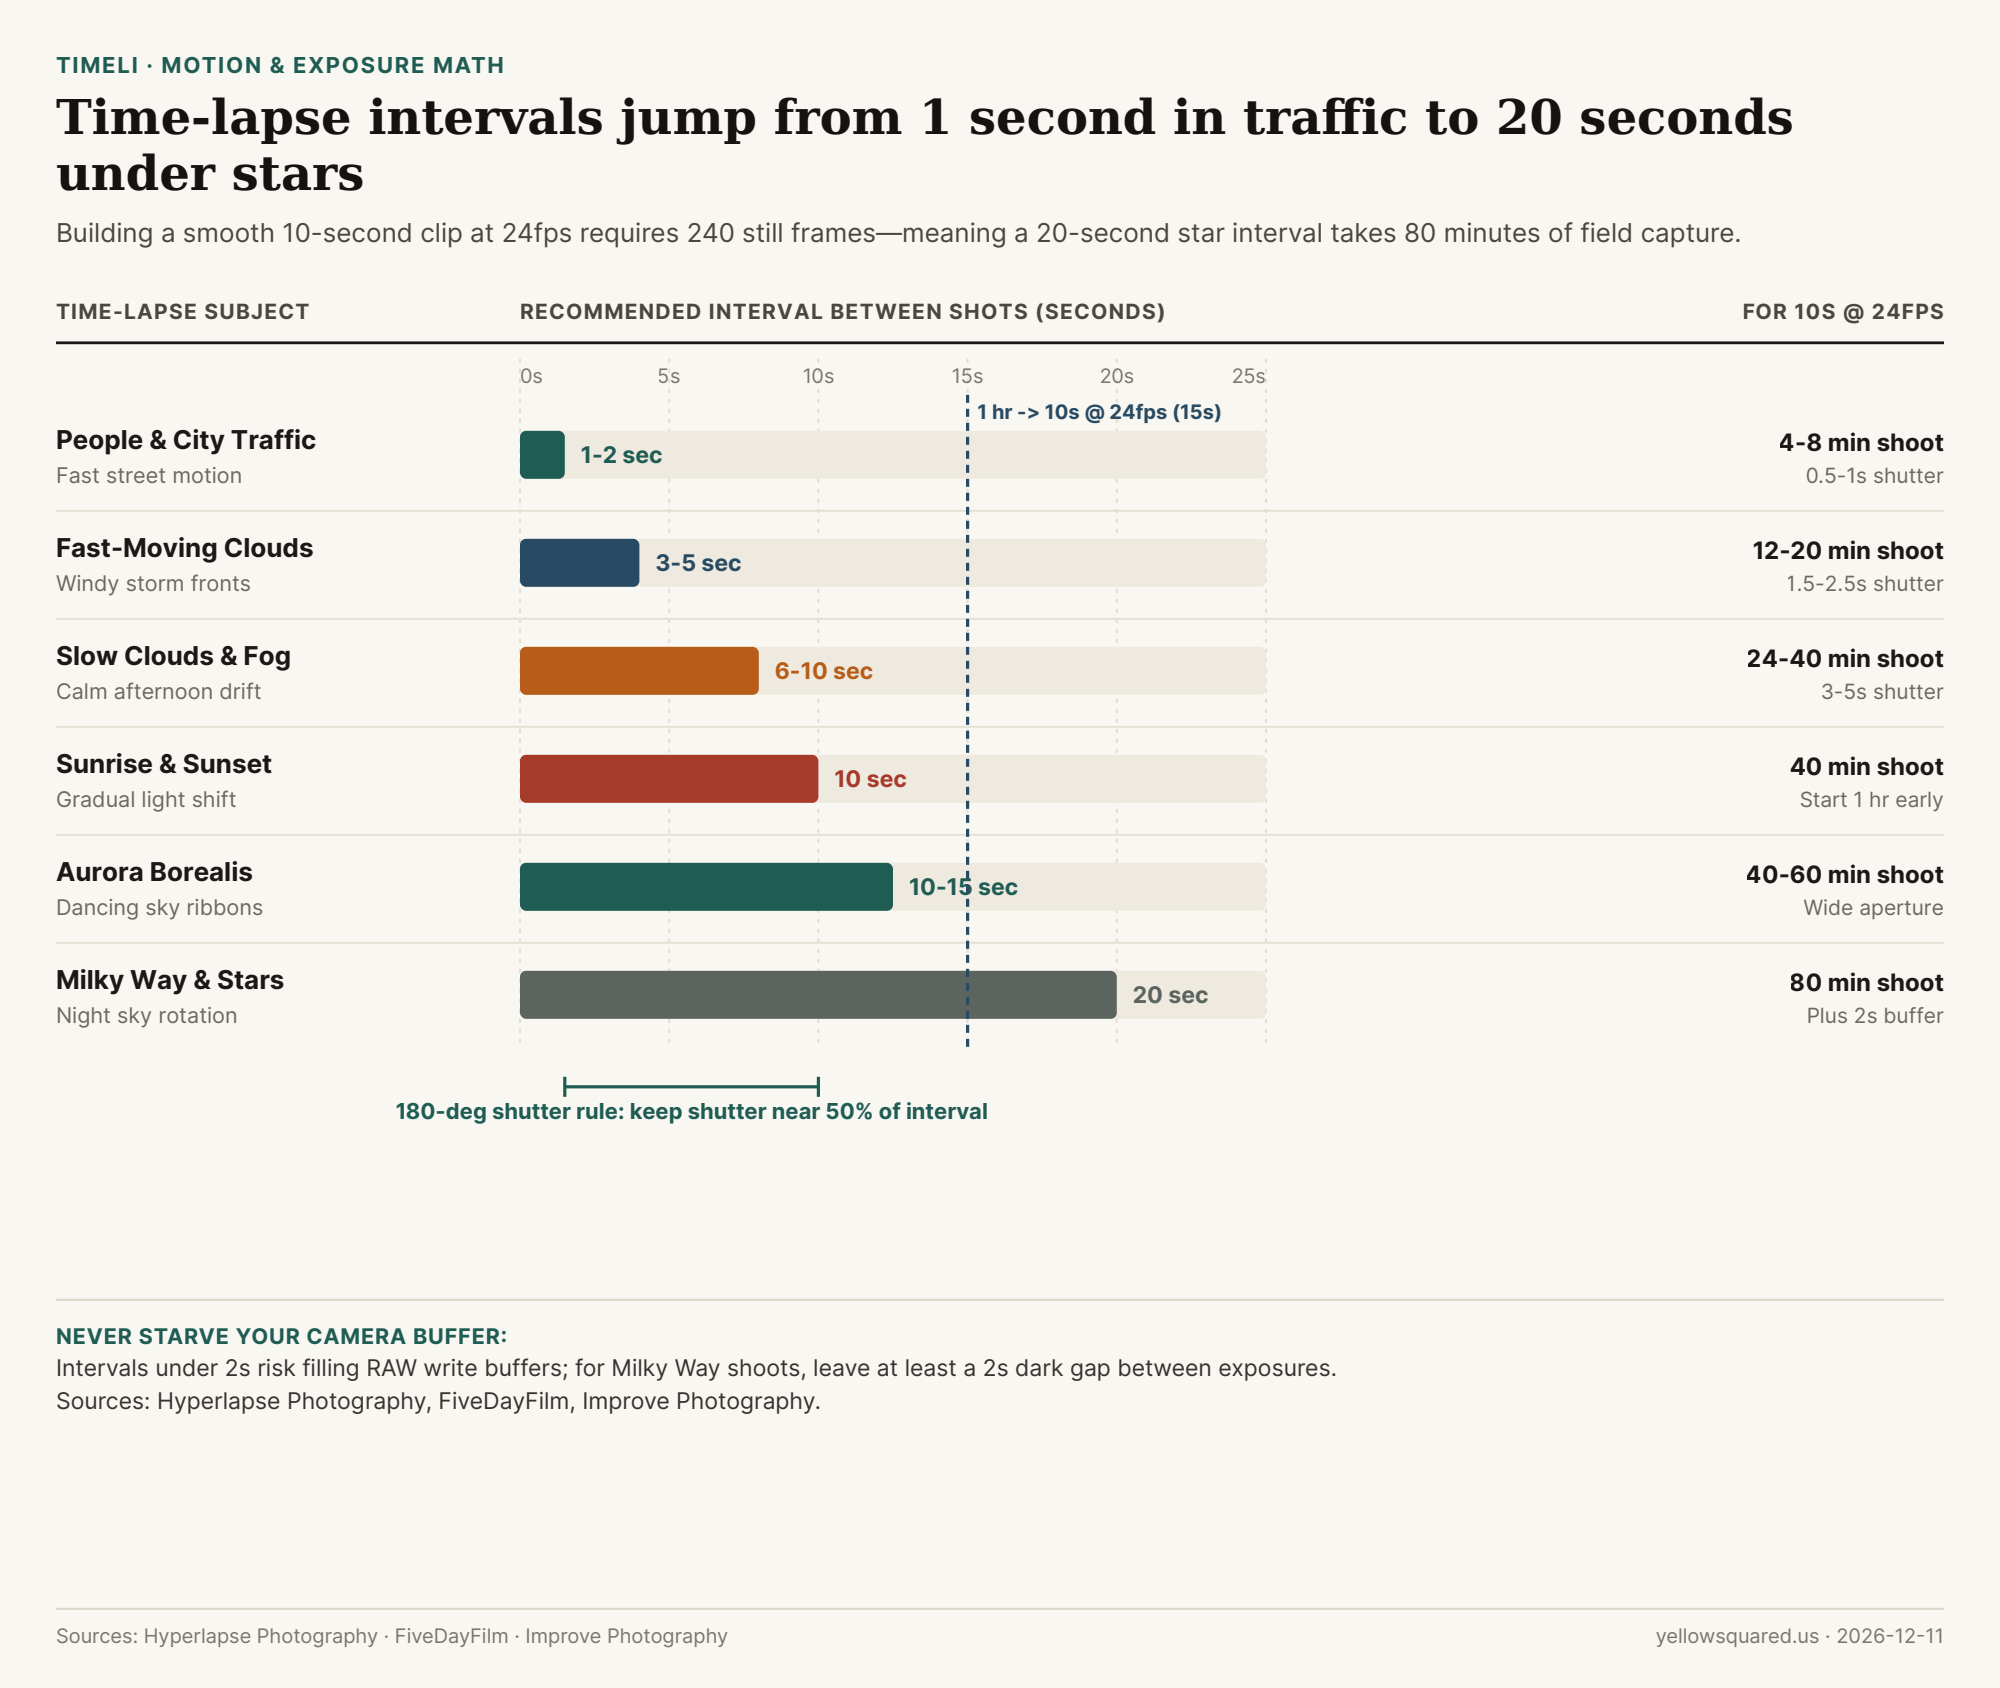
Every time-lapse begins with one simple equation: how many finished seconds of video do you want, and how fast is your subject moving? At a standard cinema frame rate of 24fps, a 10-second clip requires 240 individual photos (or 250 at 25fps, and 300 at 30fps). Multiply that frame count by your interval, and you immediately know how long you must stand by the tripod.
Interval benchmarks and total capture times needed to produce a 10-second 24fps clip across six common subjects. Data: Download CSV.
To prevent choppy, strobe-like motion between frames, FiveDayFilm recommends following the cinema 180-degree shutter rule: set your shutter speed to roughly half your interval—for example, a 0.5-second shutter on a 1-second interval, or a 3-to-5-second shutter on a 6-to-10-second cloud interval. At night, always keep at least a 2-second dark gap between the end of one exposure and the start of the next so your camera can flush the image to the memory card without dropping frames.
"A 10-second clip requires 240 photos at 24fps, 250 at 25fps, or 300 at 30fps—so compressing 1 hour of real time into 10 seconds at 24fps calls for a 15-second interval." — Hyperlapse Photography
Few things ruin an otherwise dramatic sunset time-lapse faster than distracting frame-to-frame brightness pulsing. Even when your camera sits locked on a heavy tripod, subtle mechanical and software quirks can introduce visible flicker across hundreds of sequential frames.
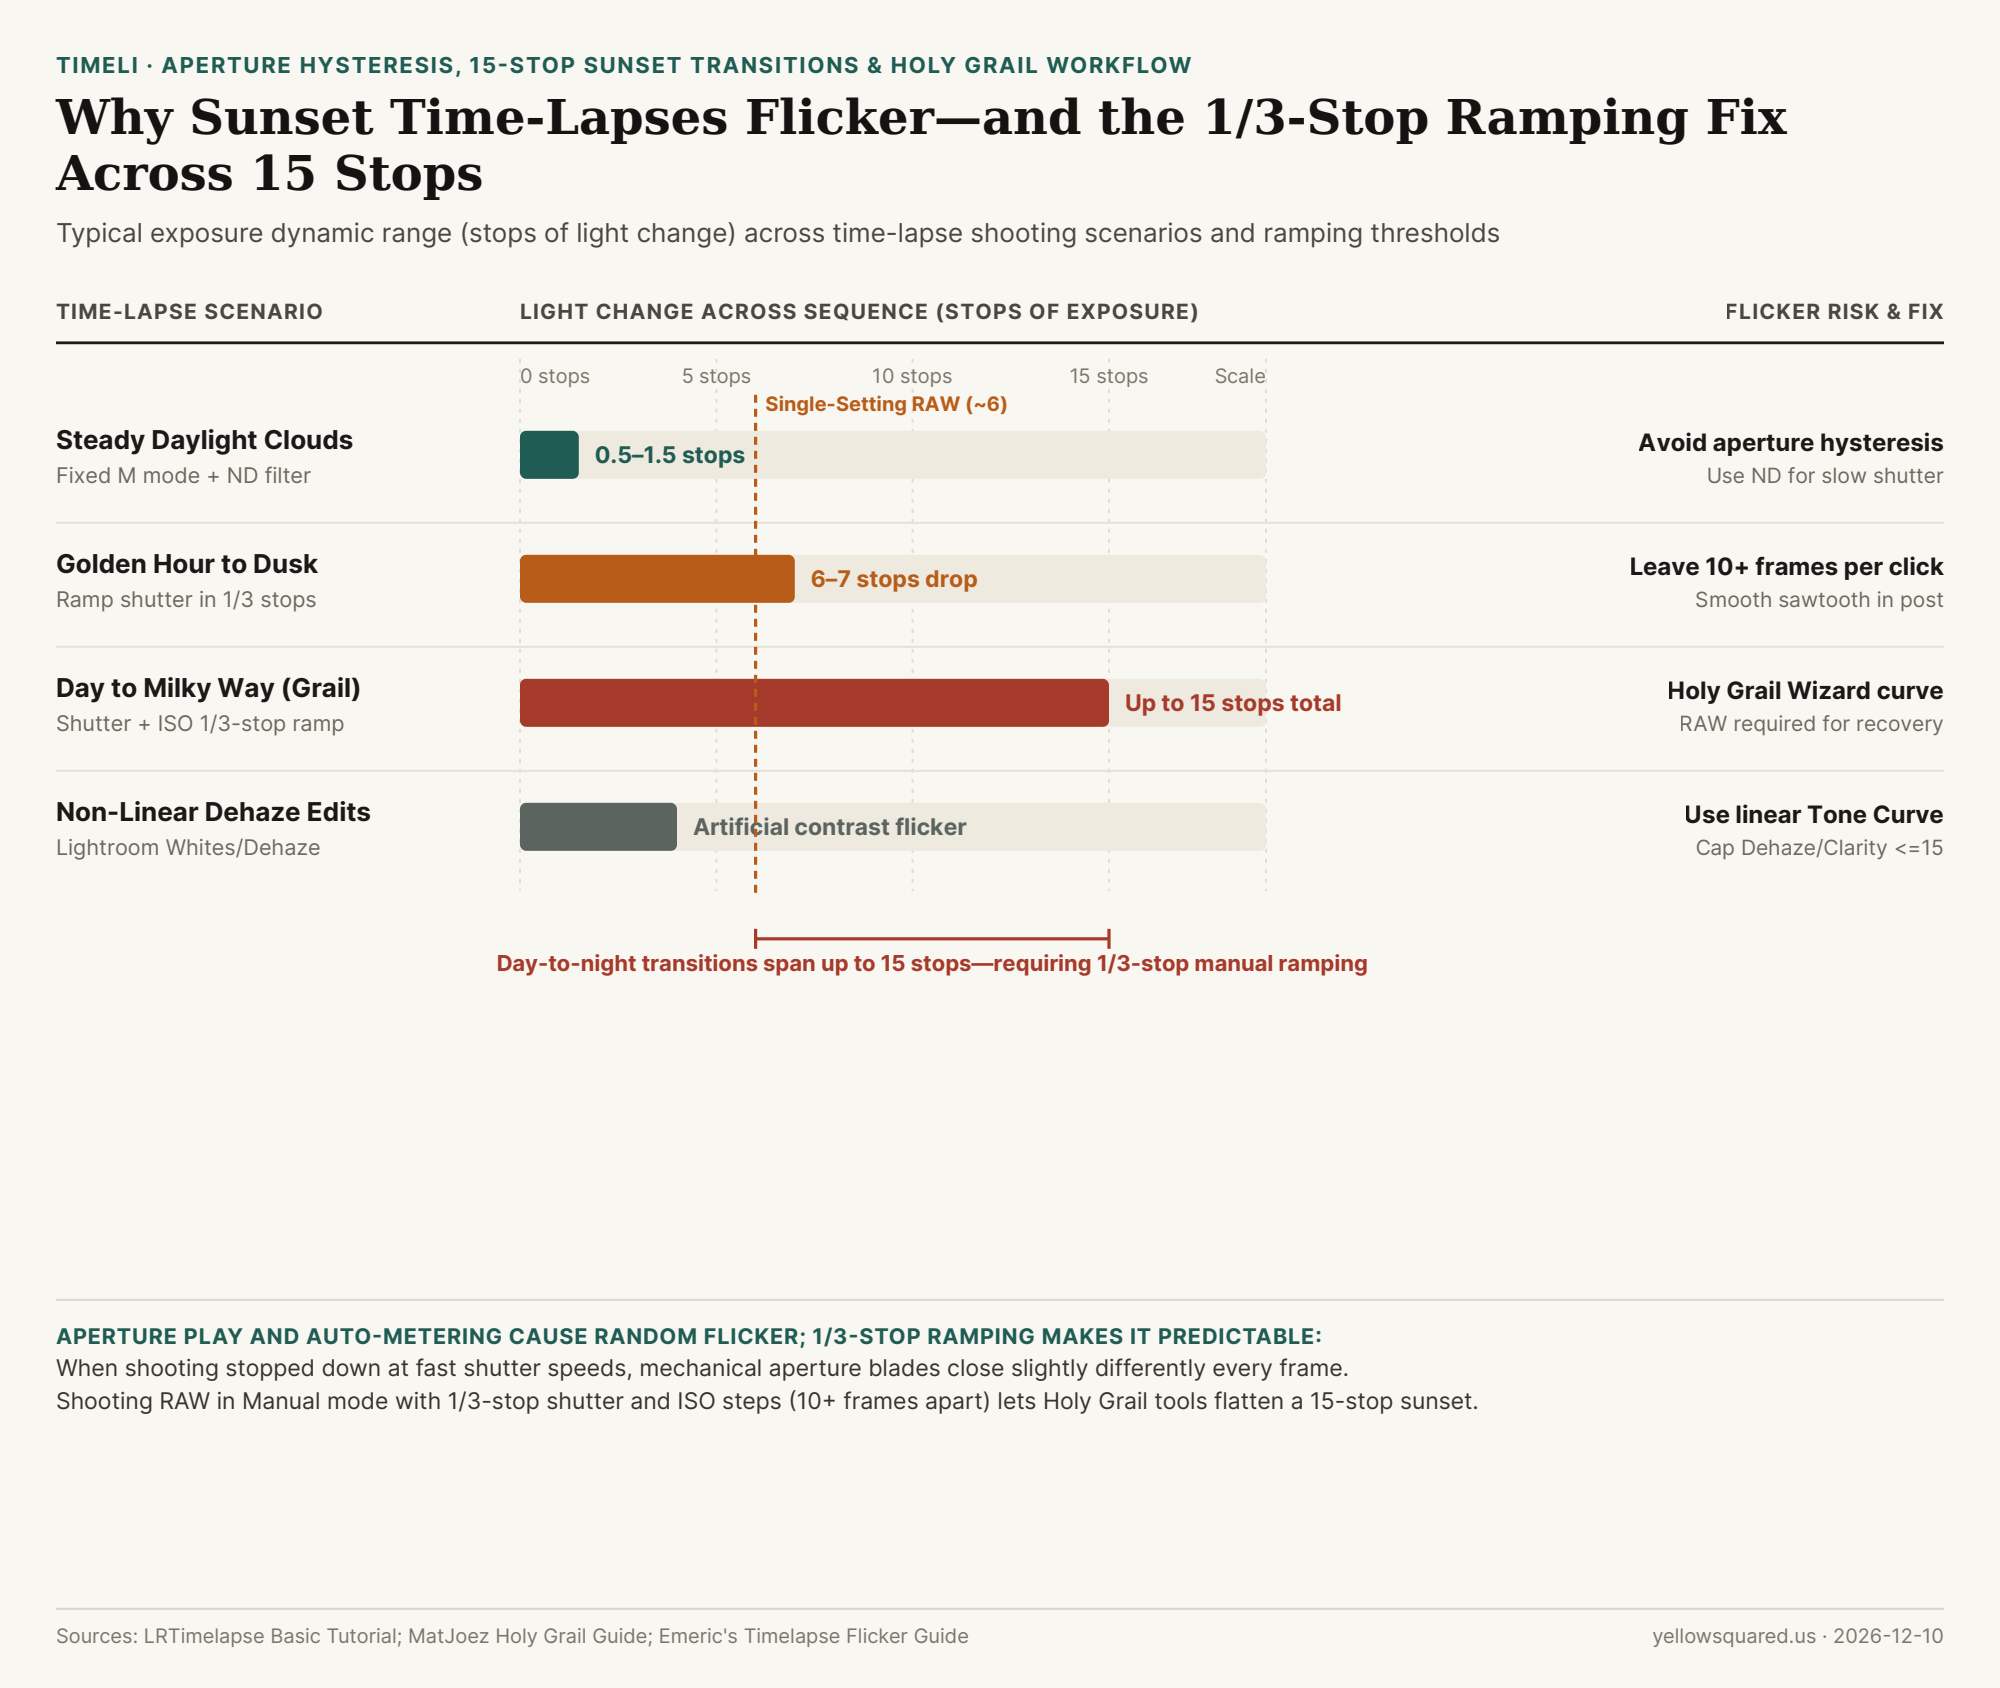
Figure 1: Exposure dynamic range (stops of light change) across time-lapse shooting scenarios and ramping thresholds. Sources: LRTimelapse and MatJoez · Download CSV dataset.
The Three Root Causes of Time-Lapse Flicker
Aperture Blade Hysteresis: On most DSLR and mirrorless lenses, the iris opens wide to meter and snaps shut to your chosen f-stop for each shot. Tiny mechanical variations between frames—especially at f/8 to f/16 with fast shutter speeds—produce random brightness flicker. Shooting wide open with an ND filter eliminates iris travel.
Auto-Exposure & Auto-ISO Jumps: Letting the camera meter automatically causes sudden brightness swings whenever a cloud or car crosses the frame. Always lock Manual (M) mode, manual white balance, and manual focus.
Non-Linear Editing Sliders: Heavy Clarity, Dehaze, Whites, or Blacks adjustments evaluate each RAW frame independently, creating contrast flicker; use a linear Tone Curve instead.
"A sunset-to-Milky-Way transition spans up to 15 stops of light—ramping shutter speed and ISO in 1/3-stop steps at least 10 frames apart turns chaotic flicker into predictable steps that software can smooth cleanly."
How Holy Grail Exposure Ramping Works
When shooting a day-to-night sequence, shoot RAW in Manual mode and monitor your histogram as the sun sets. Each time exposure drops by one-third of a stop, nudge your shutter speed slower by 1/3 stop (leaving at least 10 frames between adjustments). Once shutter speed reaches roughly half your interval, ramp ISO in 1/3-stop clicks—then let a Holy Grail deflicker pass apply inverse compensation across the sawtooth brightness curve.
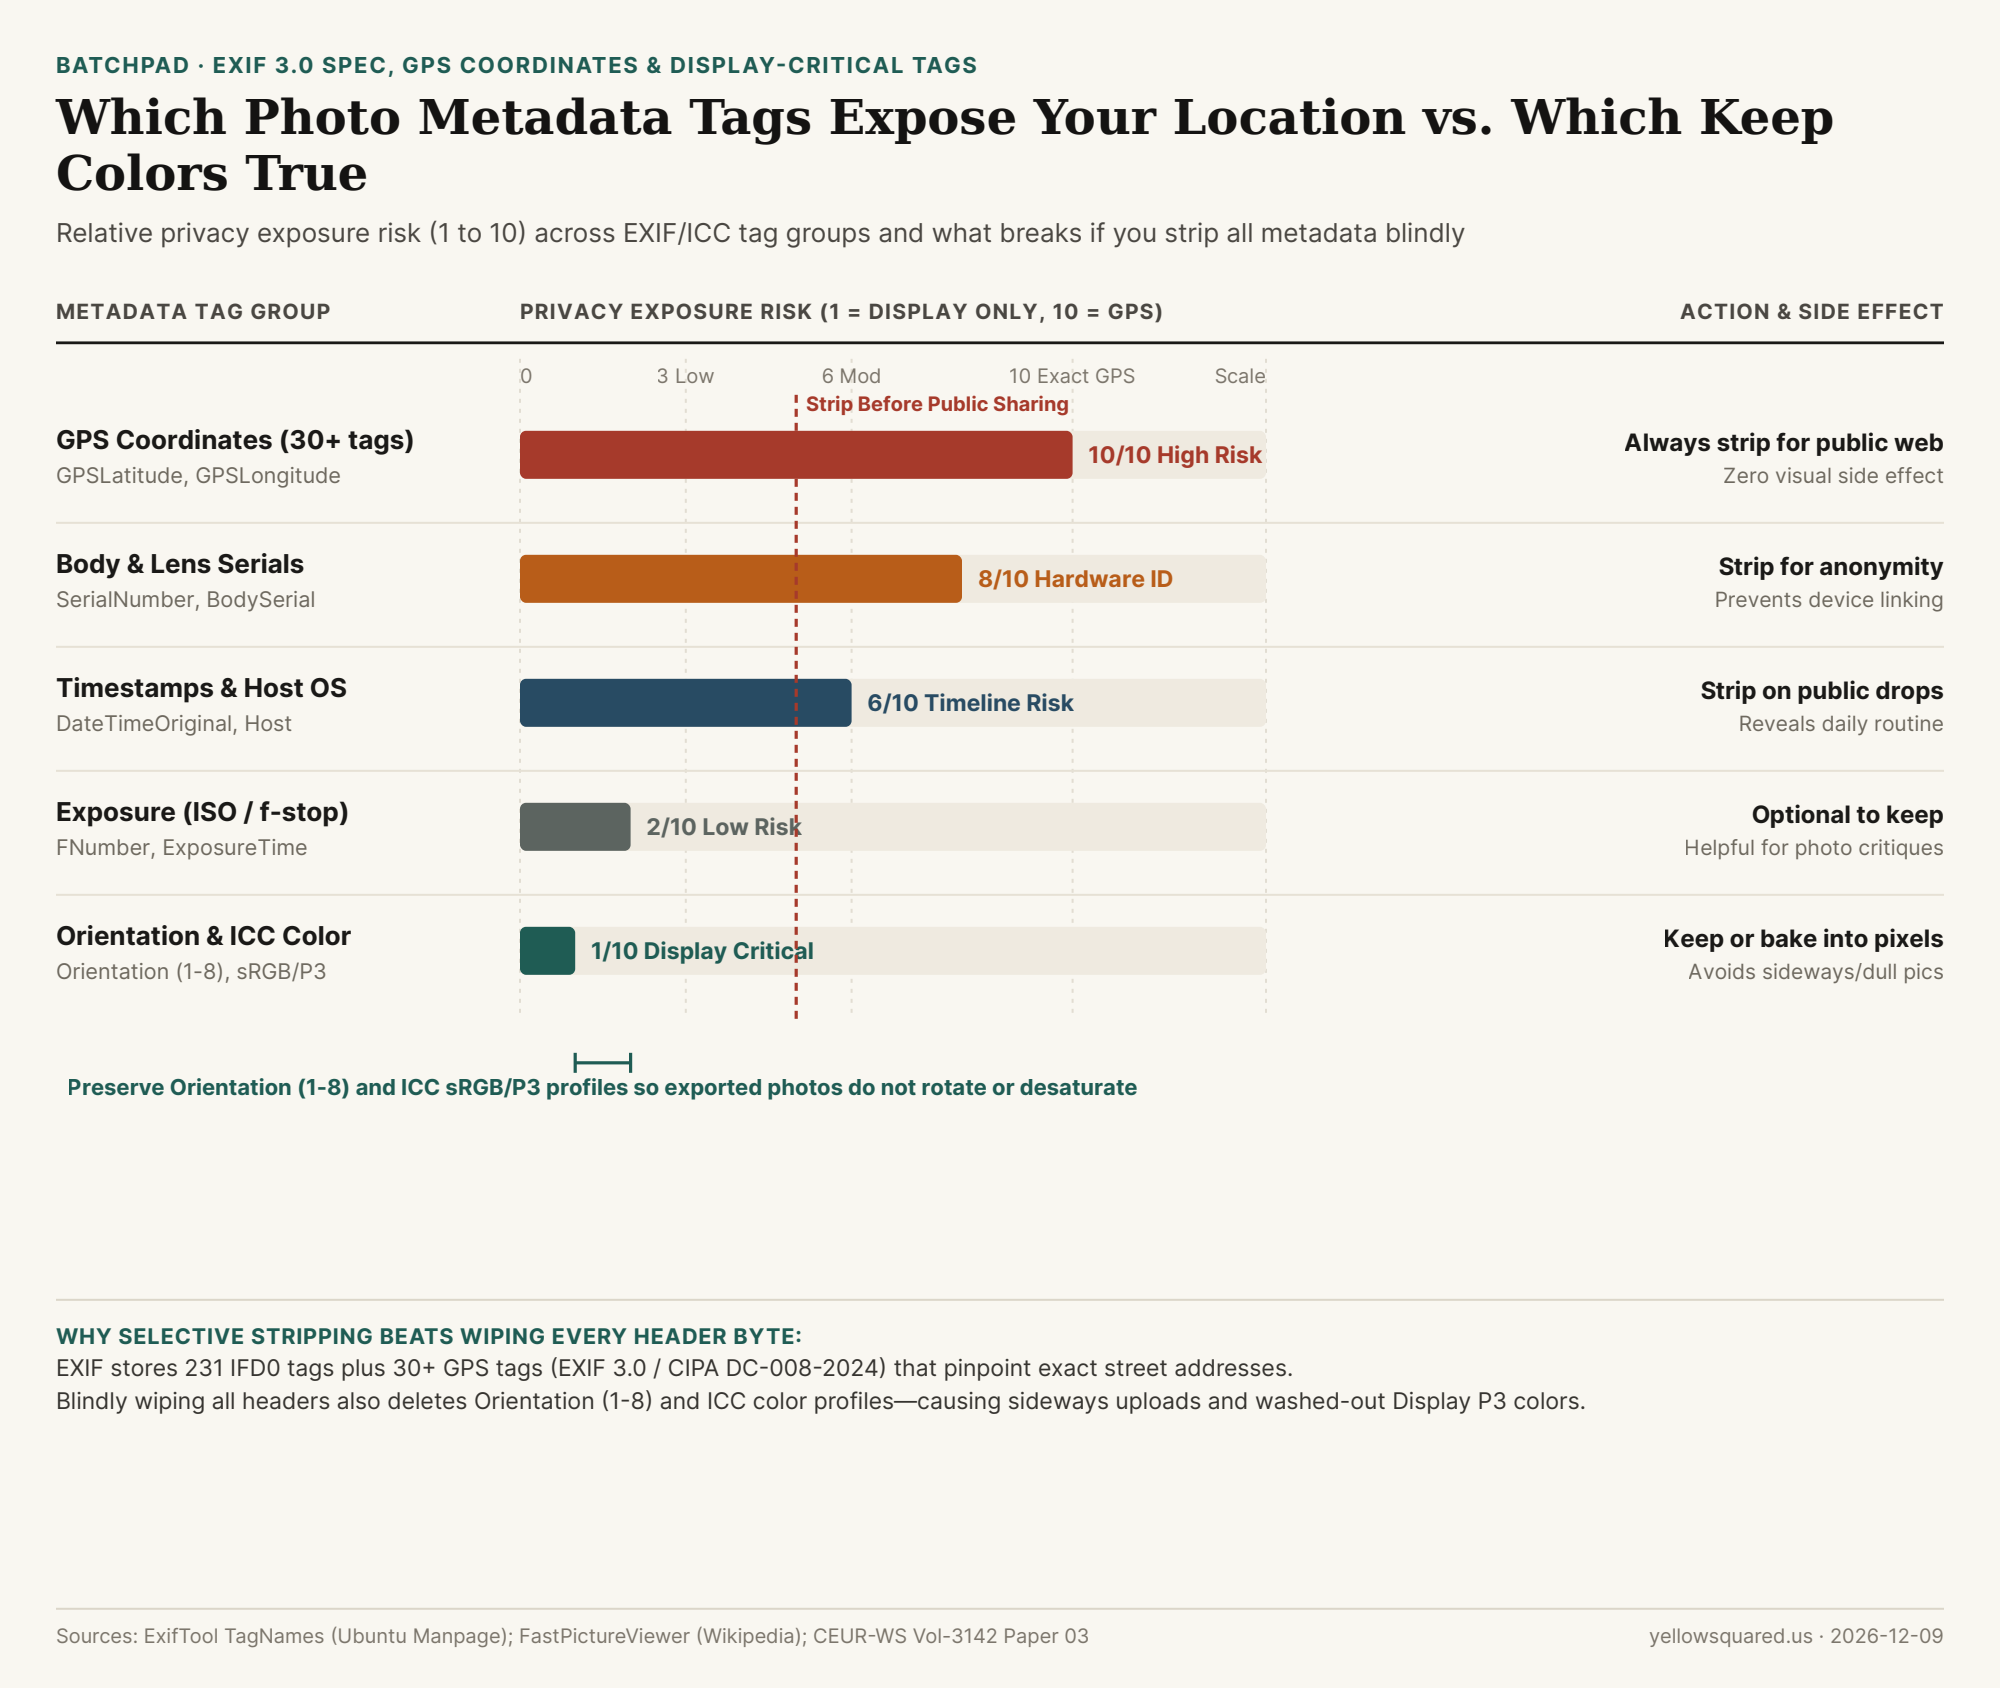
Every JPEG or HEIC image captured on a smartphone or camera carries a hidden header block called EXIF (Exchangeable Image File Format). Built on TIFF Image File Directories (IFDs) and standardized under EXIF 3.0 (CIPA DC-008-2024), those headers record everything from shutter speed and ISO to exact GPS latitude, longitude, and device serial numbers.
High-Risk Tags You Should Always Strip Before Public Sharing
GPS Coordinates (30+ tags): Fields such as GPSLatitude, GPSLongitude, GPSAltitude, and GPSImgDirection can pinpoint a home, school, or workplace within a few meters—even if you cropped the photo.
Hardware Serial Numbers: Tags like SerialNumber and LensSerialNumber in camera maker-notes can link separate anonymous uploads back to the exact same camera body.
Timestamps & Host Computer Names:DateTimeOriginal, timezone offsets, and editing-software tags reveal when you were away from home and which device exported the file.
"Safe metadata hygiene is selective: strip GPS coordinates, serial numbers, and timestamps, but bake or preserve Orientation (1–8) and ICC color profiles so your photo does not rotate sideways or turn dull."
Display-Critical Tags You Should Preserve (or Bake In)
Among the 231 standard IFD0 tags, two non-identifying groups control how browsers render pixels:
EXIF Orientation (values 1 through 8): Phones save sensor pixels in one fixed orientation and rely on the Orientation flag to tell viewers to rotate 90° or 270°. Wiping it without rotating the actual pixel grid flips portrait shots sideways.
ICC_Profile (sRGB / Display P3): Removing a Display P3 profile without converting the color space forces browsers to interpret wide-gamut values as narrower sRGB, making reds and greens look flat and washed out.
EXIF Tag Group Privacy & Display Reference Table
Use this checklist before uploading photos to marketplaces, forums, or public blogs (download the raw CSV dataset):
Metadata Group
Key Tag Names
Privacy Risk
Public Web Action
If Removed Blindly
GPS Location
GPSLatitude, GPSLongitude
10 / 10
Always strip
Zero visual impact; removes map pin
Device Serials
SerialNumber, LensSerial
8 / 10
Always strip
Zero visual impact; stops fingerprinting
Timestamps & OS
DateTimeOriginal, Host
6 / 10
Strip for anonymity
Removes capture timeline context
Exposure Data
FNumber, ISOSpeedRatings
2 / 10
Optional (keep for forums)
Hides lens/shutter learning settings
Orientation & ICC
Orientation, ICC_Profile
1 / 10
Preserve or bake in
Sideways portraits & washed-out colors
006 / 29
What Is Alpenglow in Photography, and When Does the Mountain Peak Turn Pink After Sunset?
Many landscape photographers pack up their tripod the moment the sun dips below the western horizon—missing the brief, luminous window when high granite or snow peaks opposite the sun ignite in soft rose-pink and magenta. That phenomenon is alpenglow (known in the Dolomites as enrosadira and in German as Alpenglühen).
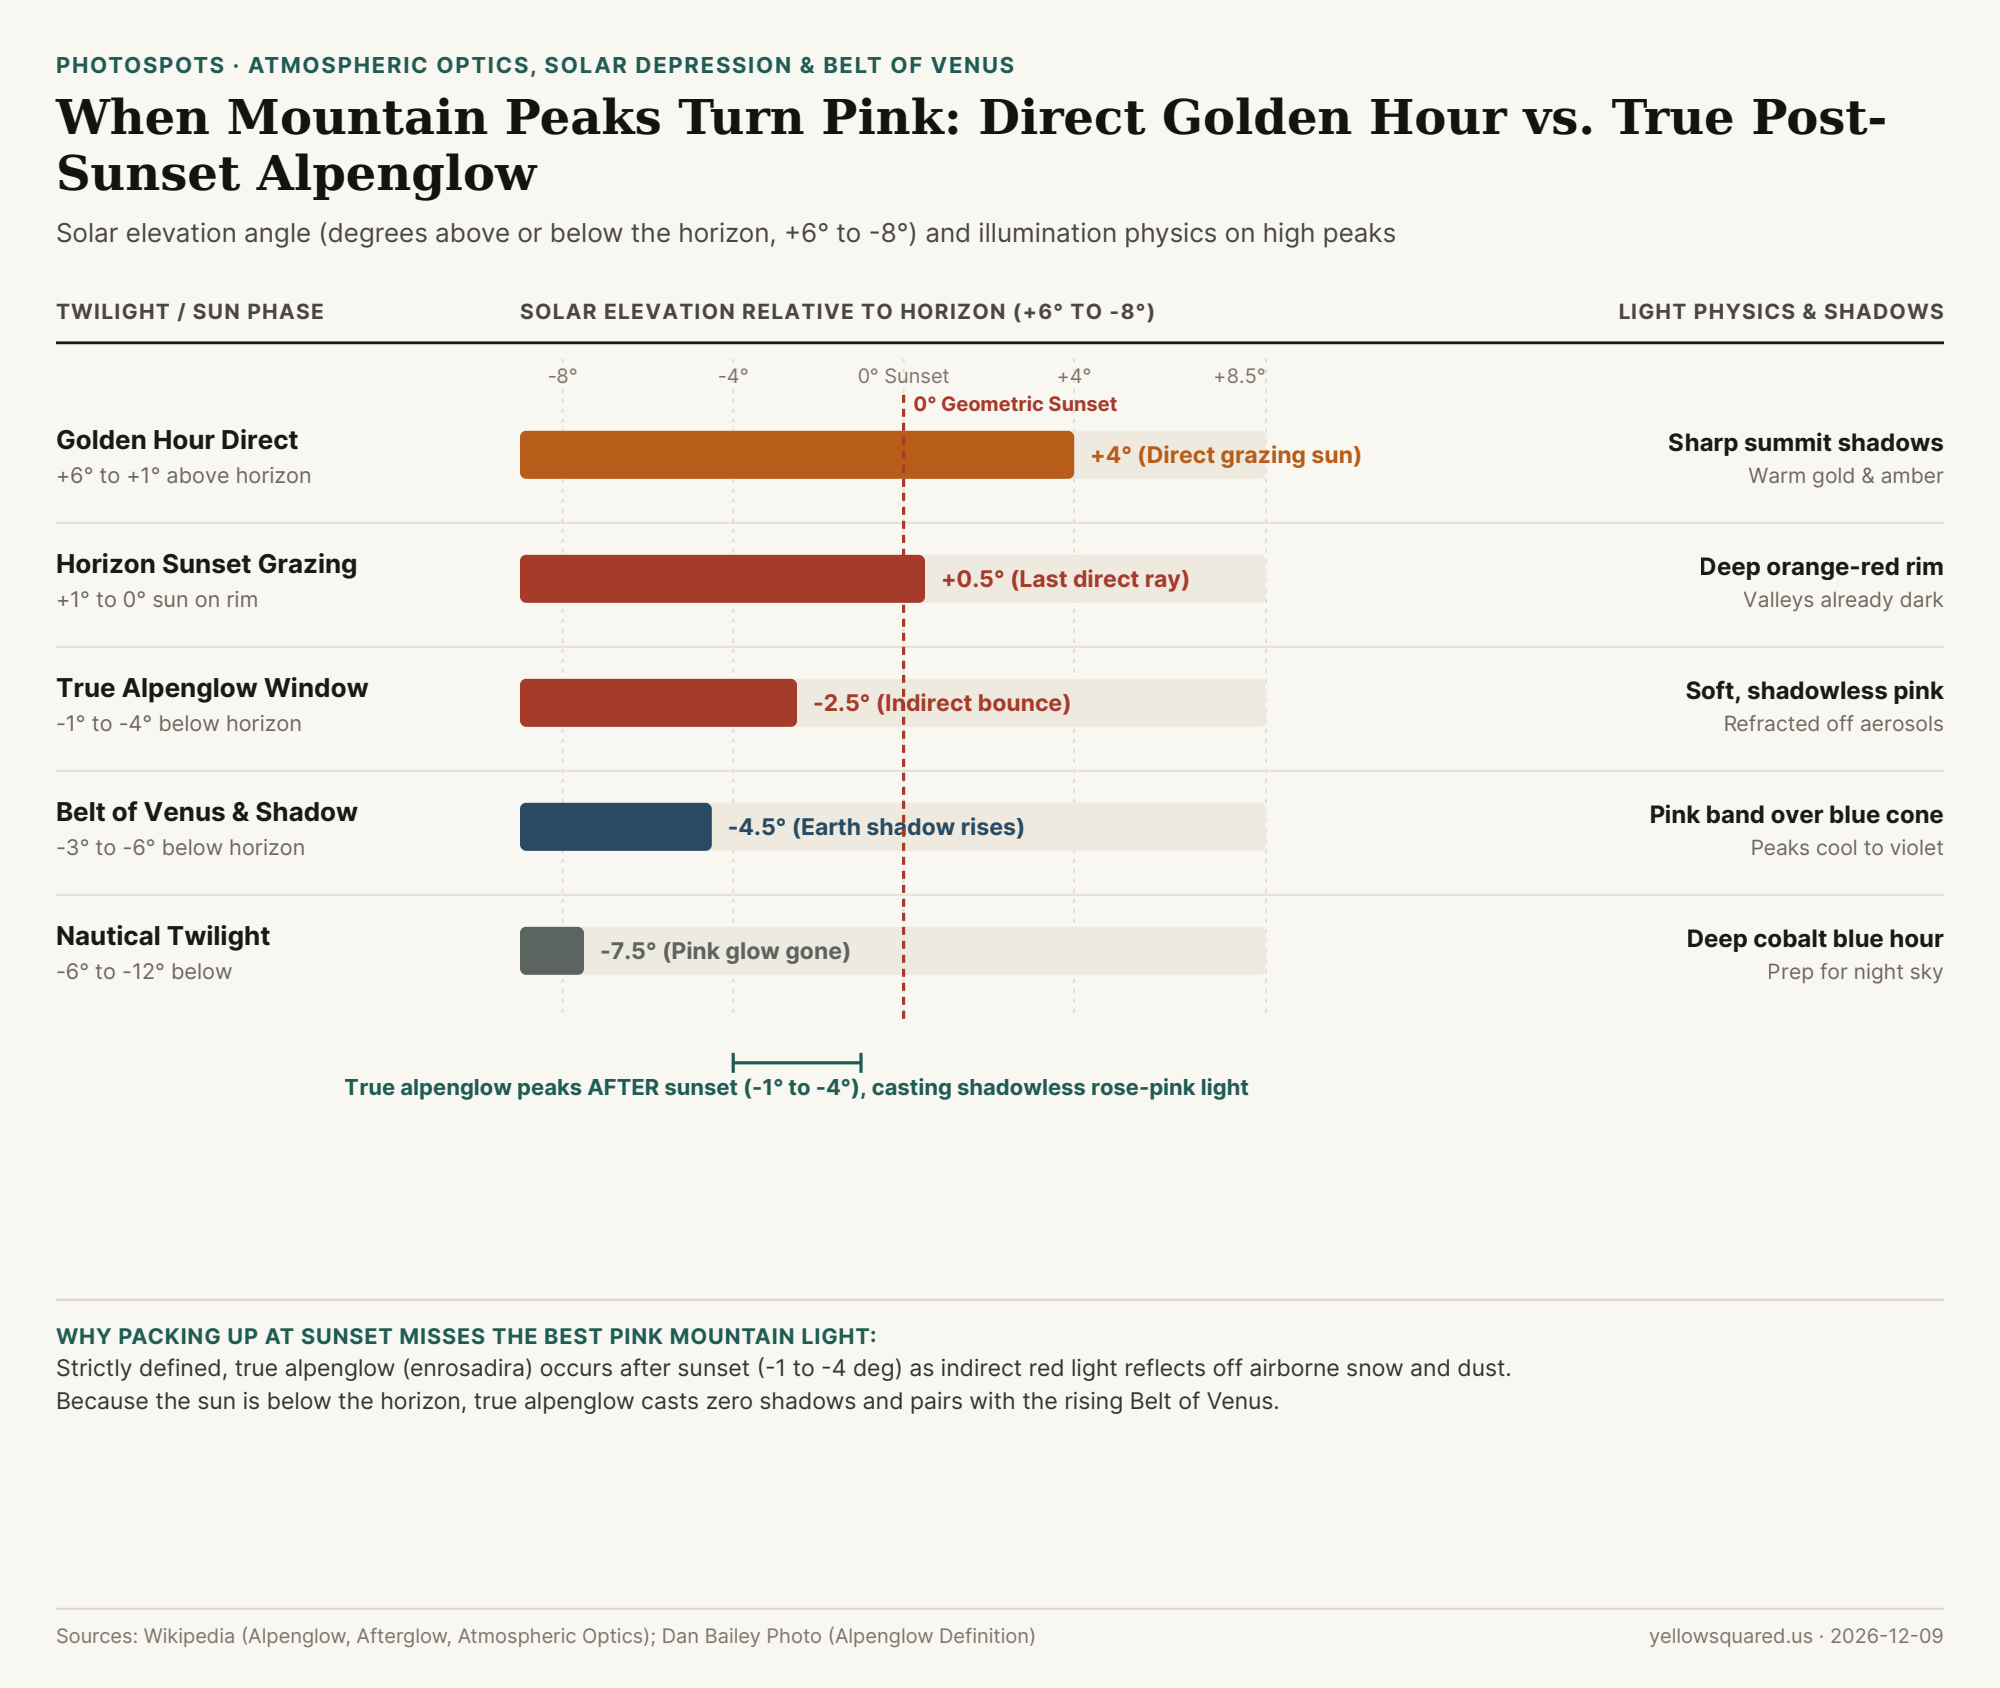
Loosely Defined (+6° to 0°): Just before sunset, low-angle direct sunlight travels through a long atmospheric path that scatters away short blue wavelengths (Rayleigh scattering), leaving warm gold, orange, and red light on high peaks while valleys sit in shadow. Because the sun is still above the horizon, these rays cast sharp shadows.
Strictly Defined True Alpenglow (-1° to -4°): Once the solar disk drops below the horizon, direct rays can no longer strike the mountain. Instead, reddish light refracts and backscatters off airborne snow, ice crystals, or atmospheric particulates—bathing the peak in soft, shadowless pink illumination.
"True alpenglow occurs after sunset or before sunrise when the sun is below the horizon: indirect red-pink light reflects off airborne aerosols, casting zero shadows above the rising Belt of Venus."
How the Belt of Venus and Earth's Shadow Frame the Peak
Looking east after sunset (between -2° and -6° solar depression), you will often see a dark slate-blue wedge rising from the horizon—Earth's shadow—topped by a glowing pink band called the Belt of Venus. High peaks that pierce through that pink band catch the cleanest alpenglow right before fading into cool blue hour at nautical twilight (-6°).
Few topics spark as much confusion in camera gear forums as crop factor equivalence. If you mount a 35mm f/1.8 lens on a 1.5× APS-C camera—or a 25mm f/1.4 lens on a 2.0× Micro Four Thirds camera—do you multiply the aperture by the crop factor too? And if you do, does that mean an f/2.8 lens on a smaller sensor lets in less exposure light and forces a slower shutter speed?
Rule 1: Why Exposure Brightness Does NOT Change (f/2.8 Is Always f/2.8)
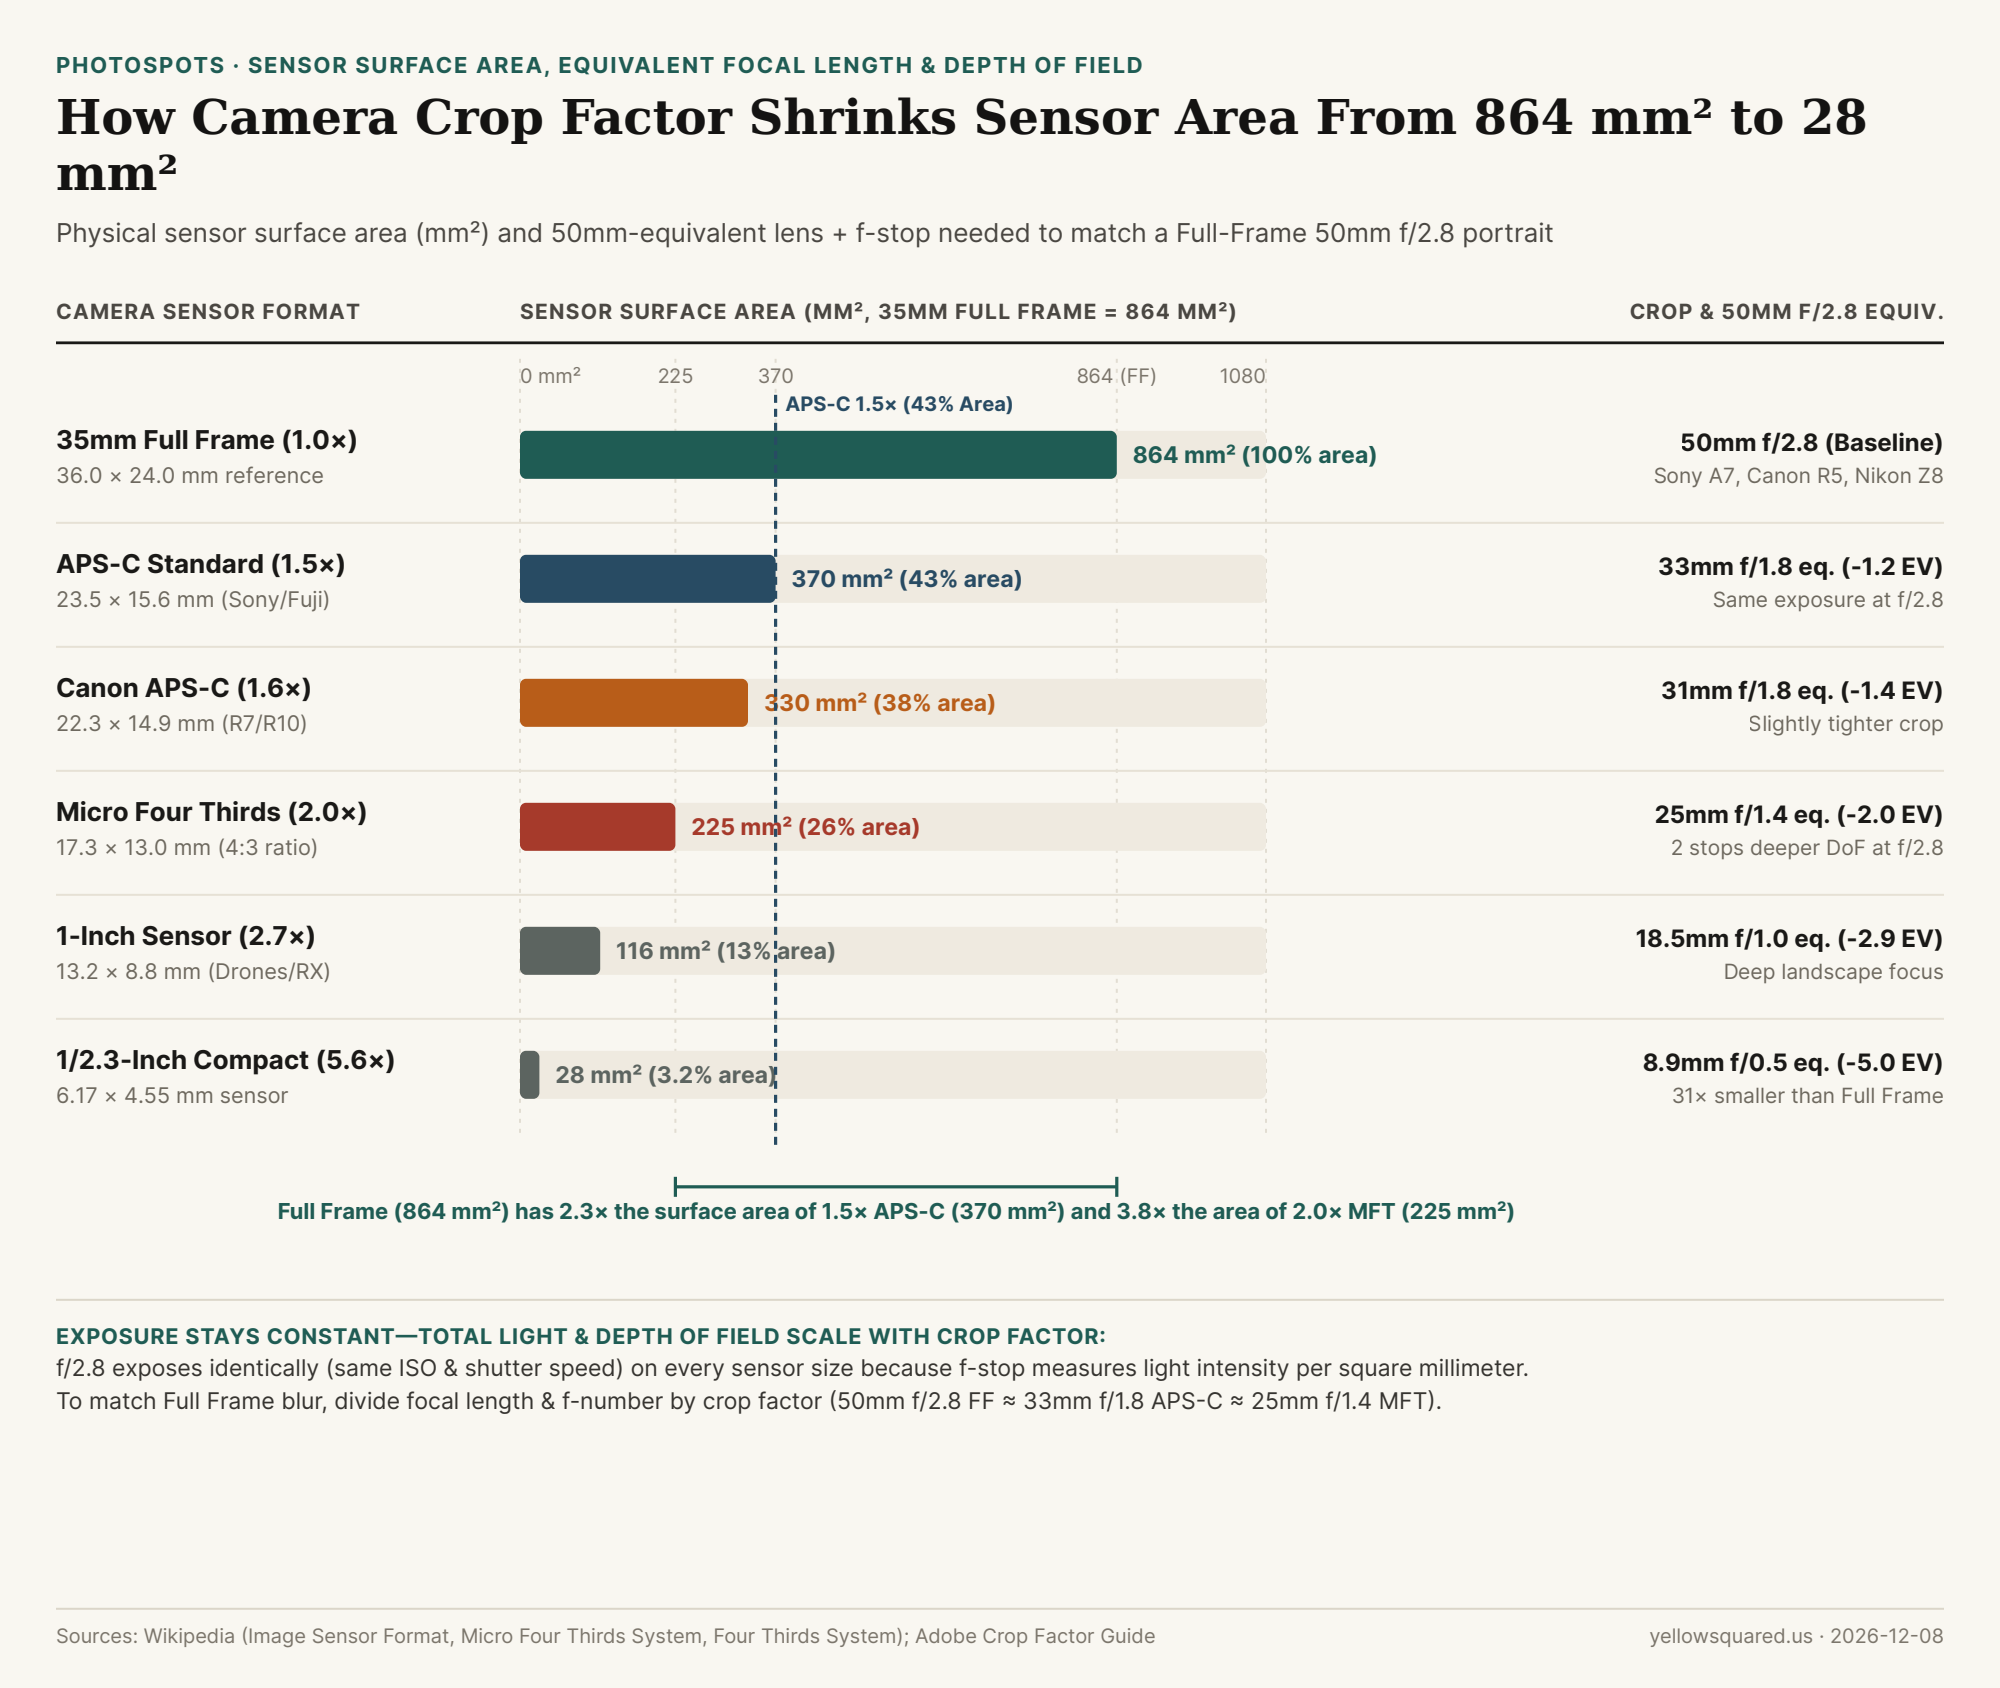
An aperture setting like f/2.8 is a ratio (focal length ÷ entrance pupil diameter). It measures the illuminance (light intensity per square millimeter) hitting the sensor plane. Whether your sensor is a huge 36 × 24 mm full-frame chip (864 mm²) or a tiny 17.3 × 13.0 mm Micro Four Thirds chip (225 mm²), setting 1/250s, f/2.8, ISO 100 produces the exact same exposure brightness in your photo. Your handheld light meter never asks what sensor size you are shooting!
Rule 2: Why Field of View, Depth of Field & Total Light DO Scale
Where crop factor (k, defined as the diagonal of a 35mm full-frame sensor divided by the diagonal of your sensor) changes everything is when you try to frame the exact same composition from the exact same spot:
Field of View (Multiply Focal Length by k): Because a smaller sensor captures only the center rectangle of a lens's image circle, a 33mm lens on a 1.5× APS-C body (33 × 1.5 ≈ 50mm) or a 25mm lens on a 2.0× Micro Four Thirds body (25 × 2.0 = 50mm) frames the exact same scene as a 50mm lens on Full Frame.
Depth of Field & Background Blur (Multiply f-Number by k): Depth of field depends on physical entrance pupil diameter (f ÷ N). A 25mm f/2.8 lens has an entrance pupil of 25 ÷ 2.8 = 8.9 mm—the exact same physical hole as a 50mm f/5.6 lens (50 ÷ 5.6 = 8.9 mm). Therefore, shooting 25mm f/2.8 on Micro Four Thirds produces the same framing and the same depth of field as 50mm f/5.6 on Full Frame (two stops deeper focus!). To match the shallow background blur of a Full-Frame 50mm f/2.8 portrait, you need a 33mm f/1.8 on APS-C or a 25mm f/1.4 on Micro Four Thirds.
Total Light & High-ISO Noise (Sensor Area Ratio): Because a Full-Frame sensor (864 mm²) has 2.3× the surface area of 1.5× APS-C (370 mm²) and 3.8× the surface area of 2.0× MFT (225 mm²), it gathers 1.2 stops to 2.0 stops more total photons during the same shutter speed—explaining Full Frame's roughly 1-to-2-stop low-light noise advantage at high ISO.
"f/2.8 on Micro Four Thirds gives you the exact same shutter speed and ISO exposure as f/2.8 on Full Frame—but the exact same background blur and total light collection as f/5.6 on Full Frame."
The table below summarizes sensor dimensions, surface area, crop factor, and 50mm f/2.8 equivalent lenses across six common formats (download the raw CSV dataset):
Near-infinite depth of field; struggles in dim light
When Smaller Sensors Are Actually an Advantage
Smaller sensors are not "worse"—they simply trade shallow portrait bokeh for compact reach and effortless depth of field. On a wildlife hike or macro shoot, a 2.0× Micro Four Thirds camera with a 300mm f/4 lens delivers a 600mm field of view at a fraction of the weight of a full-frame super-telephoto while keeping more of the bird or flower in sharp focus at f/4. Plan focal lengths and vantage points for any camera sensor in PhotoSpots to match your lens kit to each viewpoint.
008 / 29
Why Do Close-Up Phone Selfies Make Your Nose Look 30% Bigger, and Does Lens Focal Length or Distance Cause Distortion?
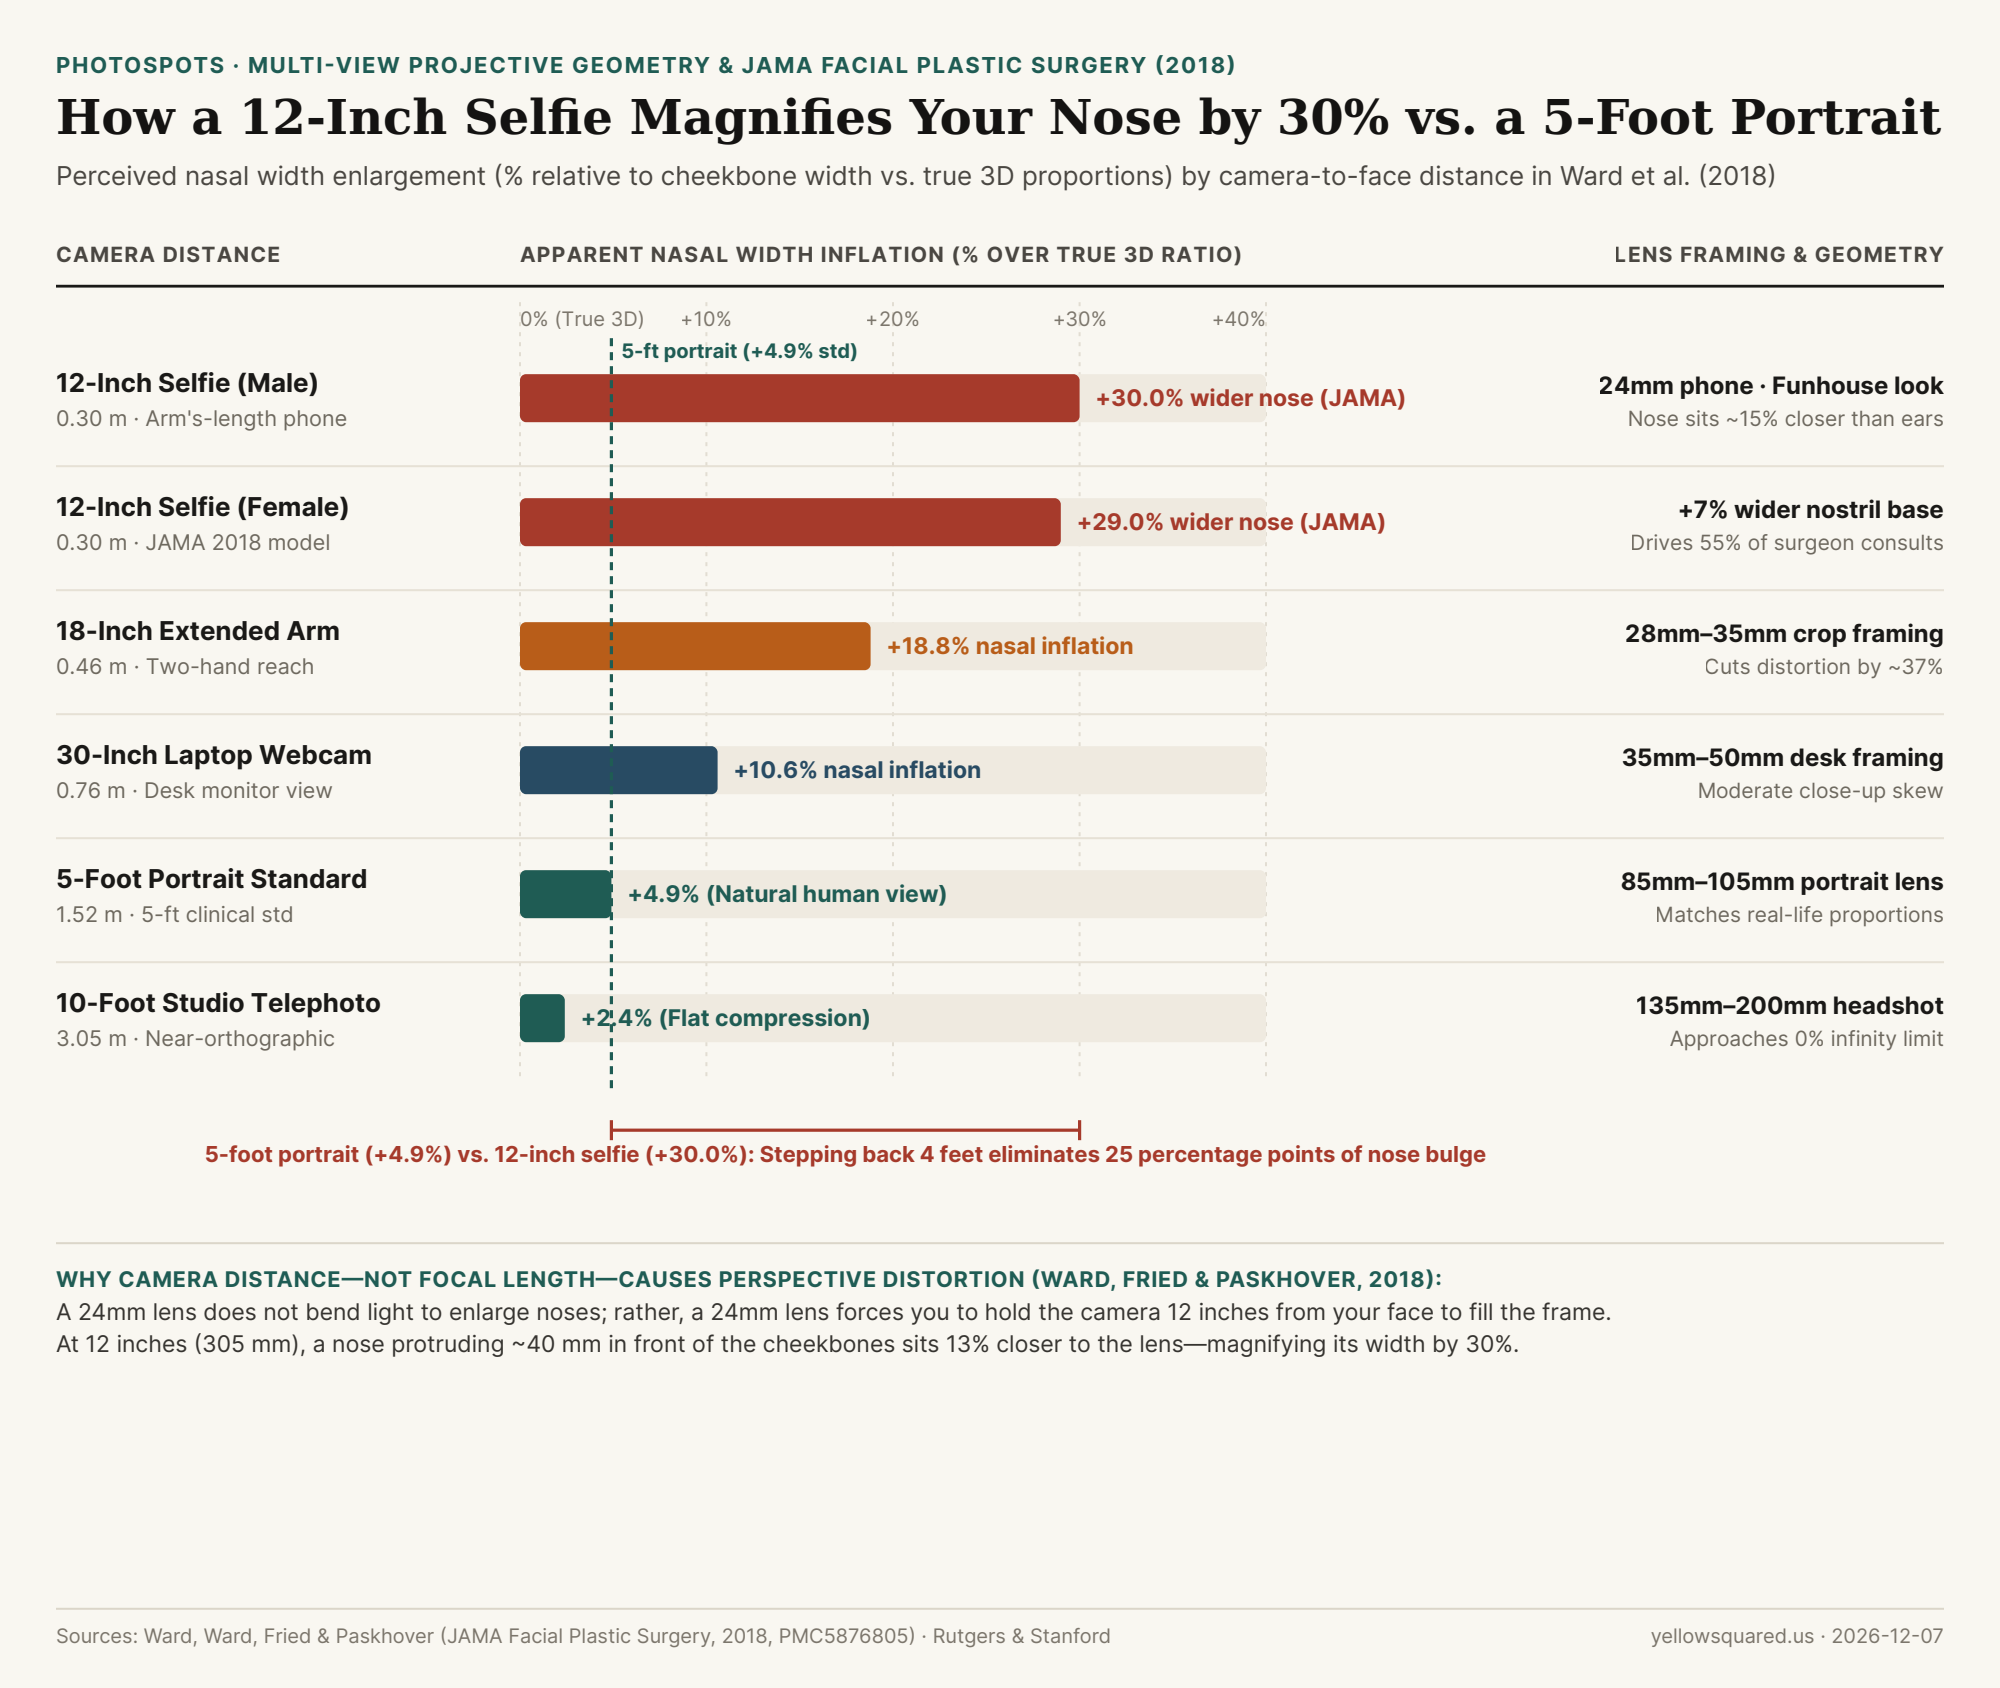
Hold your phone at arm's length (12 inches / 30 cm) to snap a front-camera selfie, and your face looks subtly wrong: your nose appears bulbous and wide, your forehead bulges forward, and your ears recede behind your cheeks. For decades, photographers casually blamed this look on "wide-angle lens distortion," claiming that a 24mm lens warps faces while an 85mm lens flatters them. In March 2018, researchers Brittany Ward, Max Ward, Stanford computer scientist Ohad Fried, and Rutgers facial plastic surgeon Boris Paskhover published a landmark mathematical proof in JAMA Facial Plastic Surgery (PubMed Central PMC5876805; full JAMA paper PDF) quantifying the exact geometry of the "Selfie Effect": a 12-inch photograph inflates perceived nasal width by 30% in males and 29% in females compared to true three-dimensional proportions—and the culprit is 100% camera-to-subject distance, not the glass inside the lens.
The Multiview Geometry Proof: Why 12 Inches Magnifies the Nose by 30%
Prompted by an American Academy of Facial Plastic and Reconstructive Surgeons survey showing that 42% to 55% of surgeons were seeing patients requesting rhinoplasty specifically to look better in social-media selfies (ZME Science), Paskhover and Fried modeled the human head as a set of parallel vertical planes perpendicular to the camera axis using U.S. anthropometric averages (PMC5876805):
The Depth Gap Between Nose Tip and Cheekbones: On an average adult face, the bizygomatic plane (the widest point of the cheekbones, averaging 143.5 mm in males and 135.1 mm in females) sits roughly 70 to 90 mm behind the tip and alar base of the nose (where nasal protrusion alone averages 21.1 mm in males and 19.8 mm in females in front of the glabella).
The Ratio of Distances (D1 / D2) Controls Perspective Magnification: In pinhole projective geometry, the apparent size of any feature is inversely proportional to its distance from the camera's entrance pupil. When a camera is placed 5 feet (60 inches / 1,524 mm) away—standard clinical and studio portrait distance—the nose is only about 4.7% to 4.9% closer to the lens than the cheekbone plane, yielding a natural portrait that matches how people see you across a room.
What Happens at 12 Inches (304.8 mm): When you hold a smartphone just 12 inches from your face, your nose sits roughly 23% closer to the camera lens than the plane of your cheekbones and ears! Keeping cheekbone width constant in the frame, the multi-view projection equation N'/B = (N · D1) / (B · D2) proves that a 12-inch selfie stretches perceived nasal width by 30.0% in males and 29.0% in females (and widens the intercrural nostril base by 7%) compared to true orthographic proportions!
"Young adults are constantly taking selfies to post to social media and think those images are representative of how they really look... when they take a selfie they are in essence looking into a portable funhouse mirror." — Dr. Boris Paskhover, Rutgers New Jersey Medical School (ZME Science)
Debunking the Lens Myth: Why Focal Length Only Changes Framing, Not Perspective
If perspective distortion depends strictly on the distance ratio D1 / D2 between the camera and the subject's facial planes, why do photographers call 85mm and 105mm lenses "flattering portrait lenses" while warning against 24mm lenses?
Same Distance = Identical Perspective Geometry: If you stand 5 feet (1.52 m) away from a subject, take one photo with a 24mm wide-angle lens and a second photo with an 85mm portrait lens from the exact same tripod spot, and then crop the center of the 24mm frame to match the 85mm field of view, the nose-to-cheekbone ratio is 100% identical (+4.9%) in both photos!
Why Wide Lenses Trick You Into Stepping Too Close: The only reason a 24mm smartphone camera distorts faces is behavioral: to fill the frame with a head-and-shoulders portrait using a wide 24mm lens, you have to move the camera to within 12 to 18 inches of the face. Switching to your phone's 2x (50mm) or 3x–5x (77mm–120mm) telephoto camera forces you (or a friend/tripod) to step back to 4 to 6 feet—where perspective distortion vanishes!
Camera-to-Face Distance
Metric / Imperial
Typical Framing Lens
Male Nose Inflation
Female Nose Inflation
Projective Geometry & Visual Outcome
Arm's-Length Selfie
0.30 m (12 in)
24mm–26mm front cam
+30.0%
+29.0%
Severe "selfie nose" bulge; ears recede
Extended Arm / Grip
0.46 m (18 in)
26mm–28mm main cam
+18.8%
+18.1%
6 extra inches cuts nose distortion by ~37%
Laptop / Desk Webcam
0.76 m (30 in)
35mm–50mm equiv
+10.6%
+10.2%
Mild close-up emphasis ("Zoom dysmorphia")
Standard Portrait
1.52 m (5 ft)
85mm–105mm portrait
+4.9%
+4.7%
Clinical & studio standard; true-to-life face
Studio Telephoto
3.05 m (10 ft)
135mm–200mm tele
+2.4%
+2.3%
Near-orthographic compression; flatters ears
Orthographic Limit
∞ (Infinity)
Theoretical parallel
0.0%
0.0%
Exact 3D anthropometric caliper ratio
Two Instant Fixes for Flattering Phone Portraits
When taking a portrait with a smartphone, never fill the frame from 12 inches away. Either switch to the 2x or 3x telephoto lens and step back 5 feet, or—if you must use the front camera at arm's length—hold the phone at full 18-to-24-inch extension with your face occupying the center third of the frame, then crop in afterward. Cropping a wider shot taken from 3 feet away gives you the exact same flattering perspective as a telephoto lens. Save portrait and landscape camera vantage points in PhotoSpots to record the best shooting distances and focal lengths at every location.