Every camera white-balance menu gives you two sliders: Color Temperature (Kelvin) and Tint (Green–Magenta). Confusing the two is the fastest way to spend an hour fighting unnatural skin tones in post-production, because each slider corrects a completely different axis of light.
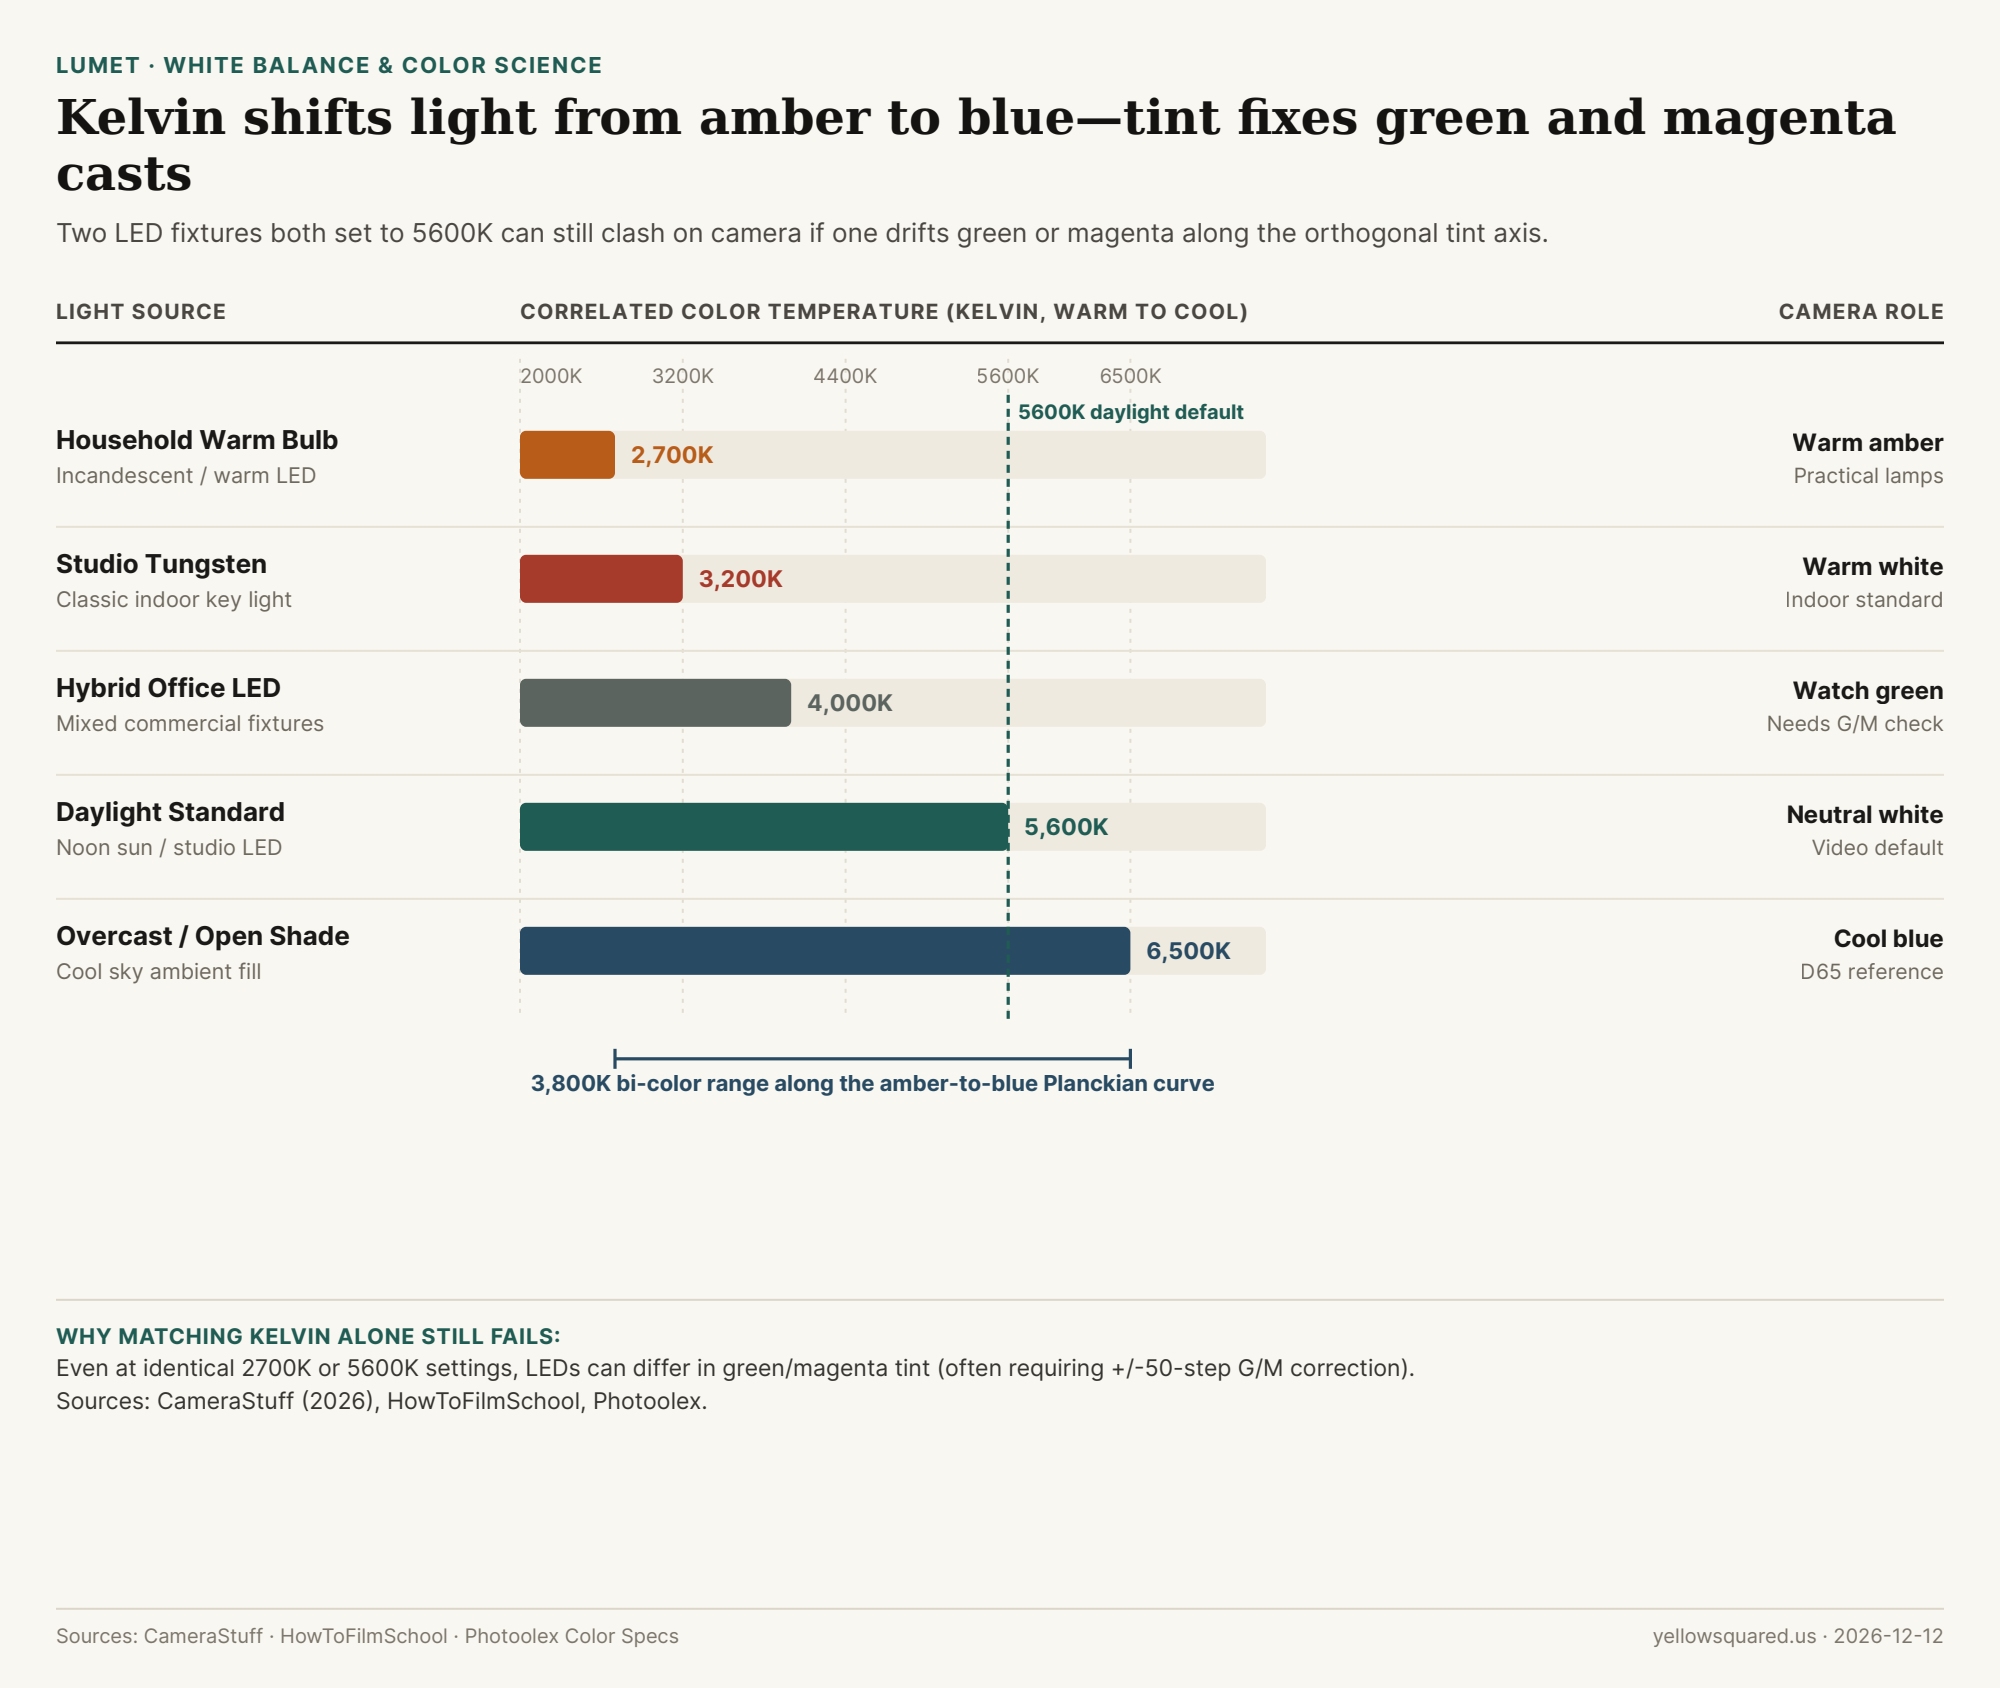
Standard Kelvin benchmarks across practical lamps, studio tungsten, and daylight LEDs along the amber-to-blue axis. Data: Download CSV.
Color Temperature (Kelvin): The Amber–Blue Axis
Measured in kelvin (K) without a degree symbol, color temperature describes how warm or cool a light source appears relative to an ideal blackbody radiator. As CameraStuff's LED guide and HowToFilmSchool explain, domestic warm bulbs sit around 2,700K, studio tungsten lamps sit at 3,200K, and neutral daylight sits near 5,600K (with overcast shade reaching 6,500K). Setting your camera's white balance lower than the room light makes the image look cooler; setting it higher warms the scene up.
"Even when two lights are set to the same Kelvin value, differences in green or magenta tint can affect how colors appear on camera." — Photoolex Lighting Specs
Tint: The Orthogonal Green–Magenta Axis
Fluorescent tubes, cheap commercial LEDs, and even high-CRI panels often drift slightly above or below the pure blackbody curve—producing a sickly green cast on skin or a magenta shift in shadows. Because Kelvin only slides between amber and blue, no amount of Kelvin adjustment can remove green or magenta. That is why modern RGB-WW and bi-color LEDs include ±50-step Green/Magenta (G/M) controls so you can neutralize the tint before locking your camera white balance.
To preview how Kelvin shifts and green/magenta tint balance interact before setting up your lights, dial in Kelvin and tint in Lumet.
002 / 18
What Is Camera Flash Sync Speed (1/200s vs. 1/250s), and How Does High-Speed Sync (HSS) Work?
Every photographer who takes a speedlight or studio strobe outdoors eventually hits the same wall: you open your portrait lens to f/2 in bright afternoon sun, your camera sets a shutter speed of 1/2000s, and either the camera refuses to let you pass 1/200s or 1/250s, or—if you use a manual radio trigger—a solid black shadow band cuts across half of your frame. As explained in Flash synchronization, Focal-plane shutter, and field guides from PhotographyTalk and Camera Dojo, that 1/200s–1/250s ceiling is your camera's maximum X-sync speed, dictated by the physical travel time of two mechanical shutter curtains across the sensor.
Why does a focal-plane shutter block a single flash pop above 1/250s, how does High-Speed Sync (HSS / FP sync) bypass that limit up to 1/8000s, and why does switching on HSS immediately cost you 75% to 98% of your flash power? Plan flash sync speeds, HSS power loss, and ND filter exposures in Lumet before your next outdoor portrait session.
Two Curtains and a 4-Millisecond Window: Why X-Sync Tops Out at 1/250s
As detailed in Focal-plane shutter mechanics, almost all modern DSLR and mirrorless cameras use a vertical-travel focal-plane shutter made of two ultra-lightweight blade curtains placed immediately in front of the 24 mm-tall full-frame sensor (or 15 mm APS-C sensor). Regardless of whether you set your shutter dial to 1/60s or 1/8000s, the physical speed at which each curtain travels across the 24 mm frame is fixed by mechanical acceleration limits at roughly 3.0 to 4.0 milliseconds:
At or Below Sync Speed (1/250s or slower): The first curtain slides open (~3.5 ms), exposing 100% of the sensor at once. The instant the first curtain reaches the bottom, the camera's X-sync contact fires a single electronic flash pop (which lasts ~1/1000s to 1/10,000s, illuminating the entire uncovered sensor), and only then does the second curtain slide across to end the exposure.
Above Sync Speed (1/500s to 1/8000s): To achieve an exposure time shorter than the ~3.5 ms curtain transit time, the camera cannot wait for the first curtain to finish opening. Instead, the second curtain starts closing while the first curtain is still moving, forming a narrow traveling slit that wipes across the sensor (about 12 mm wide at 1/500s, 3 mm wide at 1/2000s, and just 0.75 mm wide at 1/8000s). If a standard flash fires a single 1-millisecond pop while the curtains form a 6 mm slit, three-quarters of your sensor is covered by metal shutter blades—leaving a black curtain band across the frame! (By contrast, as noted in Shutter (photography), cameras with in-lens leaf shutters open from the center outward and can sync a single flash pop at 1/500s to 1/2000s with zero slit loss.)
How High-Speed Sync (HSS) Works—and Why It Eats 2 to 6 Stops of Power
To use flash above 1/250s with a focal-plane shutter, High-Speed Sync (HSS)—originally introduced on film cameras as FP (Flat-Peak) sync—changes how the flash tube discharges. Instead of releasing all capacitor energy in one intense pop, the speedlight fires an ultra-rapid 20 kHz to 50 kHz pulsed strobe train for the entire 4-to-8 millisecond duration of the curtain wipe, acting like a continuous LED light while the slit travels across the sensor.
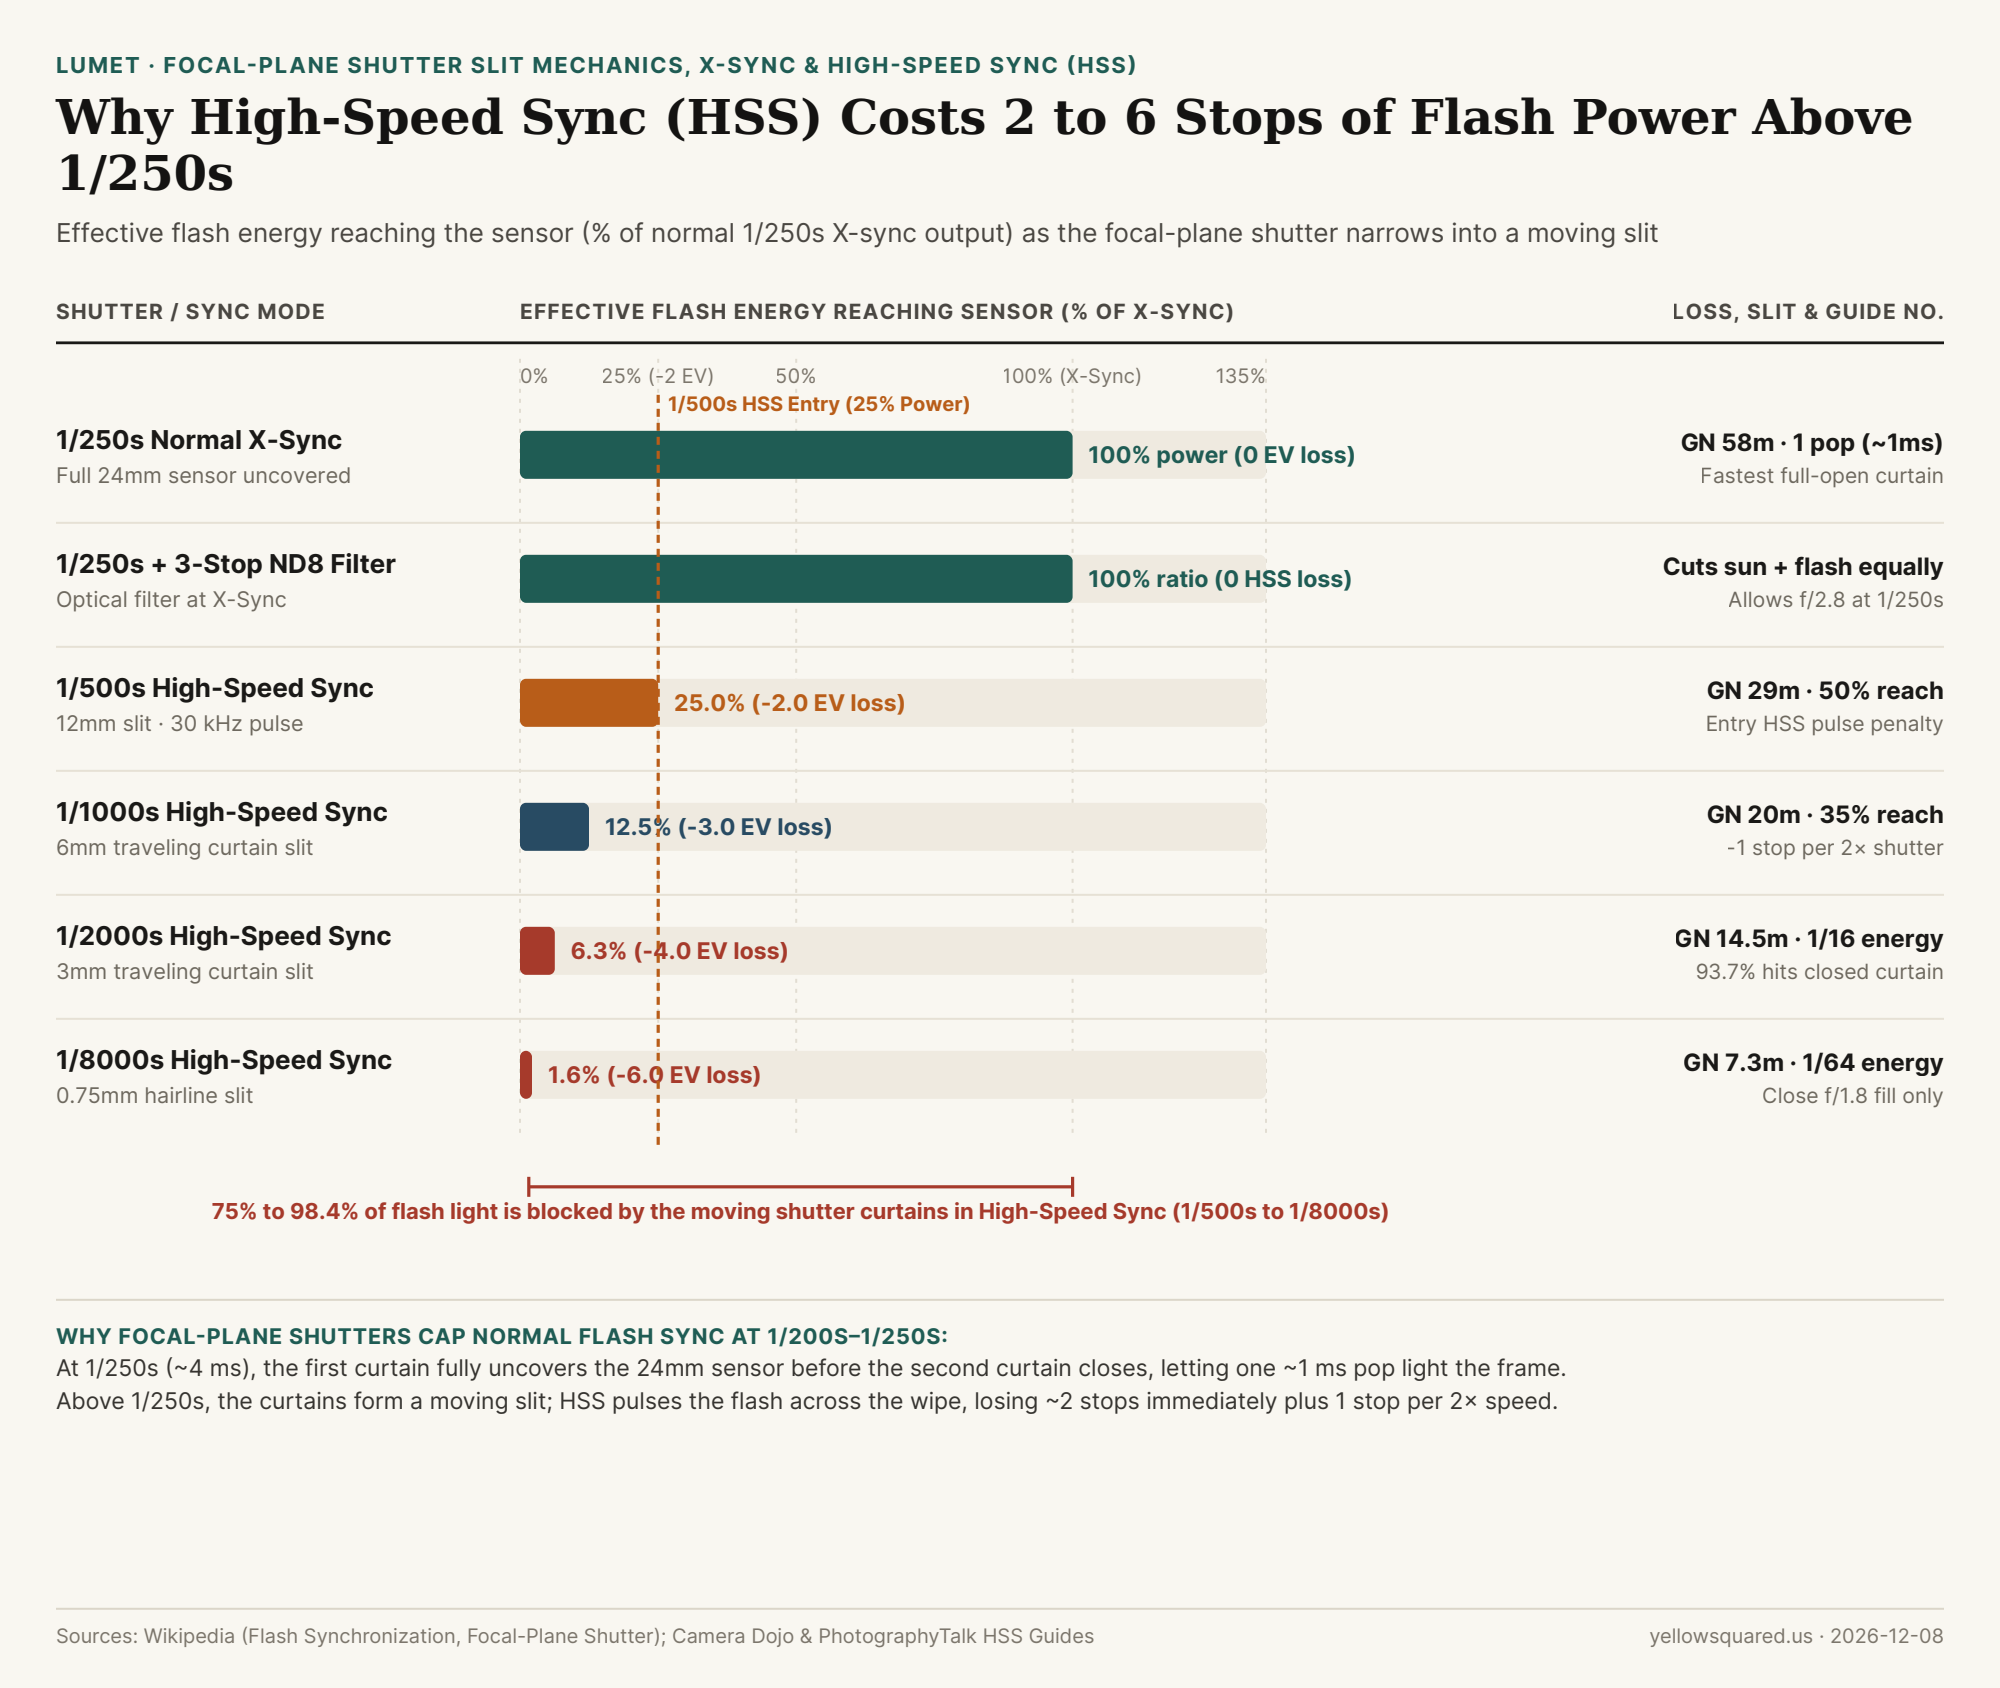
"When you switch from 1/250s normal X-sync to 1/500s High-Speed Sync, most of your flash's pulsed light lands on the closed metal shutter curtains rather than the sensor—costing roughly 2 full stops (75% of your flash energy) immediately, plus 1 additional stop every time you double the shutter speed."
As documented in Camera Dojo's Guide Number benchmarks, a speedlight rated at GN 58 (meters at ISO 100) in normal 1/250s sync drops to roughly GN 20–29 as soon as it enters HSS, and loses half of its remaining effective sensor exposure with each shutter doubling because the traveling slit narrows by half each stop.
X-Sync vs. ND Filter vs. High-Speed Sync Power Table
The table below compares curtain slit width, effective flash energy reaching the sensor, EV stop loss, and effective Guide Number reach across shutter speeds (download the raw CSV table):
Shutter & Flash Sync Mode
Curtain Slit Geometry
Effective Flash Energy
EV Power Loss
Effective Guide No. (ISO 100)
Outdoor Portrait & Fill-Flash Impact
1/200s–1/250s Normal X-Sync
Full 24 mm sensor open
100.0% (1 pop)
0.0 EV
GN 58 m (100% reach)
Maximum flash efficiency; freezes indoor motion
1/250s + 3-Stop ND8 Filter
Full 24 mm sensor open
100.0% flash-to-sun ratio
0.0 EV relative
GN 58 m ratio
Lets you shoot f/2.8 in sun at 1/250s without HSS
1/500s High-Speed Sync (HSS)
~12 mm traveling slit
25.0% (1/4 energy)
-2.0 EV
GN 29 m (50% reach)
Immediate 2-stop penalty entering pulsed HSS mode
1/1000s High-Speed Sync (HSS)
~6 mm traveling slit
12.5% (1/8 energy)
-3.0 EV
GN 20 m (35% reach)
Matches 3-stop ND filter ambient cut, but loses 87.5% flash
1/2000s High-Speed Sync (HSS)
~3 mm traveling slit
6.3% (1/16 energy)
-4.0 EV
GN 14.5 m (25% reach)
93.7% of flash light bounces off closed shutter blades
1/8000s High-Speed Sync (HSS)
~0.75 mm hairline slit
1.6% (1/64 energy)
-6.0 EV
GN 7.3 m (12.5% reach)
Matches f/1.8 in direct sun; flash must sit very close
When to Use an ND Filter Instead of HSS Outdoors
If your subject is stationary or posing for a portrait in bright sunlight and you want to shoot wide open at f/2 or f/2.8 with a small speedlight, screw a 3-stop (ND8) or 6-stop (ND64) Neutral Density filter onto your lens and stay at 1/250s normal X-sync. While a 3-stop ND filter darkens both the sunlight and the flash by 3 stops, keeping your shutter at 1/250s avoids the 2-to-3-stop HSS pulsing efficiency loss—giving your flash twice the effective reach and faster recycle times than shooting bare-lens HSS at 1/2000s. Reserve High-Speed Sync for action portraits where you specifically need a fast 1/2000s–1/4000s shutter speed to freeze hair, water, or sports motion in bright ambient light. Plan flash sync speeds, HSS power loss, and ND filter exposures in Lumet to dial in your exact strobe-to-ambient balance.
003 / 18
What Is Rembrandt Lighting vs. Loop, Butterfly, and Split Lighting in Portrait Photography, and Where Should You Place the Key Light?
Walk onto a commercial portrait set or study the close-ups in a classic film, and you will notice that cinematographers classify facial lighting into four universal patterns: Butterfly (Paramount), Loop, Rembrandt, and Split lighting. You do not need four different lamps to create them. As documented in foundational studio photographic lighting theory, FilmDaft's studio lighting setup diagrams, and PhotographyTalk's portrait geometry guide, all four patterns are generated by moving a single key light along an arc from 0° (dead center in front of the nose) to 90° (directly beside the ear) while watching how the shadow of the nose interacts with the shadow of the cheek.
The 0° to 90° Key-Light Arc: How Nose and Cheek Shadows Define Each Pattern
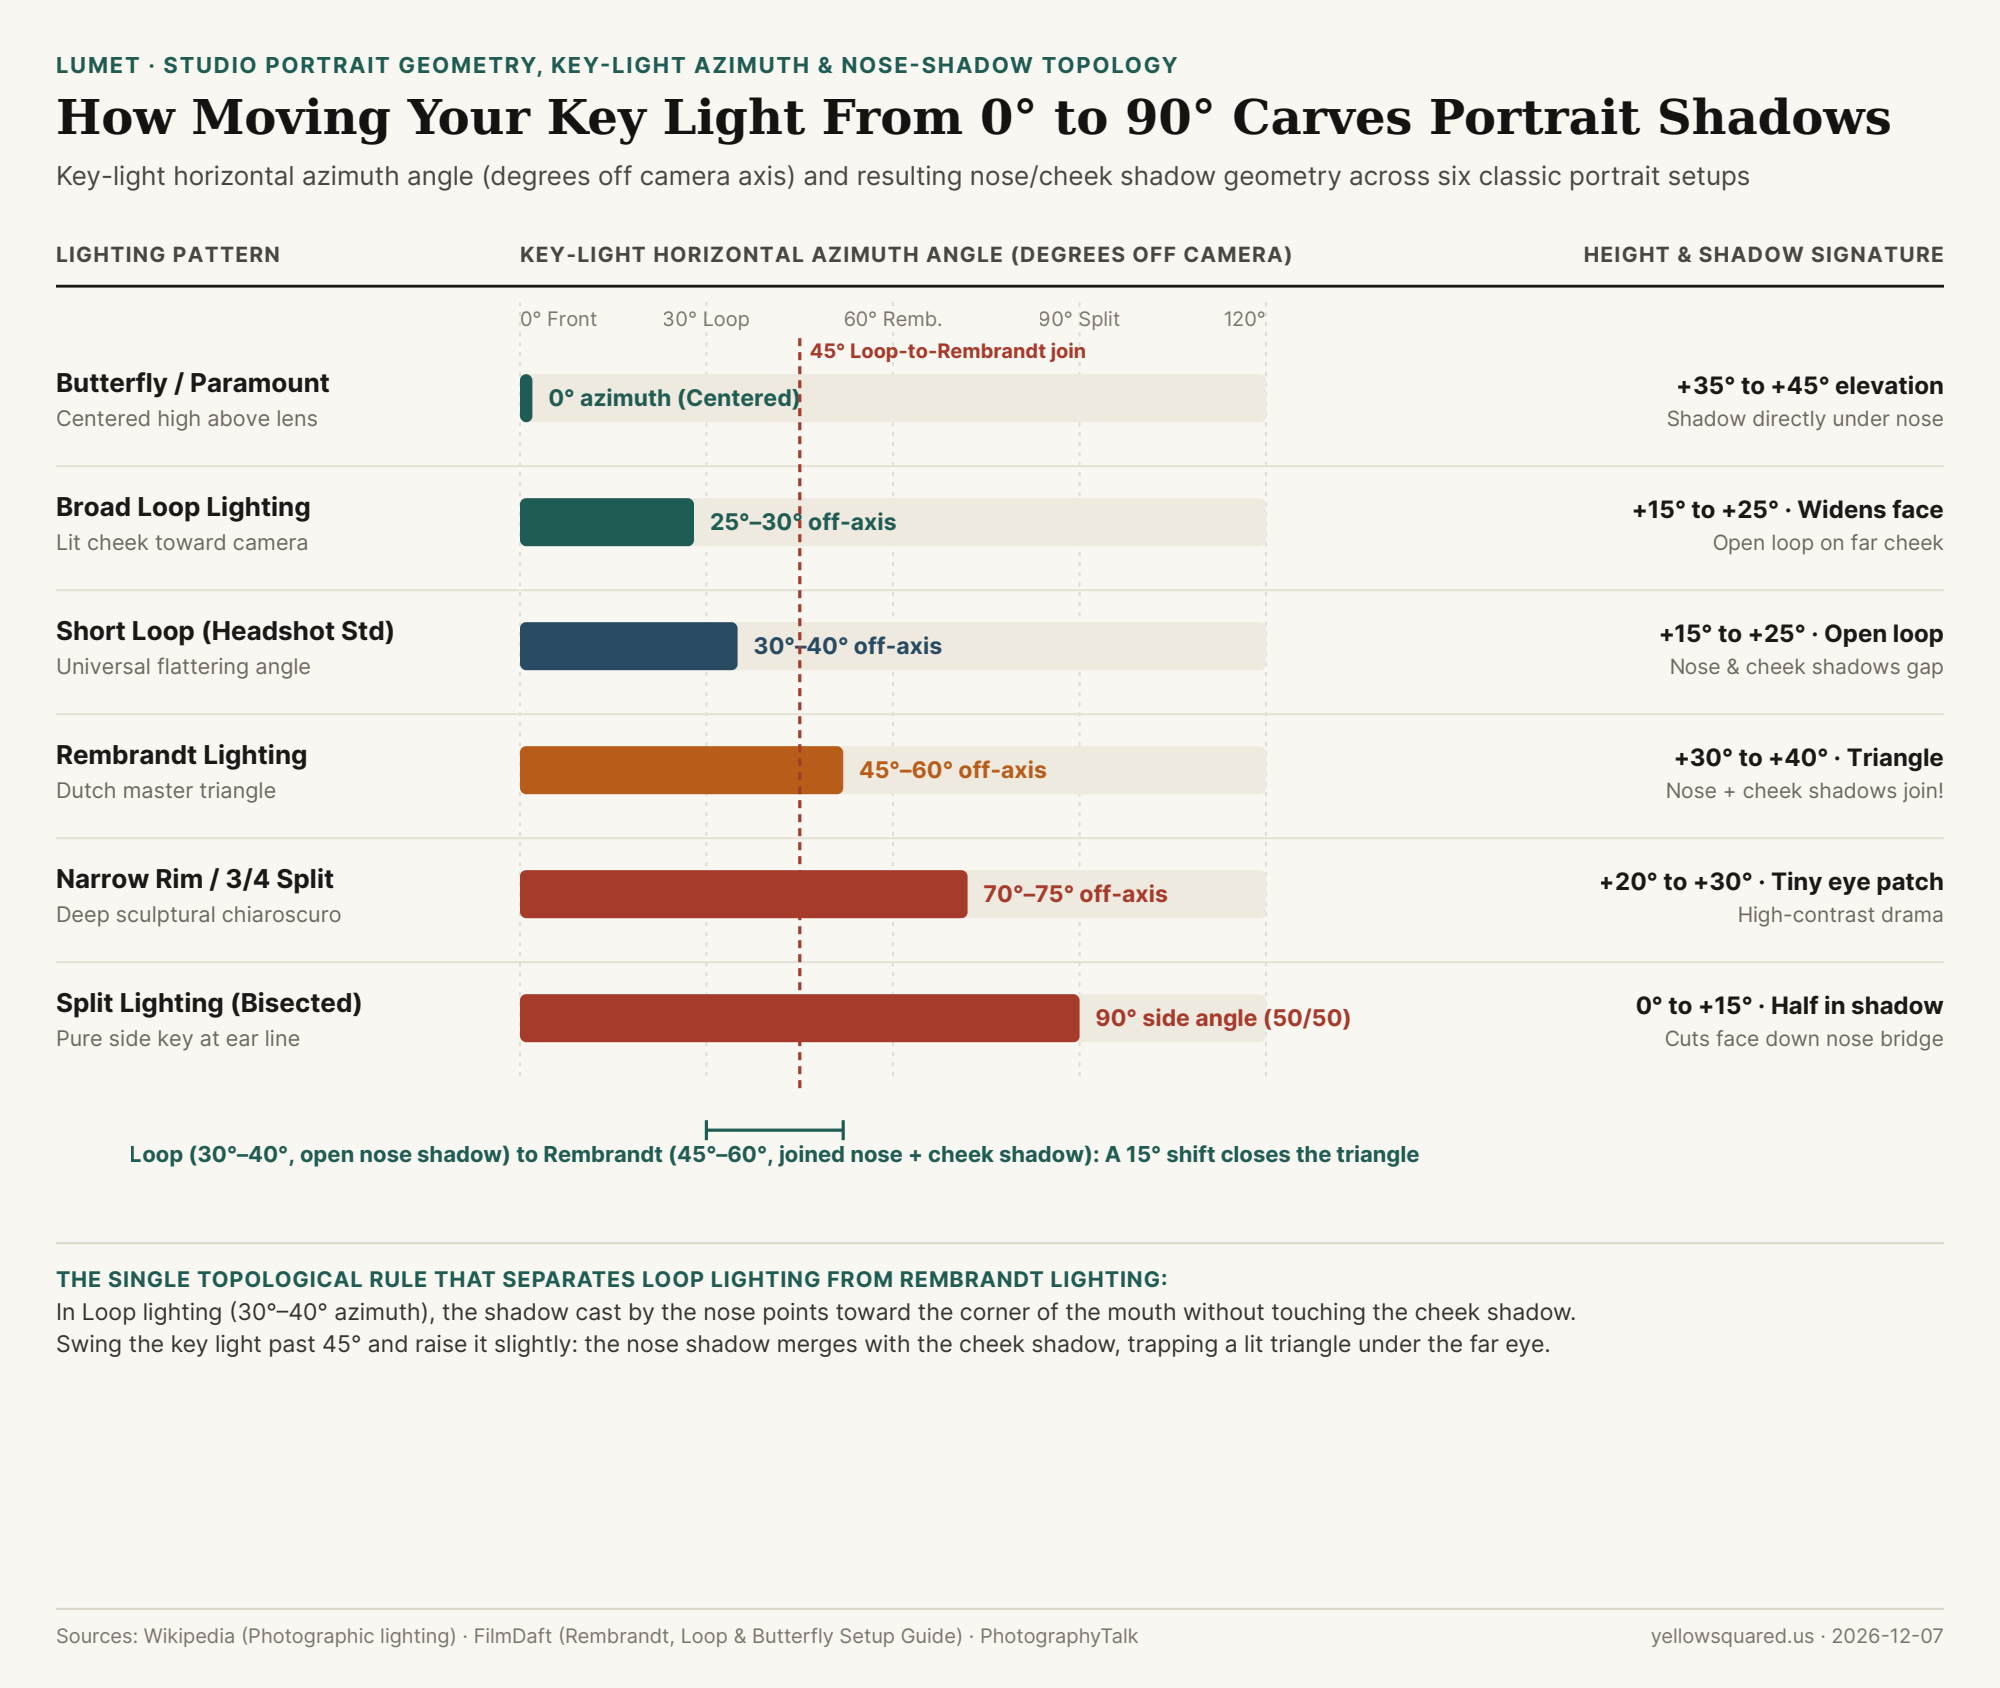
When you position a key light slightly above eye level (+15° to +45° elevation) so shadows fall naturally downward, rotating the lamp horizontally around the subject's face (azimuth angle) drives a predictable topological transition (Rembrandt vs. Loop and Split lighting):
Butterfly / Paramount Lighting (0° Azimuth, +35° to +45° Elevation — ~88% Lit Face): Positioned directly in line with the camera lens and raised high above the brow, the key light casts a symmetrical, butterfly-shaped shadow directly beneath the nose while carving out dramatic hollows under both cheekbones and the chin. Pioneered by Paramount Pictures in the 1930s for stars like Marlene Dietrich, Butterfly lighting glorifies prominent cheekbones (and converts into Clamshell lighting when a silver reflector or secondary screen fill is placed below the chin).
Loop Lighting (25° to 40° Azimuth, +15° to +25° Elevation — ~68%–78% Lit Face): Move the key light 30° to 40° to one side of the camera and lower it slightly toward eye level. The nose now casts a small, rounded shadow loop diagonally down onto the shadow cheek pointing toward the corner of the mouth. Crucially, in Loop lighting, the nose shadow and the cheek shadow never touch—an open channel of light flows down the shadow cheek. Because it sculpts facial depth without heavy shadow blocks, Loop lighting is the universal default for corporate headshots, interviews, and daily video calls.
Rembrandt Lighting (45° to 60° Azimuth, +30° to +40° Elevation — ~58% Lit Face): Swing the key light wider past 45° (up to 60°) and raise it slightly. Suddenly, the lengthening shadow of the nose bridges the gap and merges with the shadow on the far side of the cheek, trapping an illuminated inverted triangle of light directly beneath the shadow-side eye. Named after Dutch Golden Age painter Rembrandt van Rijn (and coined on Hollywood sets by director Cecil B. DeMille in 1915), a proper Rembrandt triangle should be no wider than the eye above it and no longer than the nose—and you must ensure the key light still places a specular catchlight inside the shadow-side eye so it doesn't look lifeless.
Split Lighting (90° Azimuth, 0° to +15° Elevation — 50% Lit Face): Place the key light at a full 90° right angle beside the subject's ear at face height. The light bisects the face straight down the bridge of the nose, leaving one half 100% illuminated and the opposite half in shadow.
"The difference between flattering Loop lighting and dramatic Rembrandt lighting is a 15-degree horizontal shift: the instant the shadow of the nose touches the shadow of the cheek, the open loop closes into the Rembrandt triangle."
Short Lighting vs. Broad Lighting: Which Side of the Face Should Face the Camera?
Whenever your key light is angled off-axis (Loop or Rembrandt), turning the subject's head slightly creates two distinct variations (PhotographyTalk):
Short Lighting (Slimming & Sculptural — Recommended for 90% of Portraits): The subject turns slightly toward the key light, so the narrower ("short") shadow side of the face is turned toward the camera. Placing the wider cheek in shadow visually slims round or wide faces and adds immediate three-dimensional contour.
Broad Lighting (Widening): The subject turns slightly away from the key light, so the fully illuminated ("broad") side of the face is closest to the camera lens—useful when photographing someone with a very narrow face who wants fuller facial volume.
Lighting Pattern
Horizontal Azimuth
Vertical Elevation
Lit Face Share
Nose & Cheek Shadow Topology
Best Portrait & Video Application
Butterfly (Paramount)
0° (On-axis)
+35° to +45°
~88%
Symmetrical shadow directly under nose
Fashion glamour & high-cheekbone portraits
Broad Loop
25°–30°
+15° to +25°
~78%
Open nose loop; lit cheek faces camera
Adds fullness to very slim or narrow faces
Short Loop (Default)
30°–40°
+15° to +25°
~68%
Open nose loop; gap before cheek shadow
Universal headshot, interview & webcam standard
Rembrandt Lighting
45°–60°
+30° to +40°
~58%
Nose + cheek shadows join; lit eye triangle
Dramatic editorial, cinema & character portraits
3/4 Chiaroscuro
70°–75°
+20° to +30°
~53%
Tiny sliver of light on far cheekbone
Low-key theatrical & moody portrait studies
Split Lighting
90° (Side)
0° to +15°
50%
Bisects face down nasal bridge (50/50)
Bold athletic, musician & film-noir posters
How to Set Up Loop or Rembrandt Lighting at Your Desk
You can test all four patterns right at your desk in 30 seconds: place your phone or monitor light directly above your webcam for Butterfly, slide it 8 inches to the left or right (30°) for flattering Loop lighting, or swing it 16 inches off-center (45°+) until the shadow of your nose meets your cheek shadow to form the Rembrandt triangle. Adjust warm and daylight screen key-light presets in Lumet to dial in your exact portrait angle and color temperature.
004 / 18
What Are Lighting Ratios (2:1, 4:1, and 8:1) in Portrait Photography and Video, and How Do F-Stops Control Contrast?
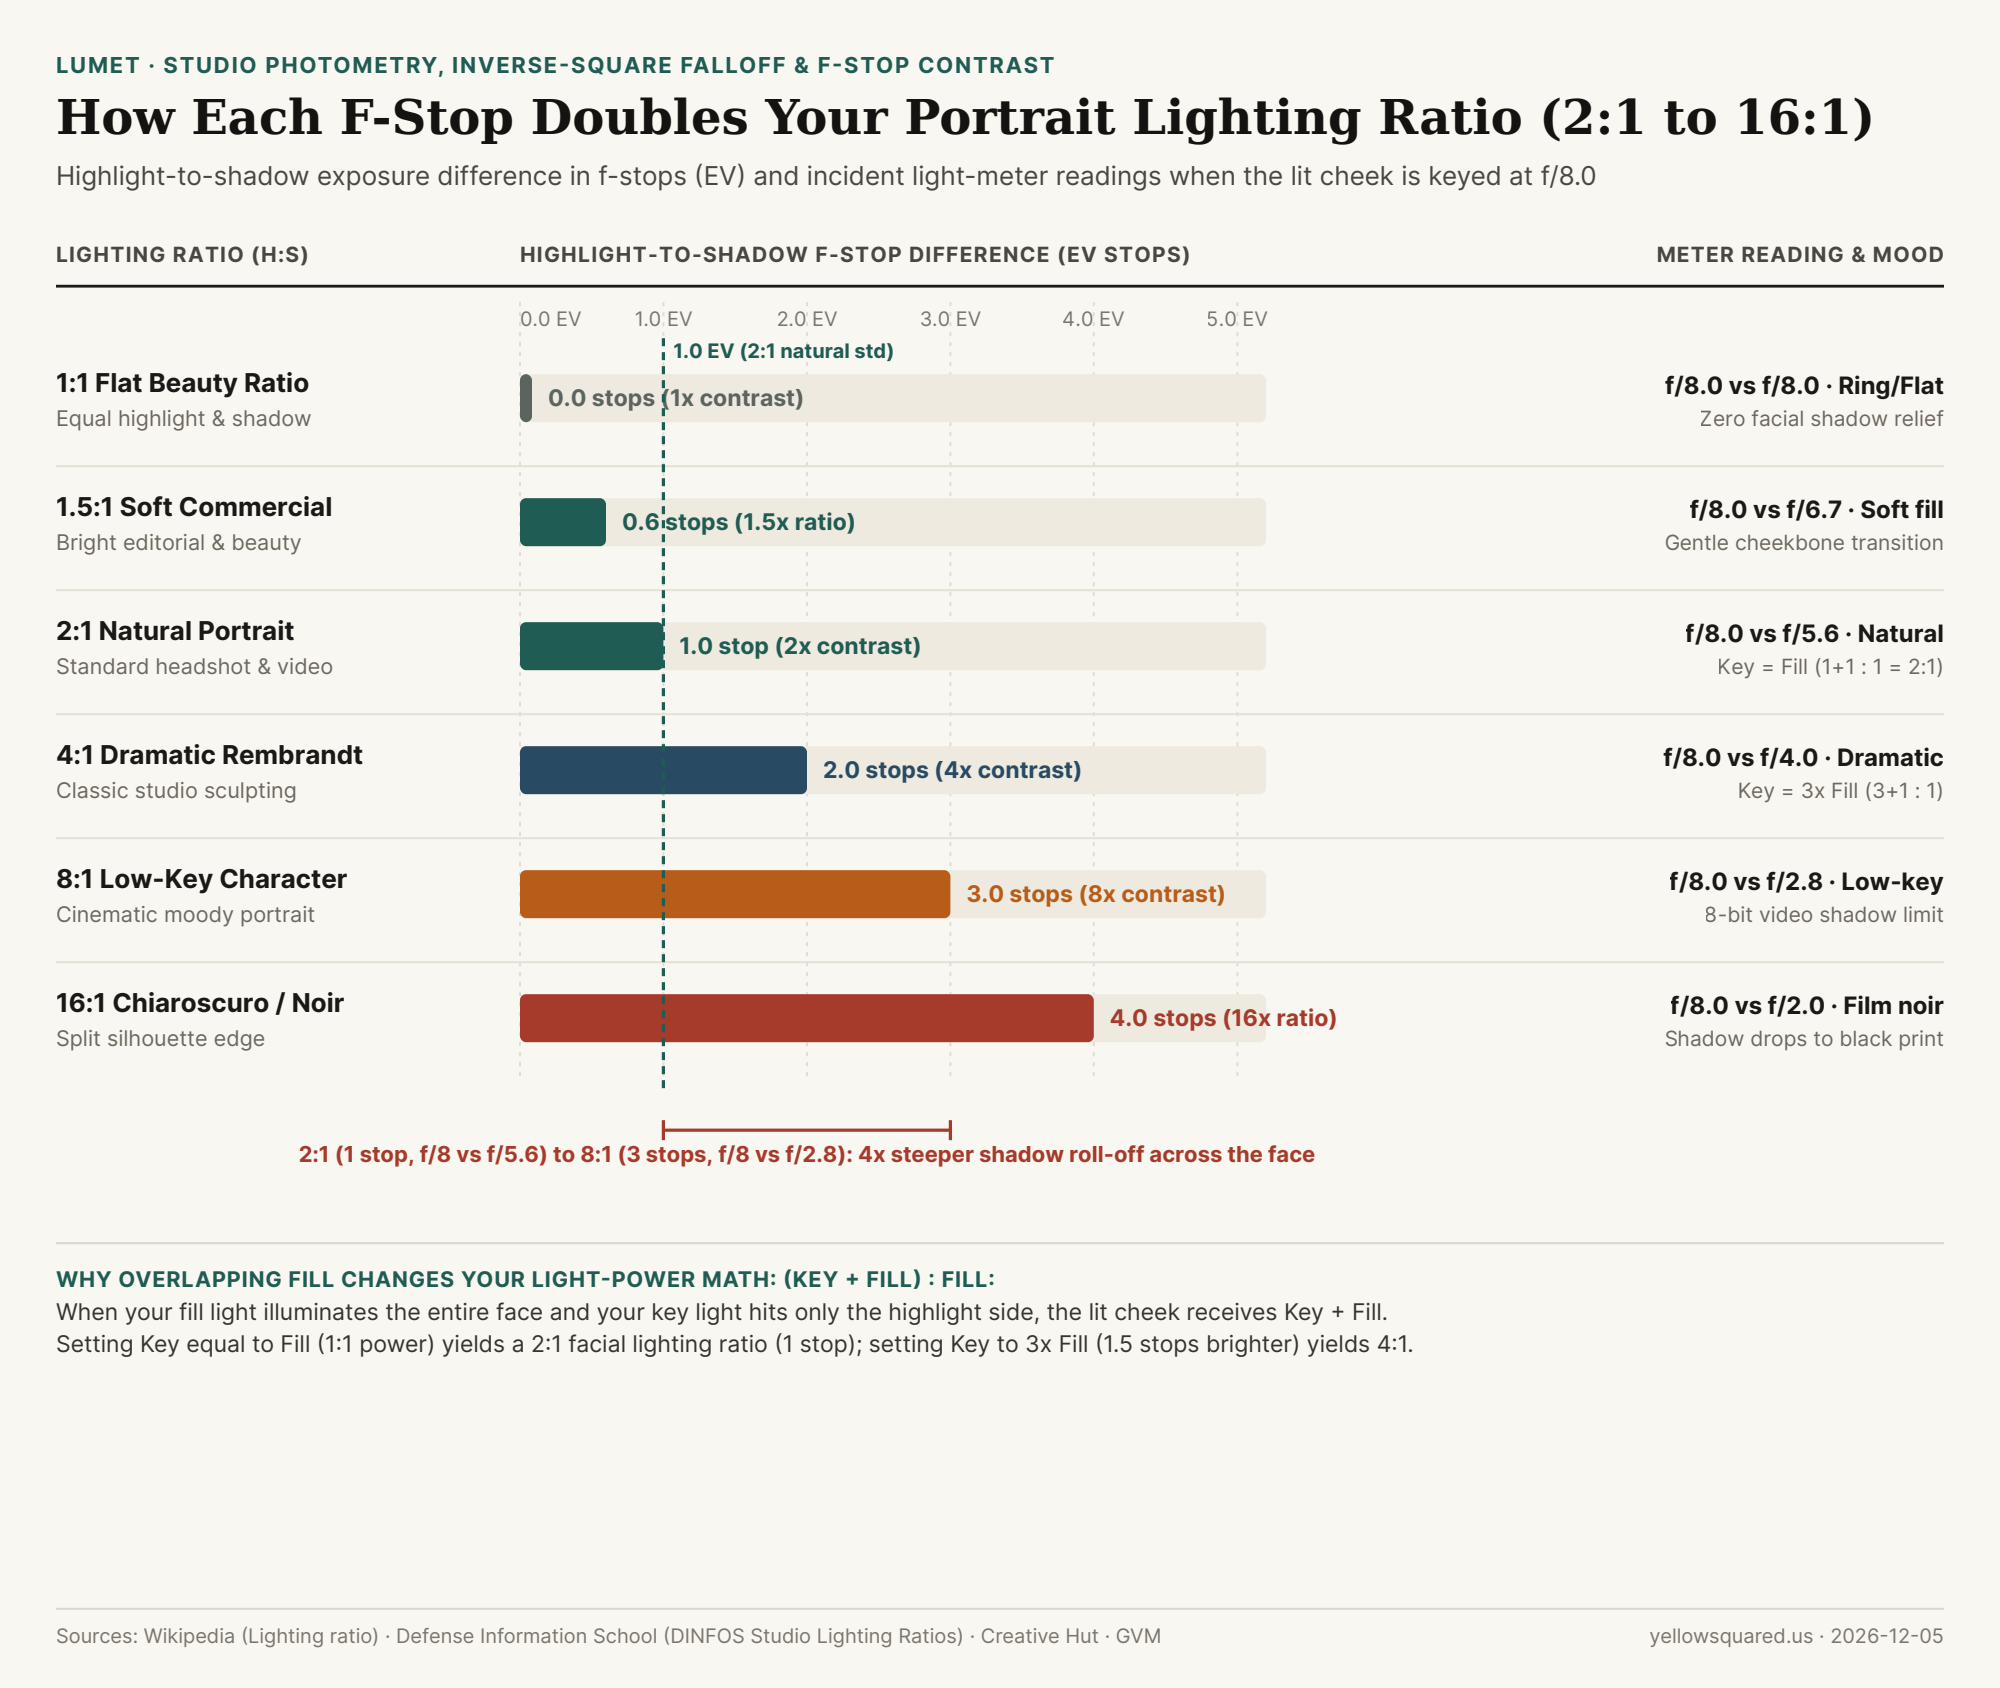
Whether you are setting up a two-light studio portrait, positioning a softbox beside a window, or dialing in a dual-screen monitor fill for a video call, the three-dimensional mood of a human face is governed by a single photometric number: the lighting ratio. As defined in standard cinematography and photography photometry and the Defense Information School (DINFOS) studio lighting curriculum, a portrait's lighting ratio compares total illumination falling on the highlight side of the face (Key + Fill) against the shadow side of the face (Fill alone). Because every 1.0 f-stop (1 EV) step doubles or halves light intensity (2^ΔEV : 1), a simple 1-, 2-, or 3-stop difference between cheeks transforms a portrait from a friendly 2:1 headshot into a dramatic 4:1 Rembrandt portrait or a brooding 8:1 low-key character study.
Why Overlapping Fill Light Changes the Math: (Key + Fill) : Fill
The most common mistake beginners make when setting up a two-light portrait is confusing the lamp power ratio (Key-only : Fill-only) with the facial lighting ratio (Highlight side : Shadow side). As explained in Creative Hut's f-stop lighting ratio guide and GVM's studio lighting reference, when your fill light is placed near the camera axis so that it illuminates both sides of the subject's face equally, and your key light is placed at a 45° angle so it illuminates only the highlight cheek, the two lights add together on the highlight side:
How to Build a 2:1 Ratio (1.0 Stop Difference): If you set your Fill light to 1 unit of illuminance across the whole face and your Key light to 1 unit of illuminance on the lit cheek, the highlight side receives 1 (Key) + 1 (Fill) = 2 units while the shadow side receives 1 unit (Fill)—producing a 2:1 facial lighting ratio (1.0 EV difference, e.g., highlight cheek meters f/8.0 and shadow cheek meters f/5.6).
How to Build a 4:1 Ratio (2.0 Stops Difference): To make the highlight side 4x brighter than the shadow side when Fill wraps across the whole face, the Key light alone only needs to deliver 3 units of light (~1.5 stops brighter than Fill alone), because 3 (Key) + 1 (Fill) = 4 units on the highlight cheek versus 1 unit on the shadow cheek (4:1 total contrast, metering f/8.0 vs. f/4.0).
When You Meter the Cheeks Directly (Shielded Incident Dome): If you hold an incident light meter at each cheek and shield the dome so each side reads total light arriving on that plane independently, the math is pure powers of two: 1 stop = 2:1, 2 stops = 4:1, 3 stops = 8:1, and 4 stops = 16:1.
"A 2:1 lighting ratio—where the shadow cheek sits exactly 1 f-stop below the highlight cheek—is the universal sweet spot for natural portraiture and video: it carves out cheekbone structure without deepening eye bags or skin texture."
Comparing 1:1, 2:1, 4:1, 8:1, and 16:1 on Skin Texture and 8-Bit Video
While a modern full-frame raw sensor captures 12 to 14 stops of dynamic range, compressed 8-bit sRGB web video (such as Zoom, Teams, or standard streaming codecs) and photographic paper prints have a much tighter tonal envelope:
1:1 to 1.5:1 (0.0 to 0.6 Stops — High-Key & Beauty): Zero to half a stop of difference fills every pore and under-eye crease, ideal for cosmetics campaigns and ring-light setups, though 1:1 alone can make round faces appear wider and flatter.
2:1 (1.0 Stop — Natural Headshot & Video Standard): With the shadow side at 50% of highlight luminance (f/8.0 vs. f/5.6), facial planes gain natural three-dimensional depth while preserving clean catchlights and shadow detail in both 8-bit webcams and print.
4:1 (2.0 Stops — Classic Rembrandt & Loop Portraiture): At 25% shadow luminance (f/8.0 vs. f/4.0), the characteristic Rembrandt triangle of light under the shadow-side eye stands out clearly, creating authoritative editorial and character portraits.
8:1 to 16:1 (3.0 to 4.0 Stops — Low-Key & Film Noir): At 3 stops down (8:1, 12.5% shadow luminance) and 4 stops down (16:1, 6.25% luminance), shadows approach the compression noise floor of 8-bit video and drop toward pure black on matte prints unless carefully graded.
Lighting Ratio (H:S)
F-Stop Diff (EV)
Highlight Meter
Shadow Meter
Key : Global Fill Power
Portrait & Video Rendering Character
1:1 (Flat Beauty)
0.0 EV
f/8.0
f/8.0
0:1 (Even wrap)
Shadowless beauty, fashion ring-lights & passport ID
Stark film-noir split light; shadow side silhouettes on print
How to Balance Key and Fill Ratios on Your Desk
If you sit beside a bright side window during daytime video calls, your face often experiences an accidental 8:1 or 16:1 split lighting ratio—blowing out the window-facing cheek while plunging the opposite eye into noisy webcam shadow. Placing a soft screen-based fill light on the shadow side of your monitor lifts the dark cheek by 1 to 2 stops, bringing your webcam contrast back into a flattering 2:1 or 4:1 ratio. Dial in warm and daylight key-light presets in Lumet to balance your desk lighting ratio in seconds.
005 / 18
Why Do Glasses Glare on Video Calls and Portraits, and How Do You Light Someone Wearing Glasses?
Clip a circular ring light around your webcam or mount a speedlight directly on top of your camera hot shoe, and anyone wearing prescription glasses immediately loses their eyes behind two glowing white donuts. Dimming the light does not fix the problem—it merely darkens the speaker's face at the exact same rate as the reflection, leaving the specular hotspot intact.
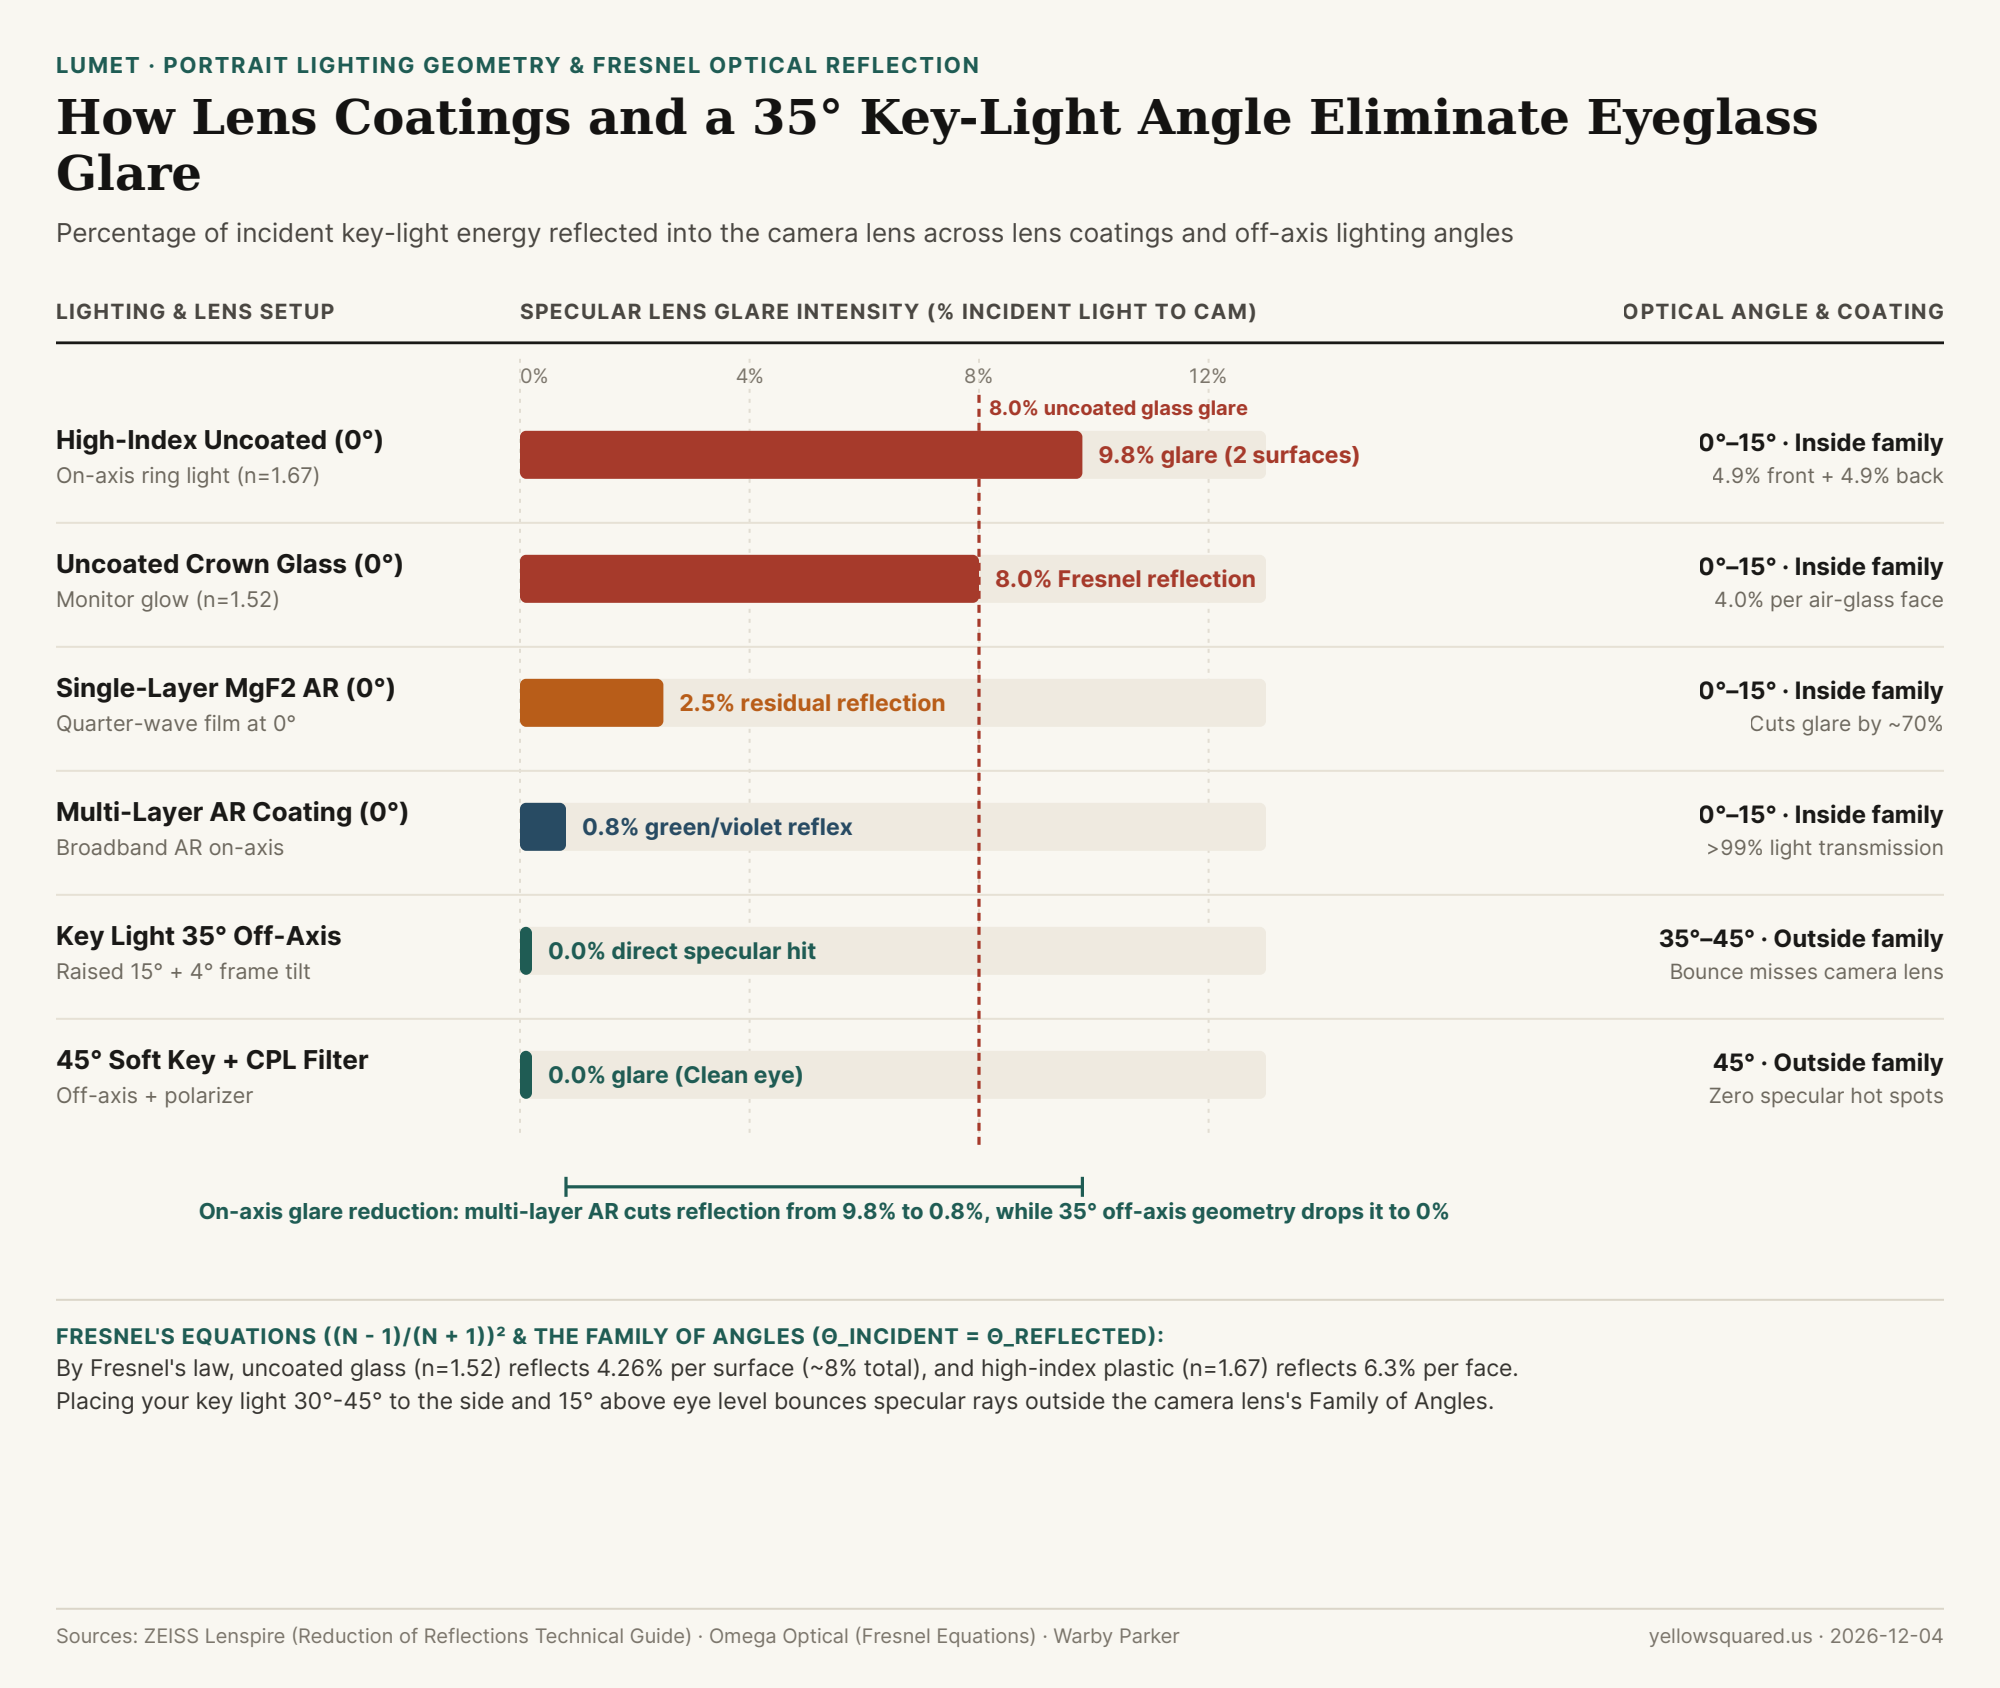
Why do transparent eyeglass lenses behave like mirrors on camera, and why does moving a fill light just twenty inches to the side make the reflection vanish completely? As explained in optical engineering guides on Fresnel's equations at Omega Optical and ZEISS Lenspire's technical monograph on optical reflections, eyeglass glare is governed by two physical laws: Fresnel refractive-index reflection at the air-lens boundary and the geometric Law of Reflection (θ_incident = θ_reflected). When setting up a desk key light or mobile fill screen for a video call or portrait session, you can Dial in warm and daylight key-light presets in Lumet and position the screen outside the lens's specular reflection cone.
Figure 1: Specular reflection intensity (% of incident light bouncing into the camera lens) across lens coatings and key-light angles. Source: ZEISS Lenspire, Omega Optical, and Warby Parker.
Fresnel's Equation: Why Uncoated High-Index Lenses Reflect Nearly 10% of Your Key Light
Whenever a ray of light travels through air (refractive index n_air = 1.00) and strikes a denser transparent medium like glass or polycarbonate (n_lens = 1.50 to 1.74) at normal (0°) incidence, Augustin-Jean Fresnel's equation dictates the exact fraction of light (R) reflected at a single surface:
R = ((n_lens - 1) / (n_lens + 1))²
Because an eyeglass lens has two air-glass boundaries—the front convex surface facing your light and the rear concave surface facing the eye—every beam of light suffers two separate Fresnel reflections:
Uncoated Crown Glass or CR-39 Plastic (n = 1.50–1.52): Each surface reflects ((1.52 - 1) / 2.52)² = 4.26% of incident light, totaling ~8.0% to 8.3% specular reflection across both faces (leaving only ~92% light transmission).
Uncoated High-Index Prescription Lenses (n = 1.67 to 1.74): Strong prescriptions use denser high-index materials to keep lenses thin. However, a higher refractive index (n = 1.67) increases single-surface reflection to ((1.67 - 1) / 2.67)² = 6.3% (and nearly 9.8% to 12% across both surfaces)—making uncoated high-index lenses reflect 50% more glare than standard glass!
Multi-Layer Anti-Reflective (AR) Coatings (<0.8% reflection): As detailed in Warby Parker's optical coating guide and ZEISS's thin-film interference documentation, vacuum-depositing alternating quarter-wavelength layers (λ / 4) of low- and high-index metal oxides creates destructive interference between the top and bottom of the coating, cutting total specular reflection down to 0.5% to 1.0% (usually visible only as a faint emerald-green or violet reflex).
"A ring light mounted around your camera lens guarantees maximum eyeglass glare because its 0-to-10-degree angle of incidence sits dead-center inside the lens's Family of Angles—bouncing 100% of the Fresnel reflection straight back into the camera sensor."
The Family of Angles: How a 35° Lateral Shift + 4° Temple Tilt Clears the Eyes
In studio lighting textbook Light: Science & Magic, the Family of Angles defines the exact cone of positions where a light source produces a direct specular reflection into the camera lens. Because the angle of reflection equals the angle of incidence (θ_i = θ_r), any light placed within 0° to 15° of the camera axis bounces directly back into the lens. To move your light completely outside the Family of Angles without creating harsh nose shadows, apply three small geometric adjustments:
Move the Key Light 30° to 45° Laterally Off-Axis: Slide your key light (or phone fill screen) 30° to 45° to the left or right of the webcam. On a flat lens, a 35° incident ray bounces away at 35° on the opposite side, missing the camera lens entirely. (Note: because nearsighted minus lenses have a concave rear surface and convex front surface, avoid pushing past 45° or the curved edge of the lens may catch the light.)
Raise the Light 15° to 20° Above Eye Level: Raising the light slightly above the subject's eyes bounces the specular ray downward toward the desk or chest rather than horizontally into the camera.
The 4-Degree Temple-Arm Trick (Pantoscopic Tilt): If a curved lens still catches the edge of a large softbox, ask the subject to raise the temple arms of their glasses by just 3 to 5 millimeters on their ears. That imperceptible 4° downward tilt of the lens face redirects the reflected beam 8° lower (2 × 4°), dropping the white square completely off the glasses.
Lighting & Eyeglass Configuration
Lens Index (n)
Light Angle to Camera
Reflected Glare to Camera
Result on Video Call or Portrait
High-Index Uncoated + On-Axis Ring Light
1.67
0° – 10° (On-axis)
~9.8% (Both faces)
Blinding white circle obscures pupils completely
Standard Uncoated Glass + Monitor Glow
1.52
0° – 15° (On-axis)
~8.0% (4.0% × 2)
Bright rectangular screen reflection over eyes
Single-Layer MgF2 AR Coating (On-Axis)
1.52
0° – 15° (On-axis)
~2.5%
Cuts glare by ~70% but leaves visible hotspot
Multi-Layer Broadband AR Coating (On-Axis)
1.60
0° – 15° (On-axis)
~0.8%
Faint green or violet tint; >99% transmission
Key Light at 35° Side + 15° Up + 4° Tilt
Any
35° – 45° (Off-axis)
~0.0% – 0.1%
Specular ray misses camera; clean iris catchlight
45° Soft Key Light + Circular Polarizer
Any
45° (Off-axis)
<0.05%
Zero lens glare with soft facial wrap
How to Set Up Your Desk Fill Light in 30 Seconds
If you wear glasses on daily video calls, dim your primary computer monitor slightly (or switch apps to dark mode so a giant white browser window at 0° does not reflect in your lenses), place your phone or tablet on a stand 35° to the left or right of your webcam and slightly above eye level, and Dial in warm and daylight key-light presets in Lumet to illuminate your face cleanly with zero eyeglass glare.
006 / 18
What Is Color Temperature (Kelvin) in Lighting? Why 2700K Bulbs Look Warm Orange While 5600K Daylight Looks Cool Blue
Walk down the lighting aisle at a hardware store or dial in a bi-color LED studio panel, and the numbers feel backward at first glance: a cozy, amber-orange living-room bulb is labeled with a low temperature (2700K), whereas a crisp, icy-blue overcast sky or hospital fluorescent tube is rated at a high temperature (6500K). Why do photographers call 2700K "warm" and 6500K "cool" when the Kelvin thermometer says the exact opposite? The answer lies in the collision between nineteenth-century psychological color theory and twentieth-century Planckian blackbody radiation physics—and understanding how Kelvin converts into micro-reciprocal degrees (mireds) is the key to matching mixed lights and choosing CTO / CTB gels on set.
Reader outcome: You will understand why heating an ideal blackbody radiator shifts light from red-orange (1850K) to blue-white (6500K+), why a 200K white-balance tweak looks 3.5 times stronger at 2800K than at 5600K, and how to use the mired formula (M = 1,000,000 / K) to pick exact Full, 1/2, or 1/4 CTO and CTB gels.
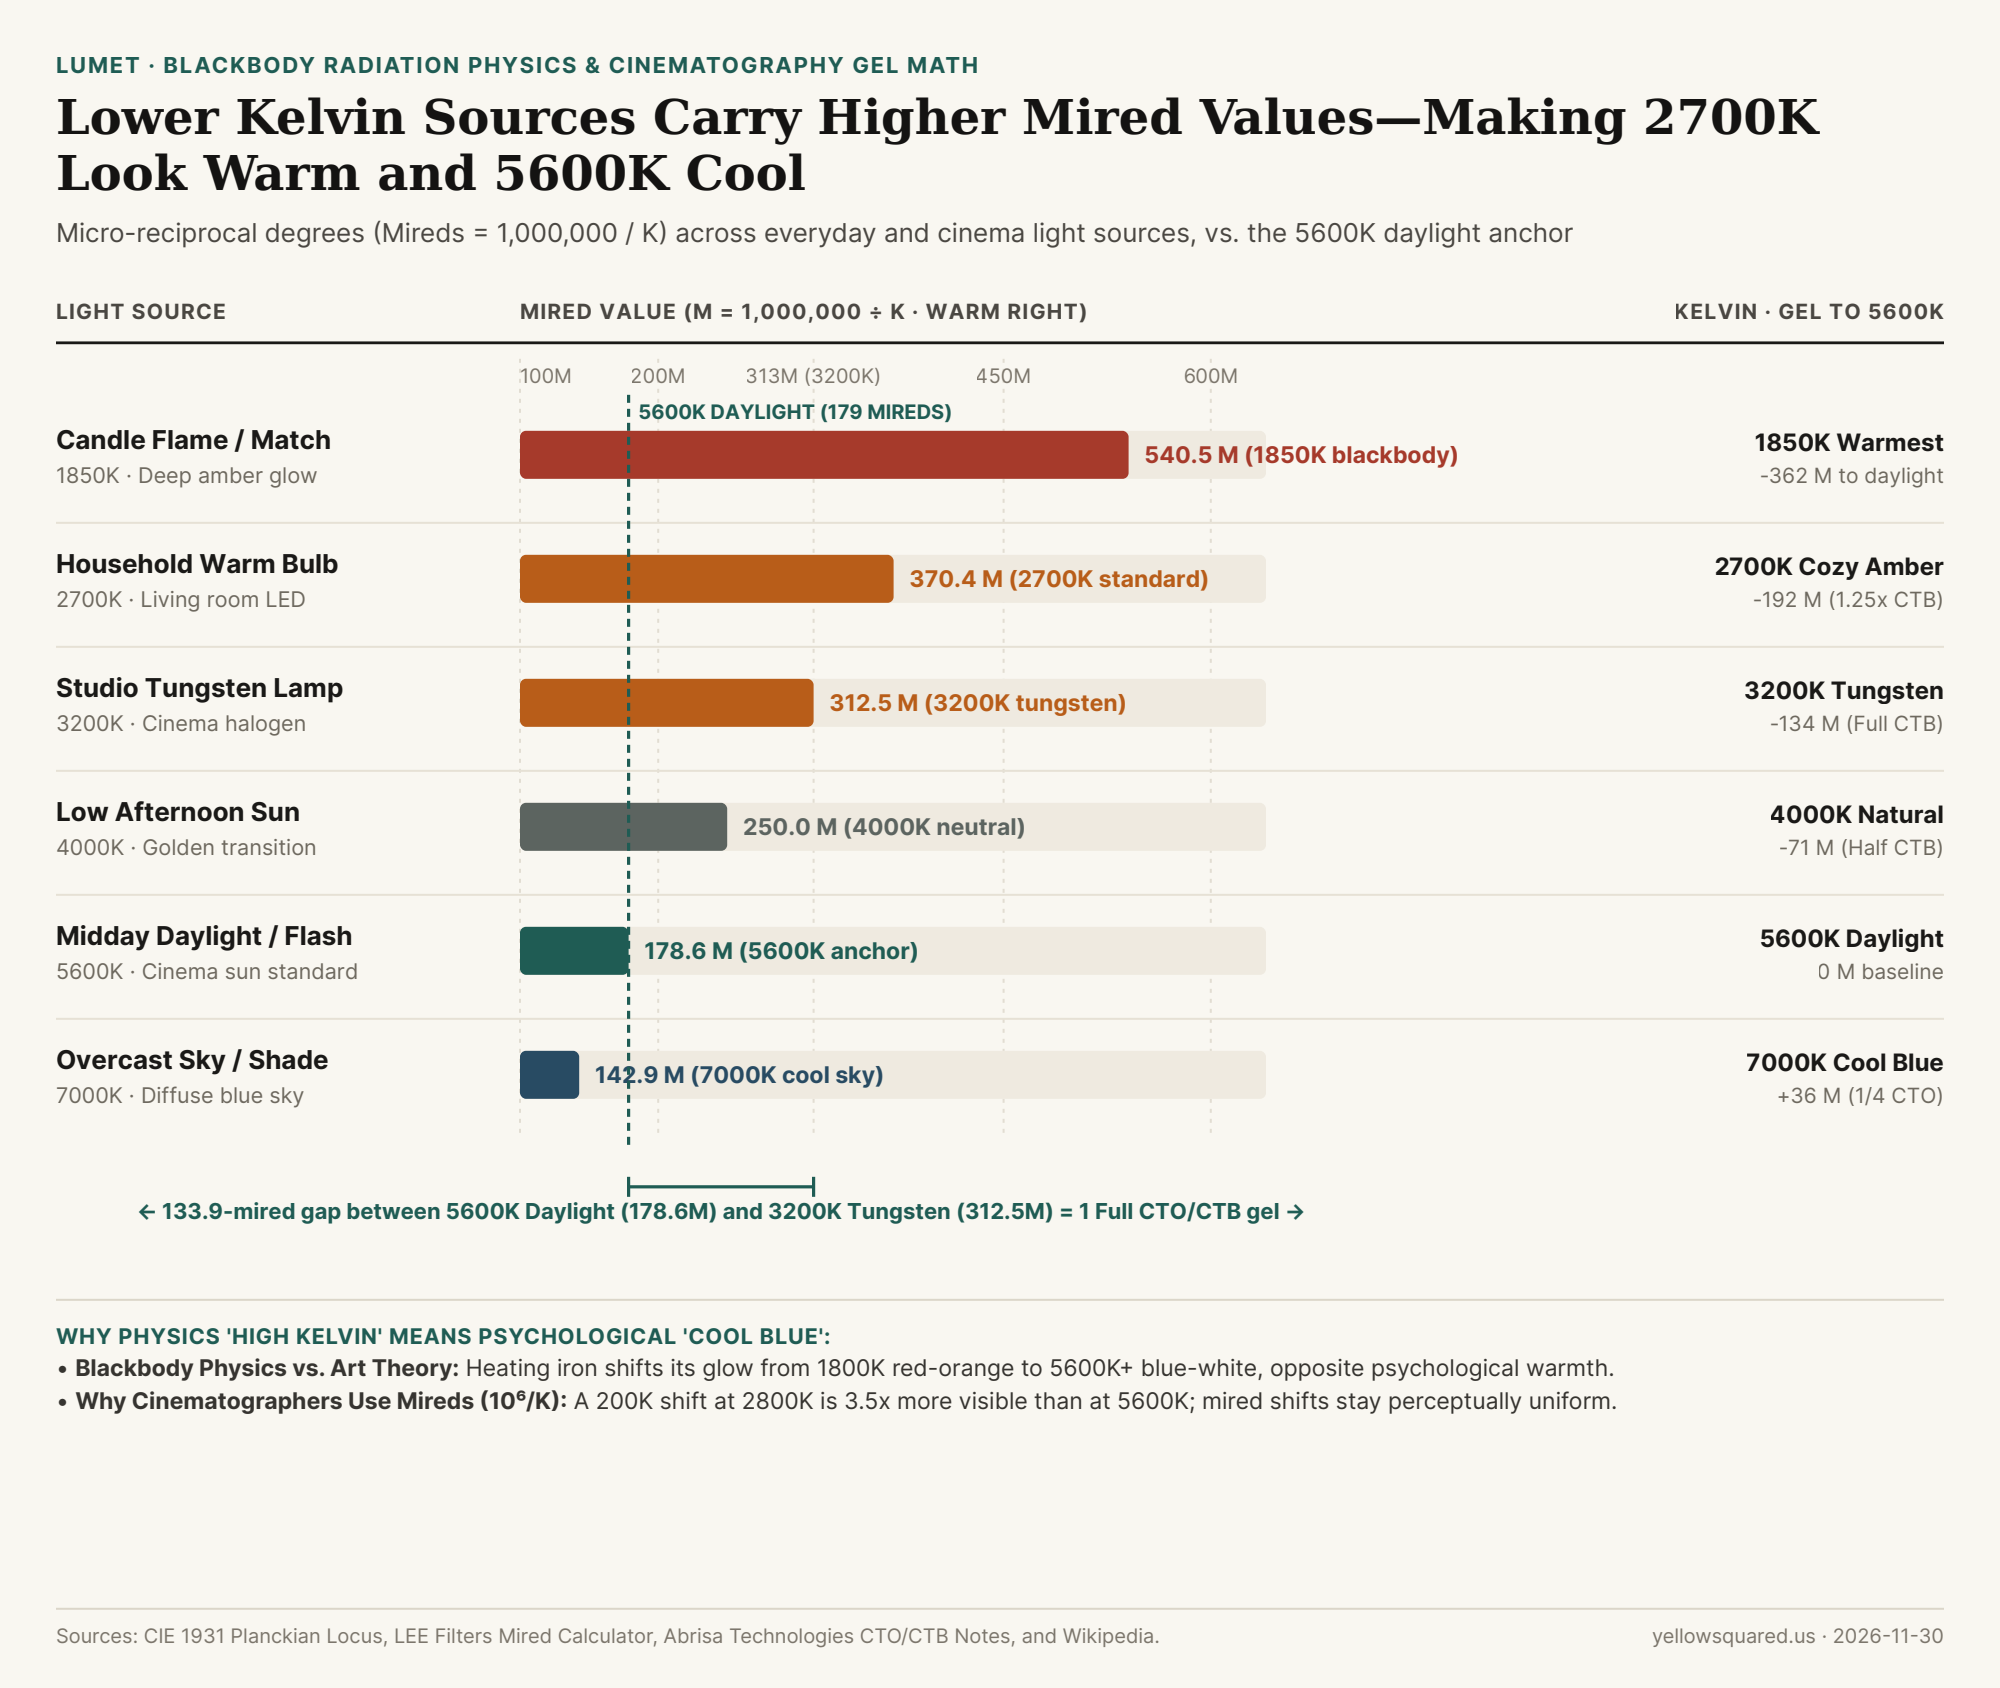
When plotted in Mireds (1,000,000 ÷ Kelvin), perceptual color warmth increases linearly from left to right: converting 5600K daylight (178.6 M) to 3200K tungsten (312.5 M) requires an exact +133.9 mired shift (1 Full CTO gel). Data: Download CSV dataset.
Why 'Higher Kelvin' Means 'Cooler Blue': Blackbody Physics vs. Psychological Warmth
In everyday life and visual art, we associate yellow, orange, and red with fire, embers, and sunlight ("warm colors"), and we associate cyan and blue with water, ice, and shade ("cool colors")—a perceptual link known in environmental psychology as the hue-heat hypothesis. In physics, however, color temperature measures the literal thermodynamic temperature in kelvins (K = °C + 273.15) of an idealized opaque, non-reflective object—a Planckian black-body radiator—heated until it incandesces.
Imagine heating a cast-iron poker in a forge. Governed by Planck's radiation law and Wien's displacement law (λ_peak = 2,898,000 nm·K / T), the peak wavelength of emitted electromagnetic radiation shifts toward shorter, higher-energy wavelengths as physical temperature rises:
1850K (Candle Flame) & 2700K (Incandescent Filament): At 1850K–2700K, the blackbody's spectral peak sits deep in the near-infrared (1,566 nm to 1,073 nm). Within the human visible spectrum (380–700 nm), the curve slopes steeply upward toward red and orange while emitting almost zero blue photons—producing a warm golden-amber glow.
3200K (Cinema Tungsten Halogen): Heating a quartz-halogen tungsten filament just below tungsten's melting point (3695K) shifts the curve toward amber-white, establishing the classic indoor motion-picture tungsten standard.
5600K (Midday Sun) to 7000K+ (Overcast Sky / Shade): The sun's photosphere has an effective temperature near 5778K (filtered through Earth's atmosphere to ~5500K–5600K at midday, peaking near 518 nm green-cyan with balanced red, green, and blue energy). When direct sunlight is blocked by clouds or open shade, Rayleigh scattering fills the sky with short-wavelength blue photons, pushing correlated color temperature (CCT) to 6500K–8000K.
A 2700K bulb is physically cooler than a 5600K strobe—just as a dull orange ember is cooler than a white-hot welding arc—even though our eyes read orange light as psychologically warm.
Why Kelvin Steps Are Uneven—And How the Mired Scale (1,000,000 / K) Fixes It
If you adjust your camera's white balance by +200K from 2800K to 3000K, you see a dramatic shift in skin tones; if you adjust it by the same +200K from 5600K to 5800K, the change is barely perceptible. That happens because human color perception responds to the reciprocal of temperature (1/T) rather than linear kelvins. In 1933, physicist Irwin G. Priest introduced the mired (micro-reciprocal degree):
Mired (M) = 1,000,000 ÷ Color Temperature (K)
In mireds, a step of 20 mireds produces the exact same perceptual color shift at the warm end of the spectrum as it does at the cool end. Better yet, optical lighting gels from LEE Filters and Rosco—specifically CTO (Color Temperature Orange) and CTB (Color Temperature Blue)—are engineered to add or subtract a fixed number of mireds regardless of the fixture behind them:
How to Balance Mixed Window Daylight and Indoor Lamps on Location
Suppose you are shooting an interview in a living room lit by 2700K practical table lamps (370.4 mireds) while 5600K daylight (178.6 mireds) pours through a side window. If you leave your key light at 5600K and set your camera white balance to 5600K, the background lamps will render deep orange; if you set your camera to 3200K, the window light turns radioactive Smurf blue. Using mired math, clipping a 1/2 CTO gel (+81 mireds) or dialing your bi-color key light to 3800K–4000K (250–263 mireds) splits the mired difference right down the middle—keeping skin tones natural while letting the practical lamp look gently warm (+110 mireds) and the window look gently cool (-71 mireds). Also watch the perpendicular axis to the Planckian locus—Tint (Green/Magenta, Δuv)—where cheap fluorescent or warehouse LEDs require 1/4 or 1/2 Minus Green gel. To read ambient lux, exposure values, and scene lighting ratios directly on your phone before setting up stands, Measure ambient and studio lighting in Lumet.
007 / 18
Why Do LED Lights Flicker or Band on Camera? PWM Dimming, 100 Hz/120 Hz Power Grids, and Safe Shutter Speeds
You set up a home studio or sit down at your desk for a video call, turn on your overhead LED lights or a dimmable ring light, and look around the room: to your naked eyes, the illumination is rock-steady. Then you open your webcam or mirrorless camera preview, and ugly dark horizontal bars begin marching up or down your face—or every third frame pulses between bright and dim. Your camera sensor is not broken. As detailed in technical production testing by MediaGear, VShow Lighting, Maxima LED, and ENTTEC, camera banding happens when a CMOS electronic rolling shutter samples an LED light source that is turning on and off at 100 Hz, 120 Hz, or 200–1,000 Hz—fast enough to fool the human brain, but slow enough to catch different rows of your camera sensor in the dark.
Why do LEDs flicker at exactly twice your wall-outlet power frequency, why does dimming an LED light from 100% down to 40% suddenly trigger sharp zebra stripes, and what exact shutter speeds eliminate banding in North America (60 Hz) versus Europe, the UK, and Australia (50 Hz)? Here is the complete electrical and optical guide.
1. Why Your Eyes Don't See It: Critical Flicker Fusion vs. CMOS Rolling Shutters
Unlike an old tungsten incandescent filament—which stays white-hot and continues glowing through the brief zero-voltage crossings of alternating current (AC) thanks to thermal inertia—a light-emitting diode (LED) is a semiconductor junction with virtually zero persistence: the instant current drops, photon emission stops within nanoseconds (ENTTEC).
The Human Eye Ceiling (~60 Hz to 90 Hz): Human retinal photoreceptors and visual cortex integrate light over a window of roughly 11 to 16 milliseconds. Once a light source flashes faster than the Critical Flicker Fusion (CFF) threshold of 60 to 90 Hz, your brain blends the on-off pulses into a continuous, steady glow.
How a Camera's Rolling ShutterSlices Time into Stripes: Almost every consumer webcam, smartphone, and mirrorless camera uses a CMOS rolling shutter (VShow Lighting; Photo-Spectrum readout tests). Instead of exposing the entire sensor at the exact same microsecond (like a global shutter), the camera reads out horizontal rows of pixels sequentially from the top of the frame to the bottom over 8 to 30 milliseconds. If the LED light turns off while rows 400 through 700 are finishing their exposure, those rows receive less light—printing a dark horizontal band across the image!
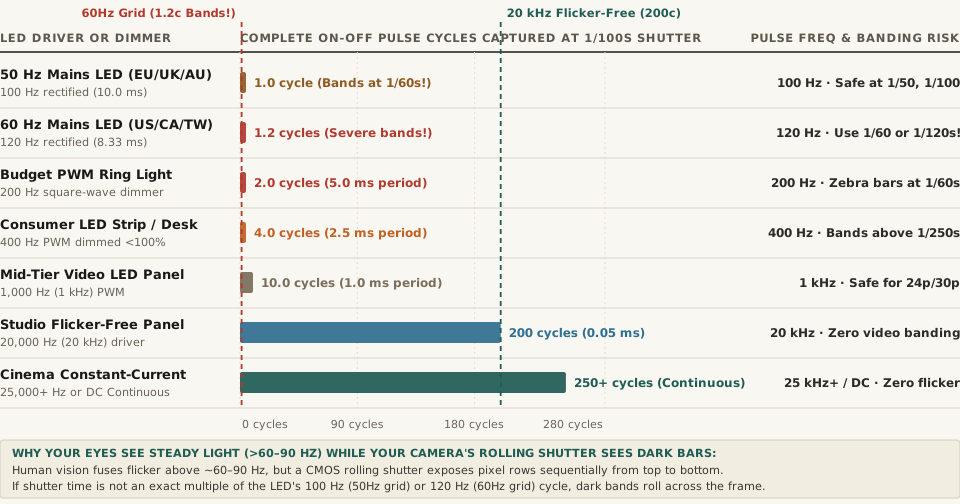
Figure 1: Complete LED on-off cycles integrated during a 1/100 s exposure across seven driver architectures (MediaGear; VShow Lighting; Maxima LED).
2. The Two Electrical Sources of Flicker: 100/120 Hz Mains Ripple vs. PWM Dimming
When you see banding on camera, the flicker comes from one of two electrical mechanisms inside the lamp's driver (Swing Catalyst; VShow Lighting):
100 Hz and 120 Hz AC Mains Rectified Ripple (Non-Dimmed Bulbs): Wall outlets deliver alternating current that reverses polarity 50 times per second (50 Hz in Europe, the UK, Australia, New Zealand, China, and eastern Japan) or 60 times per second (60 Hz in the United States, Canada, Mexico, Taiwan, South Korea, and western Japan). Inside a budget LED bulb, a bridge rectifier flips the negative half-wave into a positive half-wave, doubling the ripple frequency to 2 × 50 = 100 Hz (one pulse every 10.0 ms) or 2 × 60 = 120 Hz (one pulse every 8.33 ms). Without heavy smoothing capacitors, the bulb's brightness rises and falls 100 or 120 times every second.
Pulse-Width Modulation (PWM) Dimming (Ring Lights, LED Strips & Screens Below 100%): How do dimmable LED strips, budget video panels, and monitors lower their brightness without shifting color temperature? Instead of smoothly lowering the DC current (Constant-Current / Analog Dimming), cheap drivers use Pulse-Width Modulation (PWM) (Divoom; OPLED): at 100% brightness the LED stays on continuously, but at 50% brightness the driver switches the LED 100% ON for half the cycle and 100% OFF for the other half at a fixed frequency (often 200 Hz to 1,000 Hz). Because the "off" trough drops to zero photons, PWM dimming produces razor-sharp black-and-white zebra bands on fast shutter speeds!
"If the shutter stays open for a whole number of flicker cycles, every frame collects the same amount of light. In 50 Hz regions, Sony recommends a shutter speed of 1/50 s or 1/100 s. In 60 Hz regions it recommends 1/60 s or 1/120 s."
3. How to Fix LED Flicker Immediately: The Whole-Cycle Shutter Math
Why does changing your camera's shutter speed make rolling bands vanish on the spot? Regardless of which microsecond a sensor row starts its exposure, if the exposure duration (t) equals an exact integer multiple of the light's pulse period (T = 1 / f), every single row integrates the exact same number of bright peaks and dark troughs (MediaGear):
In 60 Hz Regions (US, Canada, Taiwan — 120 Hz Light Pulse, 8.33 ms Period):
Safe Shutter Speeds:1/120 s (captures exactly 1.0 full pulse cycle), 1/60 s (2.0 full cycles), 1/40 s (3.0 cycles), or 1/30 s (4.0 cycles).
Why 1/100 s or 1/50 s Bands in the US: At 1/100 s (10.0 ms), a 120 Hz US bulb completes 1.20 cycles—meaning some sensor rows catch an extra 0.20 peak while others catch an extra trough!
In 50 Hz Regions (Europe, UK, Australia — 100 Hz Light Pulse, 10.0 ms Period):
Safe Shutter Speeds:1/100 s (captures exactly 1.0 full cycle), 1/50 s (2.0 full cycles), or 1/25 s (4.0 cycles).
Shooting 24p Cinema in a 50 Hz Country: The classic 180-degree shutter rule at 24 fps sets shutter speed to 1/48 s (20.83 ms), which captures 2.083 cycles of a 100 Hz European light and causes slow pulsing flicker. Adjusting shutter speed to 1/50 s (a 172.8° shutter angle at 24p, per Blackmagic Design & MediaGear's 50 Hz table) locks onto exactly 2.0 cycles and eliminates the flicker.
Crank PWM Lights to 100% Brightness (or Use 20–25 kHz+ Fixtures): If a dimmable desk lamp or background LED strip still bands at 1/60 s or 1/120 s, turn its dimmer up to 100% full power (where the PWM duty cycle reaches 100% continuous DC) and diffuse or move the light physically farther away (Divoom). Professional cinema fixtures eliminate PWM banding by running constant-current drivers or ultrasonic PWM above 20,000 to 25,000 Hz (Maxima LED).
4. Complete Data Table: LED Flicker Frequencies & Safe Camera Shutter Speeds
The reproducible table below—matching the companion CSV (led-flicker-on-camera-100hz-120hz-pwm-frequencies-and-safe-shutter-speeds.csv)—lists the pulse periods, cycles per 1/100 s exposure, and safe shutter speeds across seven lighting tiers:
Lighting or Dimmer Type
Pulse Frequency
Pulse Period (T)
Cycles in 1/100 s
Safe Flicker-Free Shutter Speeds
Rolling Shutter Behavior
50 Hz Mains LED (EU/UK/AU)
100 Hz (2×50 Hz)
10.00 ms
1.00 cycle
1/100 s, 1/50 s, 1/25 s (172.8° at 24p)
Bands if camera is left on NTSC 1/60 s or 1/120 s
60 Hz Mains LED (US/CA/TW)
120 Hz (2×60 Hz)
8.33 ms
1.20 cycles
1/120 s, 1/60 s, 1/40 s, 1/30 s
Severe rolling bars if shot at PAL 1/50 s or 1/100 s
Budget PWM Ring Light
200 Hz PWM
5.00 ms
2.00 cycles
1/200 s, 1/100 s, 1/50 s (or 100% power)
Sharp black zebra stripes when dimmed below 100%
Consumer LED Strip / Display
400 Hz PWM
2.50 ms
4.00 cycles
1/400 s, 1/200 s, 1/100 s, 1/50 s
Visible banding on still photos above 1/250 s
Mid-Tier Bi-Color Panel
1,000 Hz (1 kHz)
1.00 ms
10.0 cycles
Clean up to ~1/250 s; avoid 1/1000 s+
Safe for 24p/30p webcams; bands in slow-mo video
Studio Flicker-Free Panel
20,000 Hz (20 kHz)
0.05 ms
200.0 cycles
All standard photo & video shutter speeds
200 cycles average out completely per exposure
Cinema Constant-Current / 25 kHz+
25,000+ Hz or DC
≤ 0.04 ms
250+ cycles
Flicker-free at any shutter speed (up to 1/8000 s)
Zero ripple for high-fps & silent electronic shutters
If your desk lamp or ring light causes rolling bands on your webcam whenever you dim it, Calibrate video call lighting in Lumet to use your monitor's high-frequency display backlight as a flicker-free, color-accurate key light.
008 / 18
What Is CRI vs. TLCI in LED Lights—And Why Do Cheap Bulbs Make Skin Look Pale or Green?
Walk down the lighting aisle at any hardware store—or browse budget ring lights online—and nearly every box boasts "High CRI 80+" or "90+ CRI Daylight." Yet the moment you turn on a standard household LED bulb over your desk and open a video call or mirrorless camera, your face looks waxy, pale, or faintly greenish-yellow. Why does a light source that passes an 80-point or 90-point color accuracy test make human skin look unwell? As documented in the International Commission on Illumination (CIE) Color Rendering Index specification and technical photometry analyses by UPRtek, CameraStuff, and Light Sky, the answer lies in a 50-year-old mathematical shortcut: standard headline CRI (Ra) averages only the first eight pastel test patches (R1 through R8) and completely excludes R9 (strong saturated red).
Here is how the CRI (Ra) formula works, why cheap blue-pump white LEDs deliberately sacrifice 620–680 nm red wavelengths to boost lumens-per-watt efficiency, and why cinematographers and lighting engineers rely on Extended R9, TLCI (Television Lighting Consistency Index), and IES TM-30 instead.
1. How CIE CRI (Ra) Works—And Why It Ignores R9 through R14
Introduced by the International Commission on Illumination (CIE) and refined into its modern form in 1974, the Color Rendering Index (CRI) measures how faithfully a test light source renders surface colors compared to an ideal reference illuminant of the exact same Correlated Color Temperature (CCT):
The Reference Illuminant Split at 5,000 K: As specified in the CIE CRI method, if a lamp's correlated color temperature is under 5,000 K (such as 2700K warm household tungsten or 3200K studio halogen), its spectrum is compared against an ideal Planckian black-body radiator. If its color temperature is 5,000 K or higher (such as 5600K or 6500K daylight), it is compared against a mathematical CIE Standard Illuminant D (daylight) simulator. To even qualify for a valid comparison, the lamp's chromaticity distance from the Planckian locus must satisfy DC = Δuv < 5.4 × 10^-3 on the CIE 1960 uniform chromaticity scale.
14 Test Color Samples (TCS01–TCS14), Only 8 Counted in Ra: As detailed by UPRtek's photometry guide, the CIE defines 14 Munsell reference color swatches (often expanded to 15 in Asia with R15 for Asian skin tone). However, when a manufacturer prints "CRI = 80" on a box, they are reporting General CRI (Ra), which is the unweighted arithmetic mean of only the first 8 moderately saturated pastel swatches (R1 to R8):
What Gets Left Out (R9–R14): The remaining six swatches—TCS09 (R9: Strong Saturated Red), TCS10 (R10: Strong Yellow), TCS11 (R11: Strong Green), TCS12 (R12: Strong Blue), TCS13 (R13: Caucasian Skin Tone / Light Yellowish Pink), and TCS14 (R14: Olive Leaf Green)—are classified as Special CRI values and are completely excluded from the headline Ra average.
2. The Physics of Cheap White LEDs: Why Blue-Pump Phosphors Starve Red Skin Tones
Why does omitting R9 cause such severe damage when evaluating modern LED bulbs? As explained in Light Sky's analysis of stage and studio CRI, a typical white LED is not natively white: it consists of a monochrome ~450 nm blue Indium Gallium Nitride (InGaN) semiconductor chip coated in a yellow cerium-doped yttrium aluminum garnet (YAG:Ce) phosphor.
The Lumen-per-Watt Trade-Off at 620–680 nm: Human eyes are maximally sensitive to green-yellow light at 555 nm (the photopic luminous efficacy peak) and rapidly lose sensitivity in the deep red spectrum above 620 nm. If a bulb manufacturer adds deep-red nitride phosphors emitting at 630–660 nm, a large share of the LED's electrical energy goes into red photons that barely register on a lumen meter—lowering the bulb's advertised lumens-per-watt efficacy.
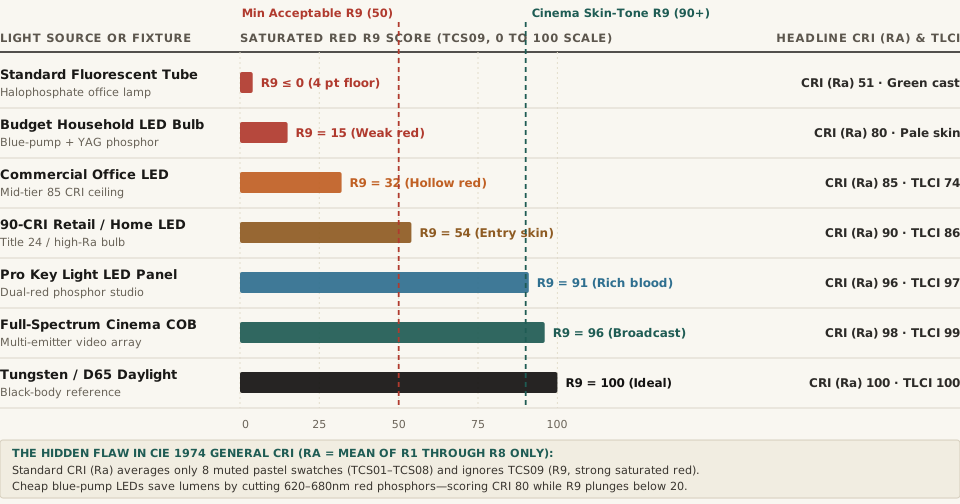
Gaming the R1–R8 Pastel Average: By concentrating phosphor output in the yellow-green band (530–590 nm) and letting the spectrum cliff-dive above 610 nm, a budget household LED easily achieves CRI (Ra) = 80–83 on the eight muted pastel swatches while its R9 score sits between 0 and 20 (and cheap halophosphate fluorescent tubes actually score a negative R9).
Why Low R9 Turns Faces Greenish-Grey: Beneath the outer melanin layer of the epidermis, human skin tone across all ethnicities is governed by the reflectance of oxygenated hemoglobin in capillary blood, which reflects strongly in the 610–680 nm red band. Under a light source with R9 = 15, there are virtually no deep-red photons available to bounce off the skin—leaving only the blue spike (450 nm) and yellow-green phosphor hump (550 nm), which renders faces ashy, pale, or jaundiced.
"In lighting design, R9 value is typically used as a benchmark to assess whether a light source can accurately reproduce red tones... An R9 value above 50 is the minimum requirement for acceptable red rendering, while an R9 value of 90 or higher indicates excellent color reproduction."
3. Why Cameras Need TLCI, TM-30, and SSI Instead of CRI
Even if an LED fixture has a high CRI (Ra), a digital camera sensor does not see light the way the human eye does. As CameraStuff's comparison of CRI, TLCI, and TM-30 explains, human vision relies on three overlapping cone cell responses (LMS) processed by the brain's chromatic adaptation engine, whereas a mirrorless camera or webcam uses discrete Red, Green, and Blue Bayer color filters over a silicon CMOS sensor:
TLCI (Television Lighting Consistency Index, 0–100): Developed by Alan Roberts for the European Broadcasting Union (EBU), TLCI replaces the human eye observer with a mathematical model of a standard broadcast camera sensor and evaluates 24 Macbeth ColorChecker patches. A score of TLCI 85–90 means a colorist can fix the footage with minor white-balance tweaks; a score of TLCI 95–100 means the fixture produces broadcast-ready skin tones straight out of camera with zero color-grading rescue required.
IES TM-30 (Rf Fidelity + Rg Gamut Across 99 Color Samples): Because LED makers learned how to tune narrow phosphor peaks to flatter the 8 specific Munsell pastel swatches in CRI, the Illuminating Engineering Society introduced TM-30, which tests 99 real-world Color Evaluation Samples (CES) selected from nature, skin, textiles, and inks. TM-30 reports both Rf (Fidelity Index, 0–100) and Rg (Gamut Index, centered on 100), revealing whether a light source desaturates reds (Rg < 95) or oversaturates them.
SSI (Spectral Similarity Index): Developed by the Academy of Motion Picture Arts and Sciences (AMPAS), SSI ignores human vision and fixed color swatches entirely, comparing the continuous wavelength-by-wavelength curve of an LED directly against tungsten (3200K) or CIE D55/D65 daylight so any future camera sensor will respond identically.
4. Complete Data Table: Lighting Tiers by CRI (Ra), Extended R9, TLCI, and TM-30
The dataset below—included in the companion CSV (cri-ra-vs-r9-saturated-red-tlci-and-tm30-led-lighting-skin-tone-benchmarks.csv)—compares seven real-world lighting tiers across all four photometric standards:
Light Source or Fixture Tier
Emitter Architecture
Headline CRI (Ra)
Extended R9 (Red)
Camera TLCI
TM-30 (Rf / Rg)
Skin-Tone & Camera Impact
Standard Fluorescent Tube
Mercury vapor lines + basic halophosphate
51
≤ 4 (Often negative)
38
Rf 54 / Rg 82
Severe green spike; sickly grey-green skin on webcam
Budget Household LED Bulb
450nm blue pump + basic YAG:Ce yellow
80
15
66
Rf 78 / Rg 94
Passes CRI 80 spec because R9 is omitted; pale/waxy skin
Commercial Office Troffer LED
Mid-power SMD array (85 CRI rated)
85
32
74
Rf 83 / Rg 96
Hollow red hemoglobin response; needs magenta tint correction
90-CRI Retail / Title 24 Home LED
Blue pump + nitride red phosphor boost
90
54 (R9 ≥ 50 floor)
86
Rf 89 / Rg 99
Acceptable residential warmth; minor CMOS grading required
Pro Video Key Light Panel
Dual-red phosphor studio SMD array
96
91
97
Rf 94 / Rg 101
Natural blood warmth; zero post color correction (TLCI > 95)
Full-Spectrum Cinema COB LED
Multi-phosphor / continuous-spectrum COB
98
96
99
Rf 96 / Rg 100
Matches natural window daylight and cinema LUTs seamlessly
Tungsten / D65 Daylight Reference
Continuous black-body / solar spectrum
100
100
100
Rf 100 / Rg 100
Ideal 100-point reference across all 14 TCS & 99 CES patches
If your desk is lit by overhead office LEDs or mixed window light and you want flattering, natural skin tones on video calls without buying a $600 cinema COB fixture, Calibrate video call lighting in Lumet to turn your monitor into a color-accurate, temperature-matched key light with custom warmth to compensate for low-R9 room bulbs.