YellowSquared  /  Field notes

Notes from the workshop

29 posts, newest first. Choose an app to narrow the feed.

009 / 29

What Causes Sunstars in Landscape Photography, and Why Do Odd Aperture Blades Double the Points?

Count the glowing spikes radiating from the setting Sun in two landscape photographs taken at f/16: one photo displays 8 bold, symmetrical rays, while the next displays 18 delicate, needle-sharp rays. Neither photographer used a cross-screen star filter or post-processing brush. The difference comes entirely from a single mechanical detail hidden inside the lens barrel: whether the aperture diaphragm has an even or an odd number of blades.

As demonstrated in optical bench comparisons by Vadnais Engineering and wave-optics explainers at PetaPixel, an aperture with an even number of blades (N) always produces exactly $N$ sunstar points (6 blades = 6 points, 8 blades = 8 points), whereas an aperture with an odd number of blades (N) always doubles its output to $2N$ sunstar points (7 blades = 14 points, 9 blades = 18 points, 11 blades = 22 points). Before hiking out to capture a ridge-line sunset or streetlamp starburst, you can Scout golden hour and blue hour angles in PhotoSpots to time the exact minute the solar disk grazes a mountain edge or tree trunk.
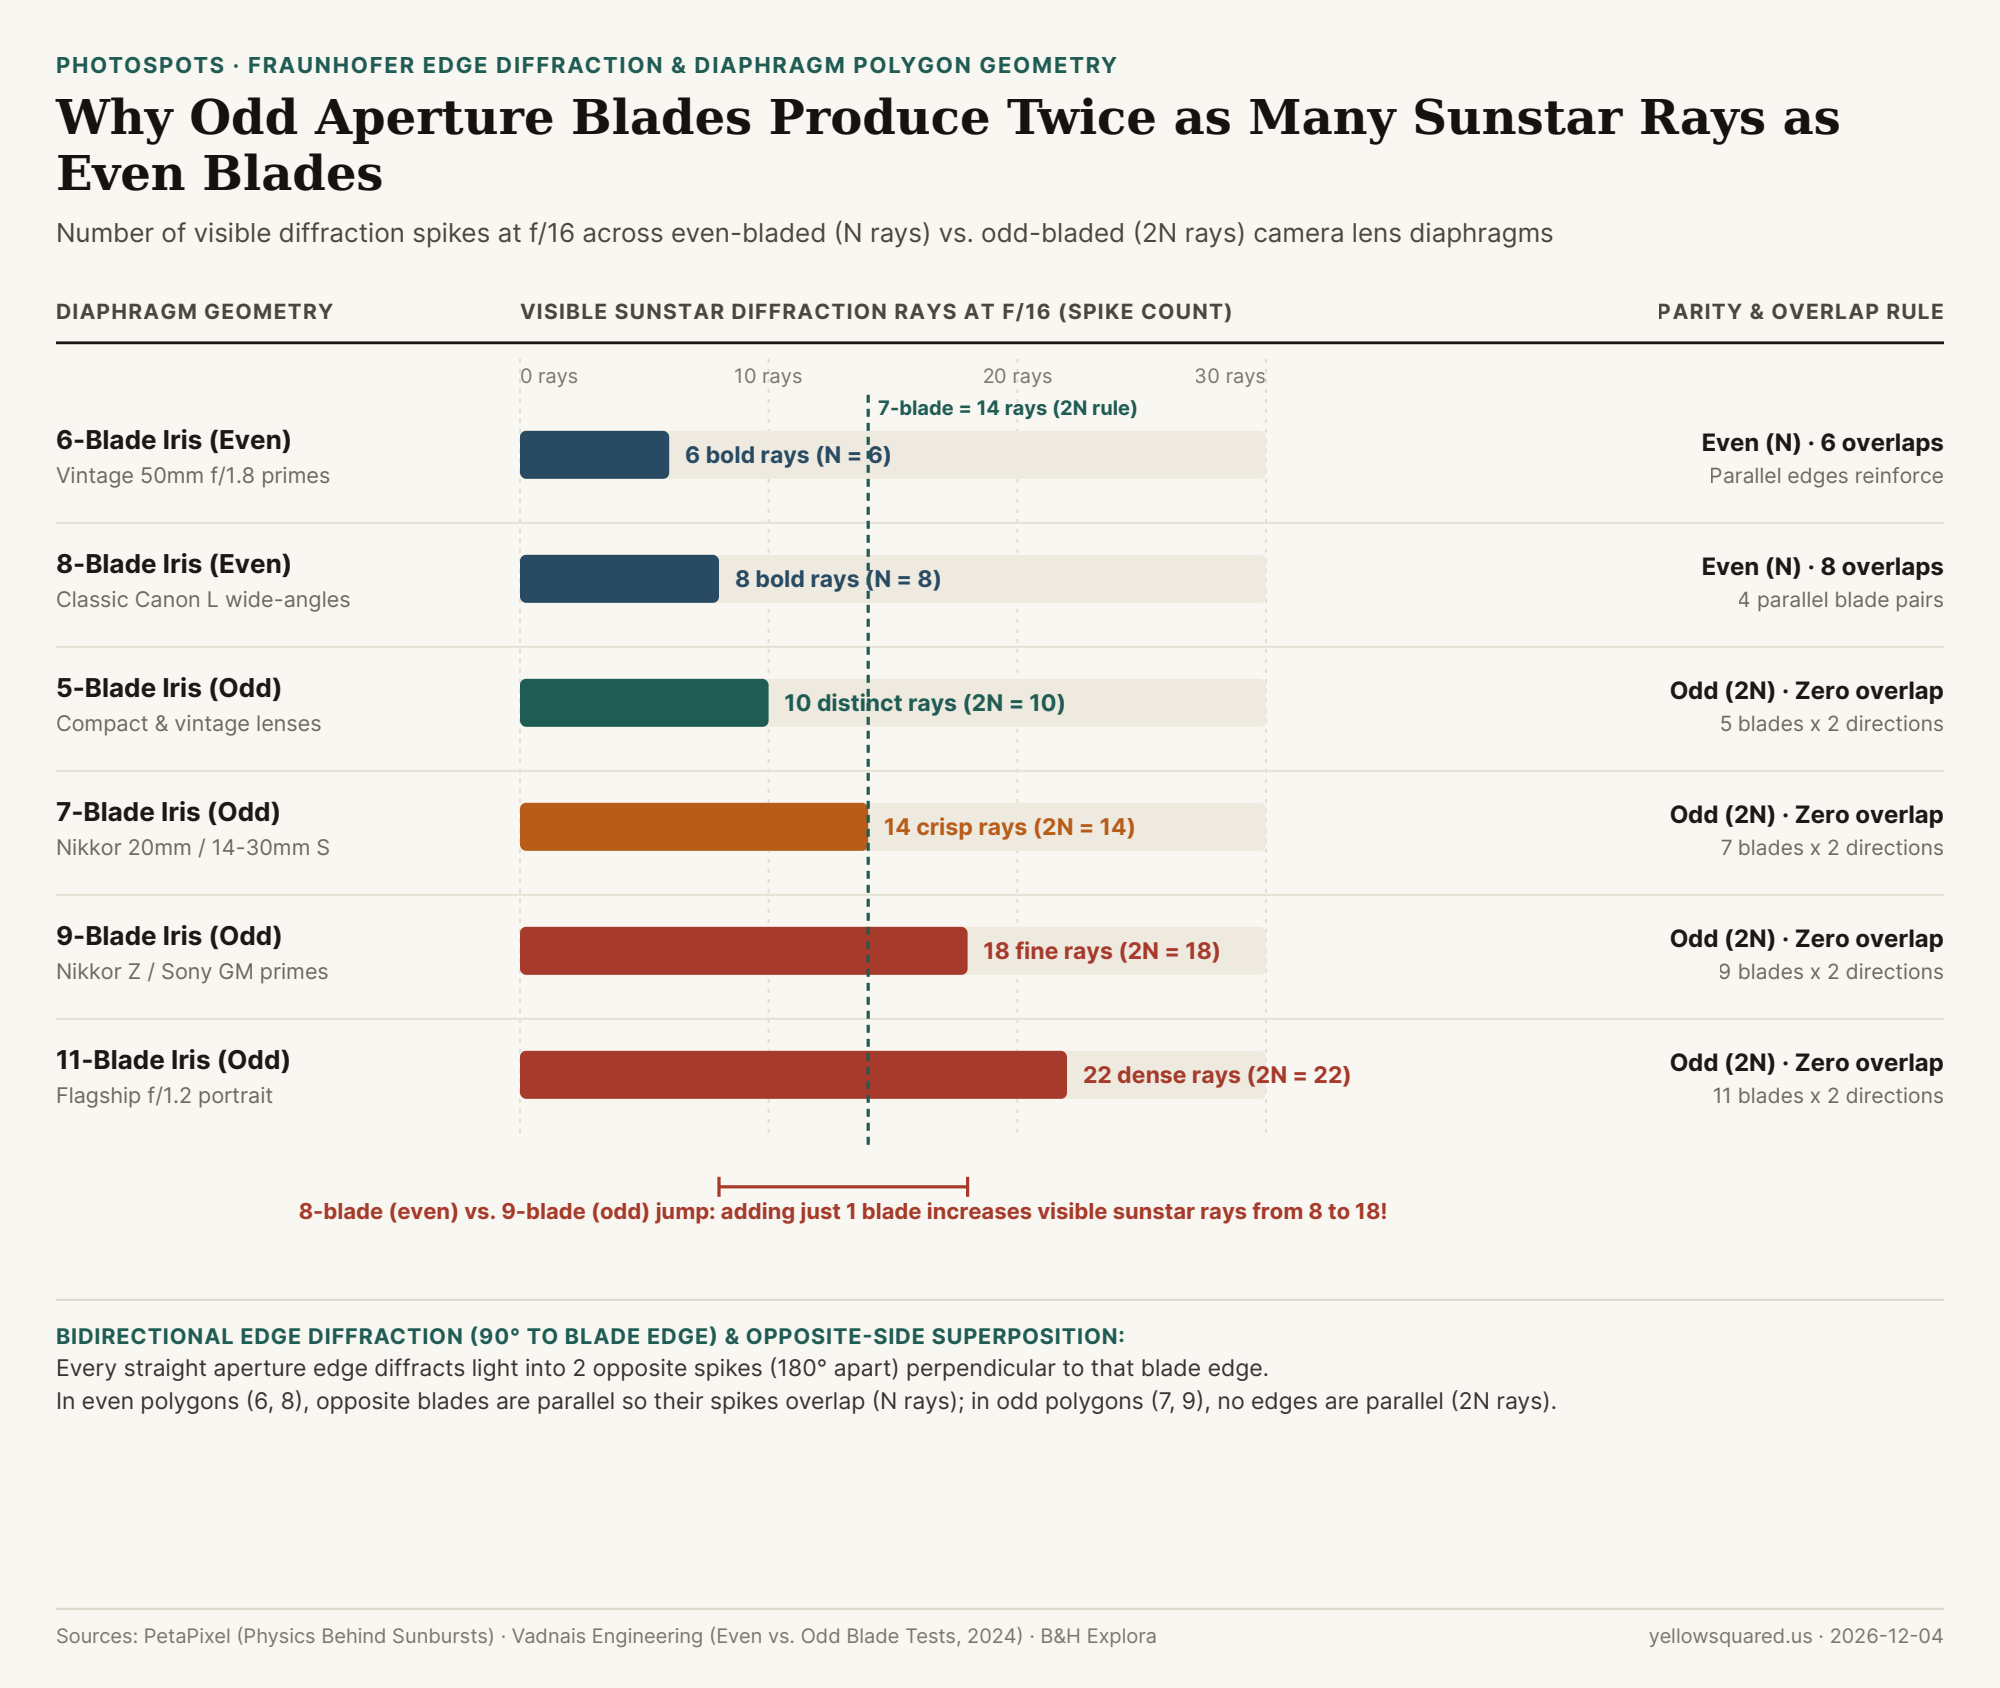
Horizontal bar chart comparing visible sunstar diffraction rays at f/16 across 6-blade (6 rays), 8-blade (8 rays), 5-blade (10 rays), 7-blade (14 rays), 9-blade (18 rays), and 11-blade (22 rays) lens diaphragms.
Figure 1: Visible sunstar diffraction spikes at f/16 across even-bladed (N rays) and odd-bladed (2N rays) camera lens diaphragms. Source: PetaPixel, Vadnais Engineering (2024), and B&H Explora.

Fraunhofer Edge Diffraction: Why Every Straight Blade Edge Creates Two Opposite Rays

When a lens is shot wide open (f/1.4 to f/2.8), nearly all incoming light passes unimpeded through the center of the circular opening, and a bright point light source renders as a soft circular glow. As you stop the diaphragm down to f/11, f/16, or f/22, the physical diameter of the entrance pupil shrinks to just 1 to 3 millimeters, forcing a much larger fraction of the incoming wavefront to skim past the metallic edges of the iris blades.

By Christiaan Huygens' wavelet principle and Fraunhofer diffraction, whenever a coherent planar wavefront passes a straight knife edge, secondary wavelets spread out along an axis perpendicular (90°) to that straight edge in both directions (180° apart). Thus, a single straight blade edge does not create one ray—it creates a bidirectional line of two opposite rays (0° and 180° perpendicular to the blade).

"Every straight blade edge in your lens diaphragm generates two diffraction spikes 180 degrees apart: in an 8-blade octagon, four pairs of parallel opposite edges lay their spikes right on top of each other to make 8 bright rays; in a 9-blade nonagon, no two edges are parallel, fanning out into 18 separate rays."

The Geometry of Overlap: Even Polygons (N) vs. Odd Polygons ($2N$)

Once you know that every blade edge produces two 180°-opposite diffraction spikes, the mystery of why adding a single blade to an 8-blade lens jumps the sunstar count from 8 to 18 becomes pure polygon geometry, as illustrated in B&H Explora's starburst optics guide:

  • Even-Bladed Polygons (6, 8, or 10 Blades → 6, 8, or 10 Rays): In any regular polygon with an even number of sides (a hexagon or octagon), every side has a strictly parallel partner directly across the center (180° opposite). Because both parallel edges share the exact same perpendicular normal vector, the two diffraction spikes from Blade #1 land directly on top of the two diffraction spikes from opposite Blade #5. The 2N spikes superimpose in pairs, yielding $N$ extra-bright, high-contrast rays.
  • Odd-Bladed Polygons (5, 7, 9, or 11 Blades → 10, 14, 18, or 22 Rays): In a regular polygon with an odd number of sides (a heptagon or nonagon), every flat side sits across from a pointed corner vertex rather than a parallel side. No two edges in the entire diaphragm are parallel! Consequently, none of the bidirectional diffraction spikes overlap, and all $2N$ rays fan out evenly around the clock (every 25.7° for a 7-blade lens, and every 20.0° for a 9-blade lens).
Aperture Blade Count Polygon Parity Parallel Opposite Edges Visible Sunstar Rays Angular Ray Spacing Representative Lens Examples
6 Blades (Hexagon) Even (N) 3 parallel pairs 6 bold rays 60.0° apart Vintage 50mm f/1.8 primes & Leica Summicron
8 Blades (Octagon) Even (N) 4 parallel pairs 8 bold rays 45.0° apart Canon EF 16-35mm f/2.8L II & classic wide-angles
5 Blades (Pentagon) Odd (2N) 0 parallel pairs 10 distinct rays 36.0° apart Compact pancake lenses & vintage primes
7 Blades (Heptagon) Odd (2N) 0 parallel pairs 14 crisp rays 25.7° apart Nikkor Z 14-30mm f/4 S, Canon EF 17-40mm f/4L
9 Blades (Nonagon) Odd (2N) 0 parallel pairs 18 fine rays 20.0° apart Nikkor Z 50mm f/1.8 S, Nikkor Z 24-70mm f/2.8 S
11 Blades (Hendecagon) Odd (2N) 0 parallel pairs 22 dense rays 16.4° apart Sony FE 50mm f/1.2 GM (stopped down to f/16)

How to Shoot Razor-Sharp Sunstars Without Ruining Overall Image Sharpness

Two practical rules govern field technique when shooting sunstars: first, straight aperture blades produce needle-sharp rays by concentrating diffraction along a single normal angle, whereas modern rounded aperture blades (designed for circular wide-open bokeh) spread the diffracted light across a slight arc unless you stop down to f/14 or f/16 where the blade corners meet tightly. Second, shrink the apparent angular diameter of the Sun by partially occulting the solar disk behind a sharp ridge, rock spire, building corner, or tree trunk—turning a 0.5° solar disk into a tiny point source so you get crisp 14- or 18-point rays at f/11–f/16 without having to stop down to f/22 (where Airy-disk diffraction softens the rest of your landscape). To plan the exact azimuth and elevation where the Sun will clip a skyline or mountain ridge, Scout golden hour and blue hour angles in PhotoSpots.
010 / 29

What Is the Belt of Venus, and Why Does the Opposite Horizon Turn Pink and Blue at Sunset?

Most landscape and portrait photographers spend sunset facing west toward the setting Sun. Yet on any cloud-free evening, turning 180° around toward the antisolar point in the east reveals one of atmospheric optics' most striking two-tone gradients: a glowing rose-pink band—known since Victorian astronomy as the Belt of Venus (or anti-twilight arch)—floating 10° to 20° above a rising slate-blue wedge that is literally Earth's shadow projected onto the lower atmosphere.

As quantified in radiative-transfer field studies of twilight's Belt of Venus in Applied Optics, this pastel pink-and-blue separation only exists during civil twilight—the brief 25- to 40-minute window when the geometric center of the Sun sits between 0° and -6° below the horizon. Before heading out for an evening shoot, you can Scout golden hour and blue hour angles in PhotoSpots to align mountain ridges, city skylines, or coastal headlands with the exact azimuth of the antisolar horizon.

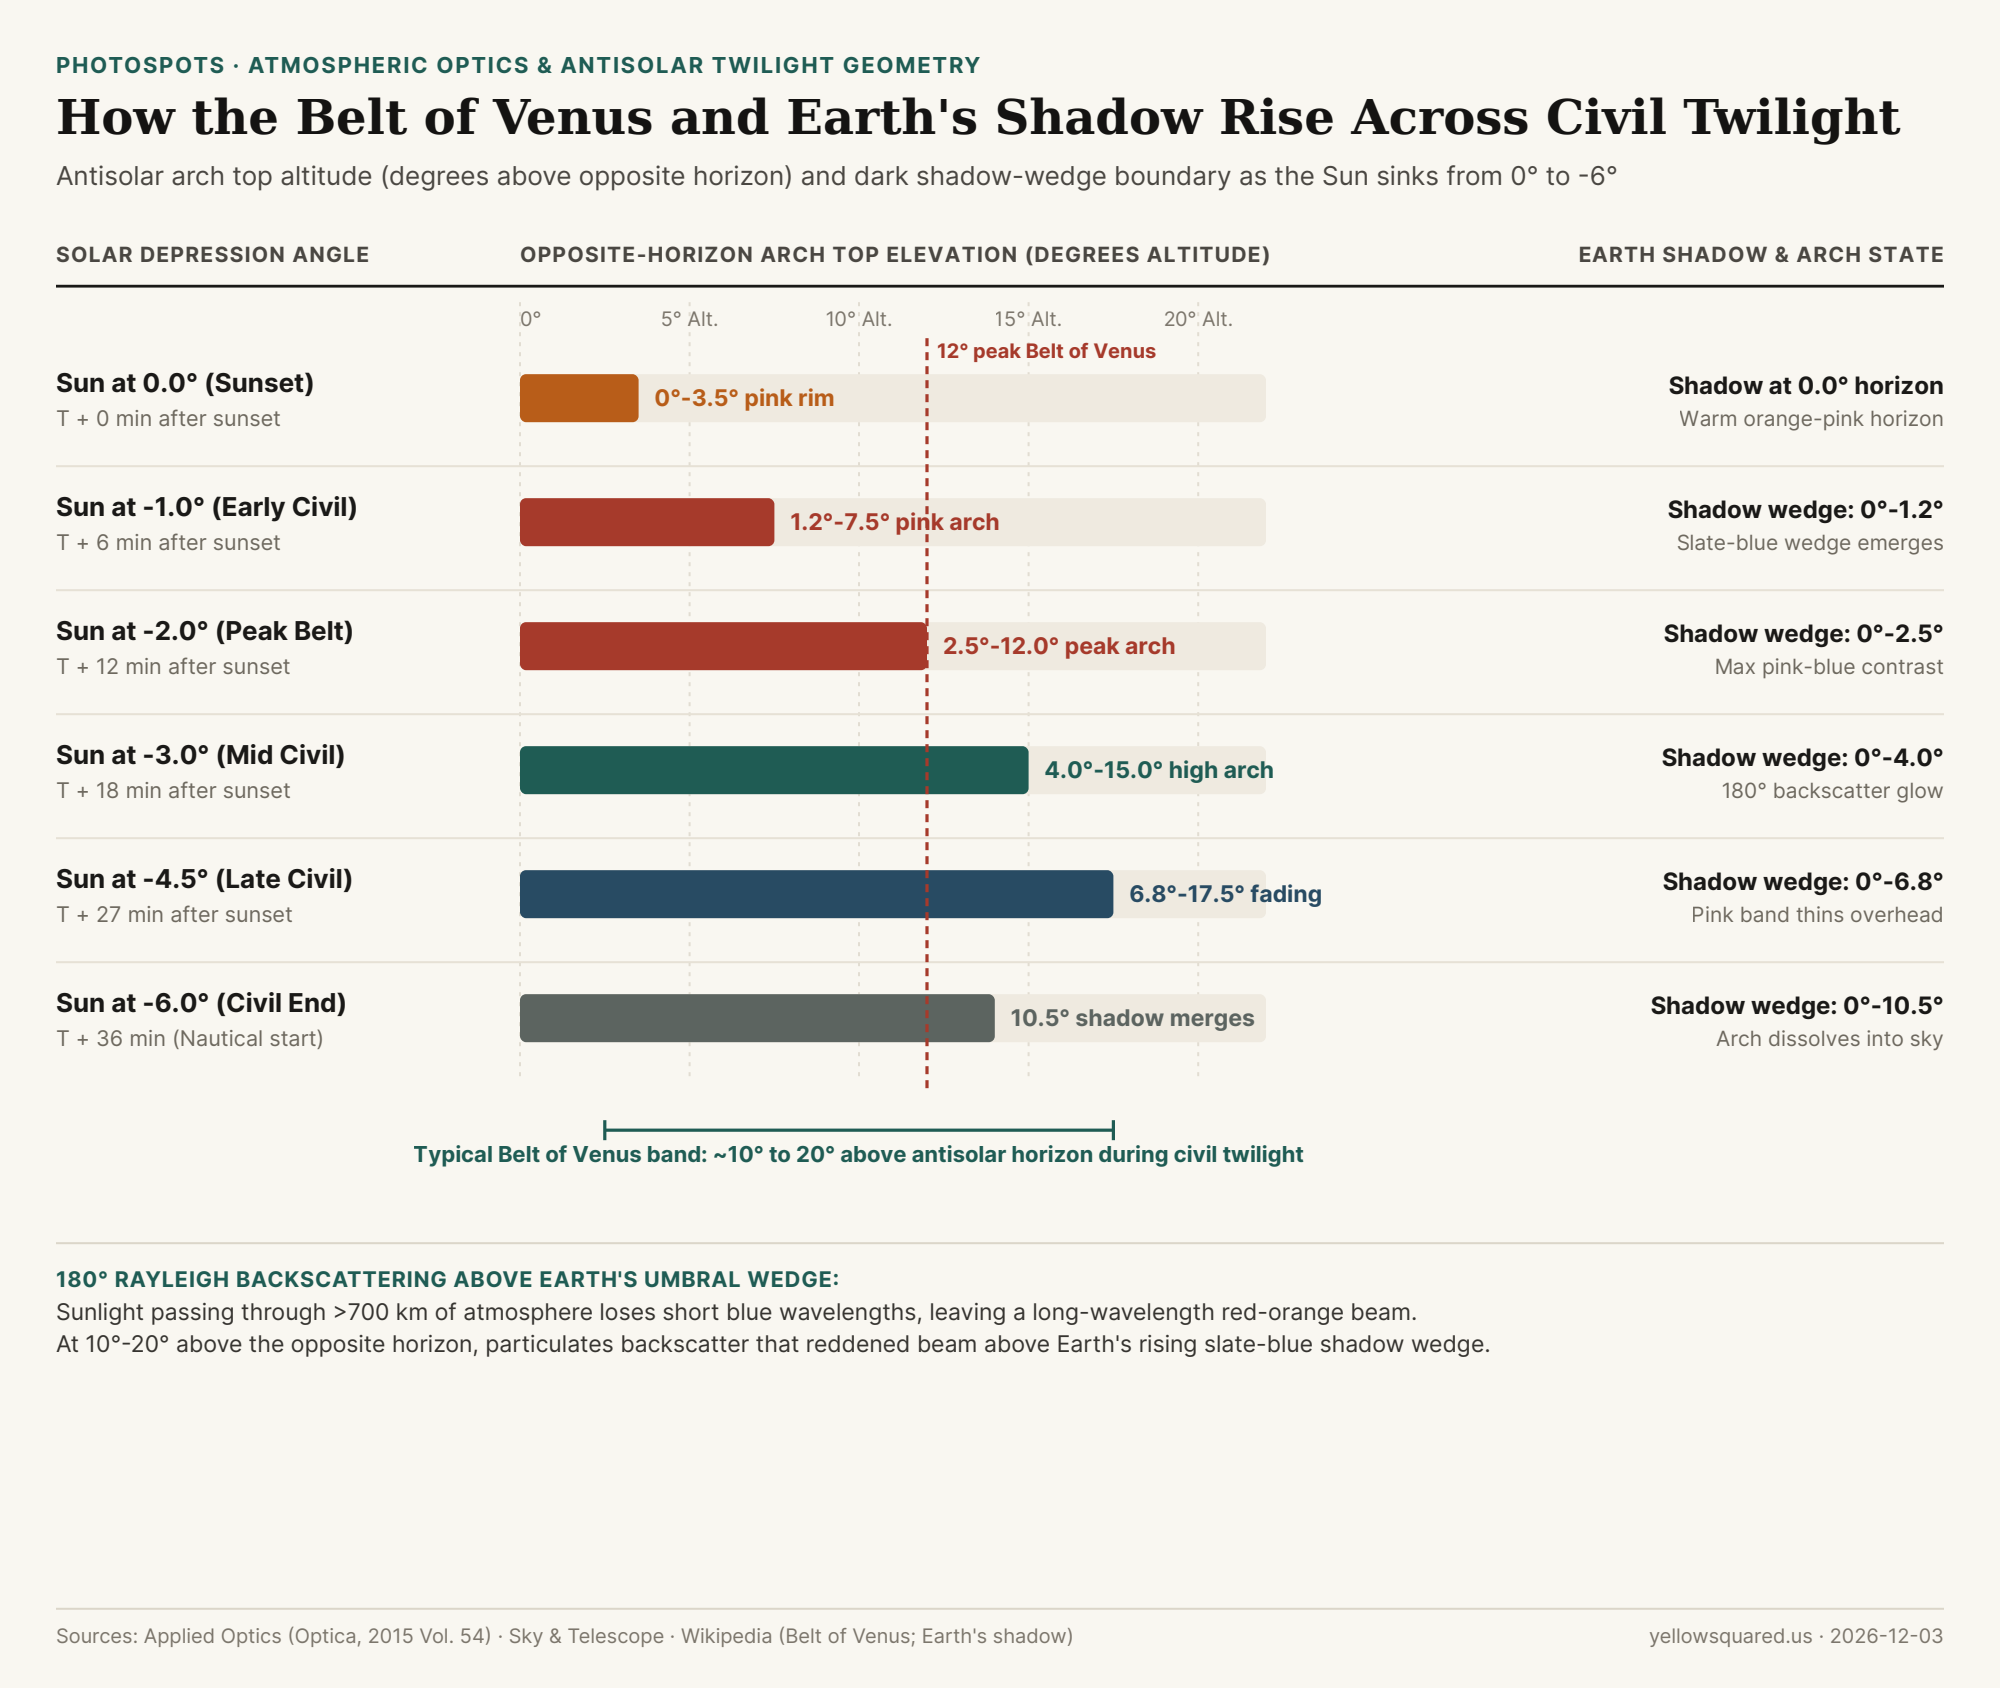
Horizontal bar chart showing the elevation in degrees of the Belt of Venus pink arch and Earth's shadow wedge across solar depression angles from 0 degrees to -6 degrees.
Figure 1: Opposite-horizon altitude of the Belt of Venus arch top and Earth's shadow wedge across solar depression angles from 0.0° (sunset) to -6.0° (end of civil twilight). Source: Applied Optics (Optica, 2015), Sky & Telescope, and Wikipedia.

The Two Stacked Layers: Earth's Shadow Wedge vs. Backscattered Alpenglow

When the Sun drops below the western horizon (`solar elevation < 0°`), the solid curvature of the Earth blocks direct sunlight from illuminating the lowest kilometers of air in the east. Looking east, your line of sight passes through two distinct optical regimes stacked vertically above the horizon:

  • The Lower Dark Segment (Earth's Shadow Wedge, 0° to ~10° altitude): Below the shadow boundary, air molecules and aerosols receive zero direct solar beams. They are lit only by diffuse multiple scattering from the overhead blue sky, producing a cool, dense slate-blue or steel-gray band hugging the horizon. Because atmospheric refraction bends grazing sunlight downward by roughly 0.5° to 1.0°, the visible top of Earth's shadow rises slightly faster than the geometric solar depression angle (`reaching ~2.5° altitude when the Sun is at -2.0°, and ~10.5° when the Sun hits -6.0°`).
  • The Upper Rose-Pink Arch (Belt of Venus, ~2.5° to 17.5° altitude): Immediately above the shadow line, upper-tropospheric air and fine aerosols (`3 to 12 km` altitude) are still in direct line of sight of the setting Sun. Because those grazing solar rays have traveled through more than 700 km of dense lower atmosphere, Rayleigh scattering (`proportional to wavelength^-4`) has stripped out nearly all short blue and green wavelengths (`400–530 nm`). The surviving long-wavelength orange-red beam (`600–700 nm`) strikes particulates in the eastern sky and backscatters by 180° back toward the observer, mixing with diffuse overhead blue sky light to create a luminous rose-pink and magenta arch.

"Unlike a rainbow—which owes its 42-degree geometry to internal refraction inside liquid raindrops—the Belt of Venus requires dry air: it is pure 180-degree Rayleigh and aerosol backscattering of reddened sunset light grazing the top of Earth's umbral shadow wedge."

Minute-by-Minute Twilight Progression (0° to -6° Solar Depression)

As noted by astronomy observers at Sky & Telescope, the Belt of Venus is most vivid when the Sun sits between -1.5° and -3.5° below the horizon—typically 10 to 20 minutes after upper-limb sunset (or before sunrise) at mid-latitudes (`35°N–50°N`). During this prime window, the dark blue shadow wedge is tall enough (`2.0° to 4.5°` above the horizon) to clearly separate the pink arch from terrain clutter, yet the pink arch has not yet attenuated into the stratosphere.

Solar Depression Angle Mid-Latitude Post-Sunset Time Earth's Shadow Top Altitude Belt of Venus Arch Span Visual Appearance & Photographic Application
0.0° (Upper-limb sunset) T + 0 min 0.0° (At horizon) 0.0° – 3.5° Warm peach-orange rim hugs the eastern horizon; shadow not yet detached
-1.0° (Early civil) T + 6 min 1.2° 1.2° – 7.5° Thin slate-blue shadow wedge separates from horizon beneath rose-pink band
-2.0° (Peak Belt window) T + 12 min 2.5° 2.5° – 12.0° Peak pastel saturation; ideal for portraits and alpine peak alpenglow
-3.0° (Mid civil) T + 18 min 4.0° 4.0° – 15.0° Dark blue wedge climbs behind city skylines while pink arch widens overhead
-4.5° (Late civil) T + 27 min 6.8° 6.8° – 17.5° Pink arch pales into lavender as sunlit beam retreats into rarefied air
-6.0° (Civil twilight end) T + 36 min 10.5° Dissolves (>10.5°) Earth's shadow merges into overhead sky, initiating true nautical blue hour

How to Expose for the Belt of Venus Without Clipping Highlights

Because the antisolar eastern sky is roughly 2.5 to 3.5 stops darker than the western sunset horizon, shooting toward the Belt of Venus solves the biggest dynamic-range headache of golden hour photography: foreground subjects facing west are lit by soft, warm wrap-around light from the setting Sun while the background sky behind them displays pastel pink and slate-blue bands within a single 5-stop dynamic range. Use a 35mm to 85mm lens to compress the 0°–15° vertical band above the horizon, set white balance to a fixed Daylight (`5200K–5500K`) preset so auto white balance does not neutralize the magenta-pink tint, and Scout golden hour and blue hour angles in PhotoSpots to verify that the western horizon is unobstructed so clouds do not block the grazing solar beam at the source.

011 / 29

Guide Number (GN) Flash Math: How Distance and Aperture Control On-Camera and Studio Strobe Power

Before through-the-lens (TTL) pre-flashes existed, photographers calculated every flash exposure in two seconds of mental arithmetic using a single number stamped on the back of the strobe: its Guide Number (GN) (Guide number - Wikipedia). Even today, whenever you switch a speedlight or studio strobe to manual power (1/1 down to 1/128) so your lighting stays 100% consistent across a portrait session, the ISO 1230 Guide Number equation tells you the exact aperture required for any flash-to-subject distance (Flash (photography) - Wikipedia).

Understanding how Guide Numbers scale with the square root of flash power and ISO lets you position key lights, softboxes, and rim strobes with mathematical precision—and verify your ambient-to-flash ratio when you Measure ambient and studio lighting in Lumet.

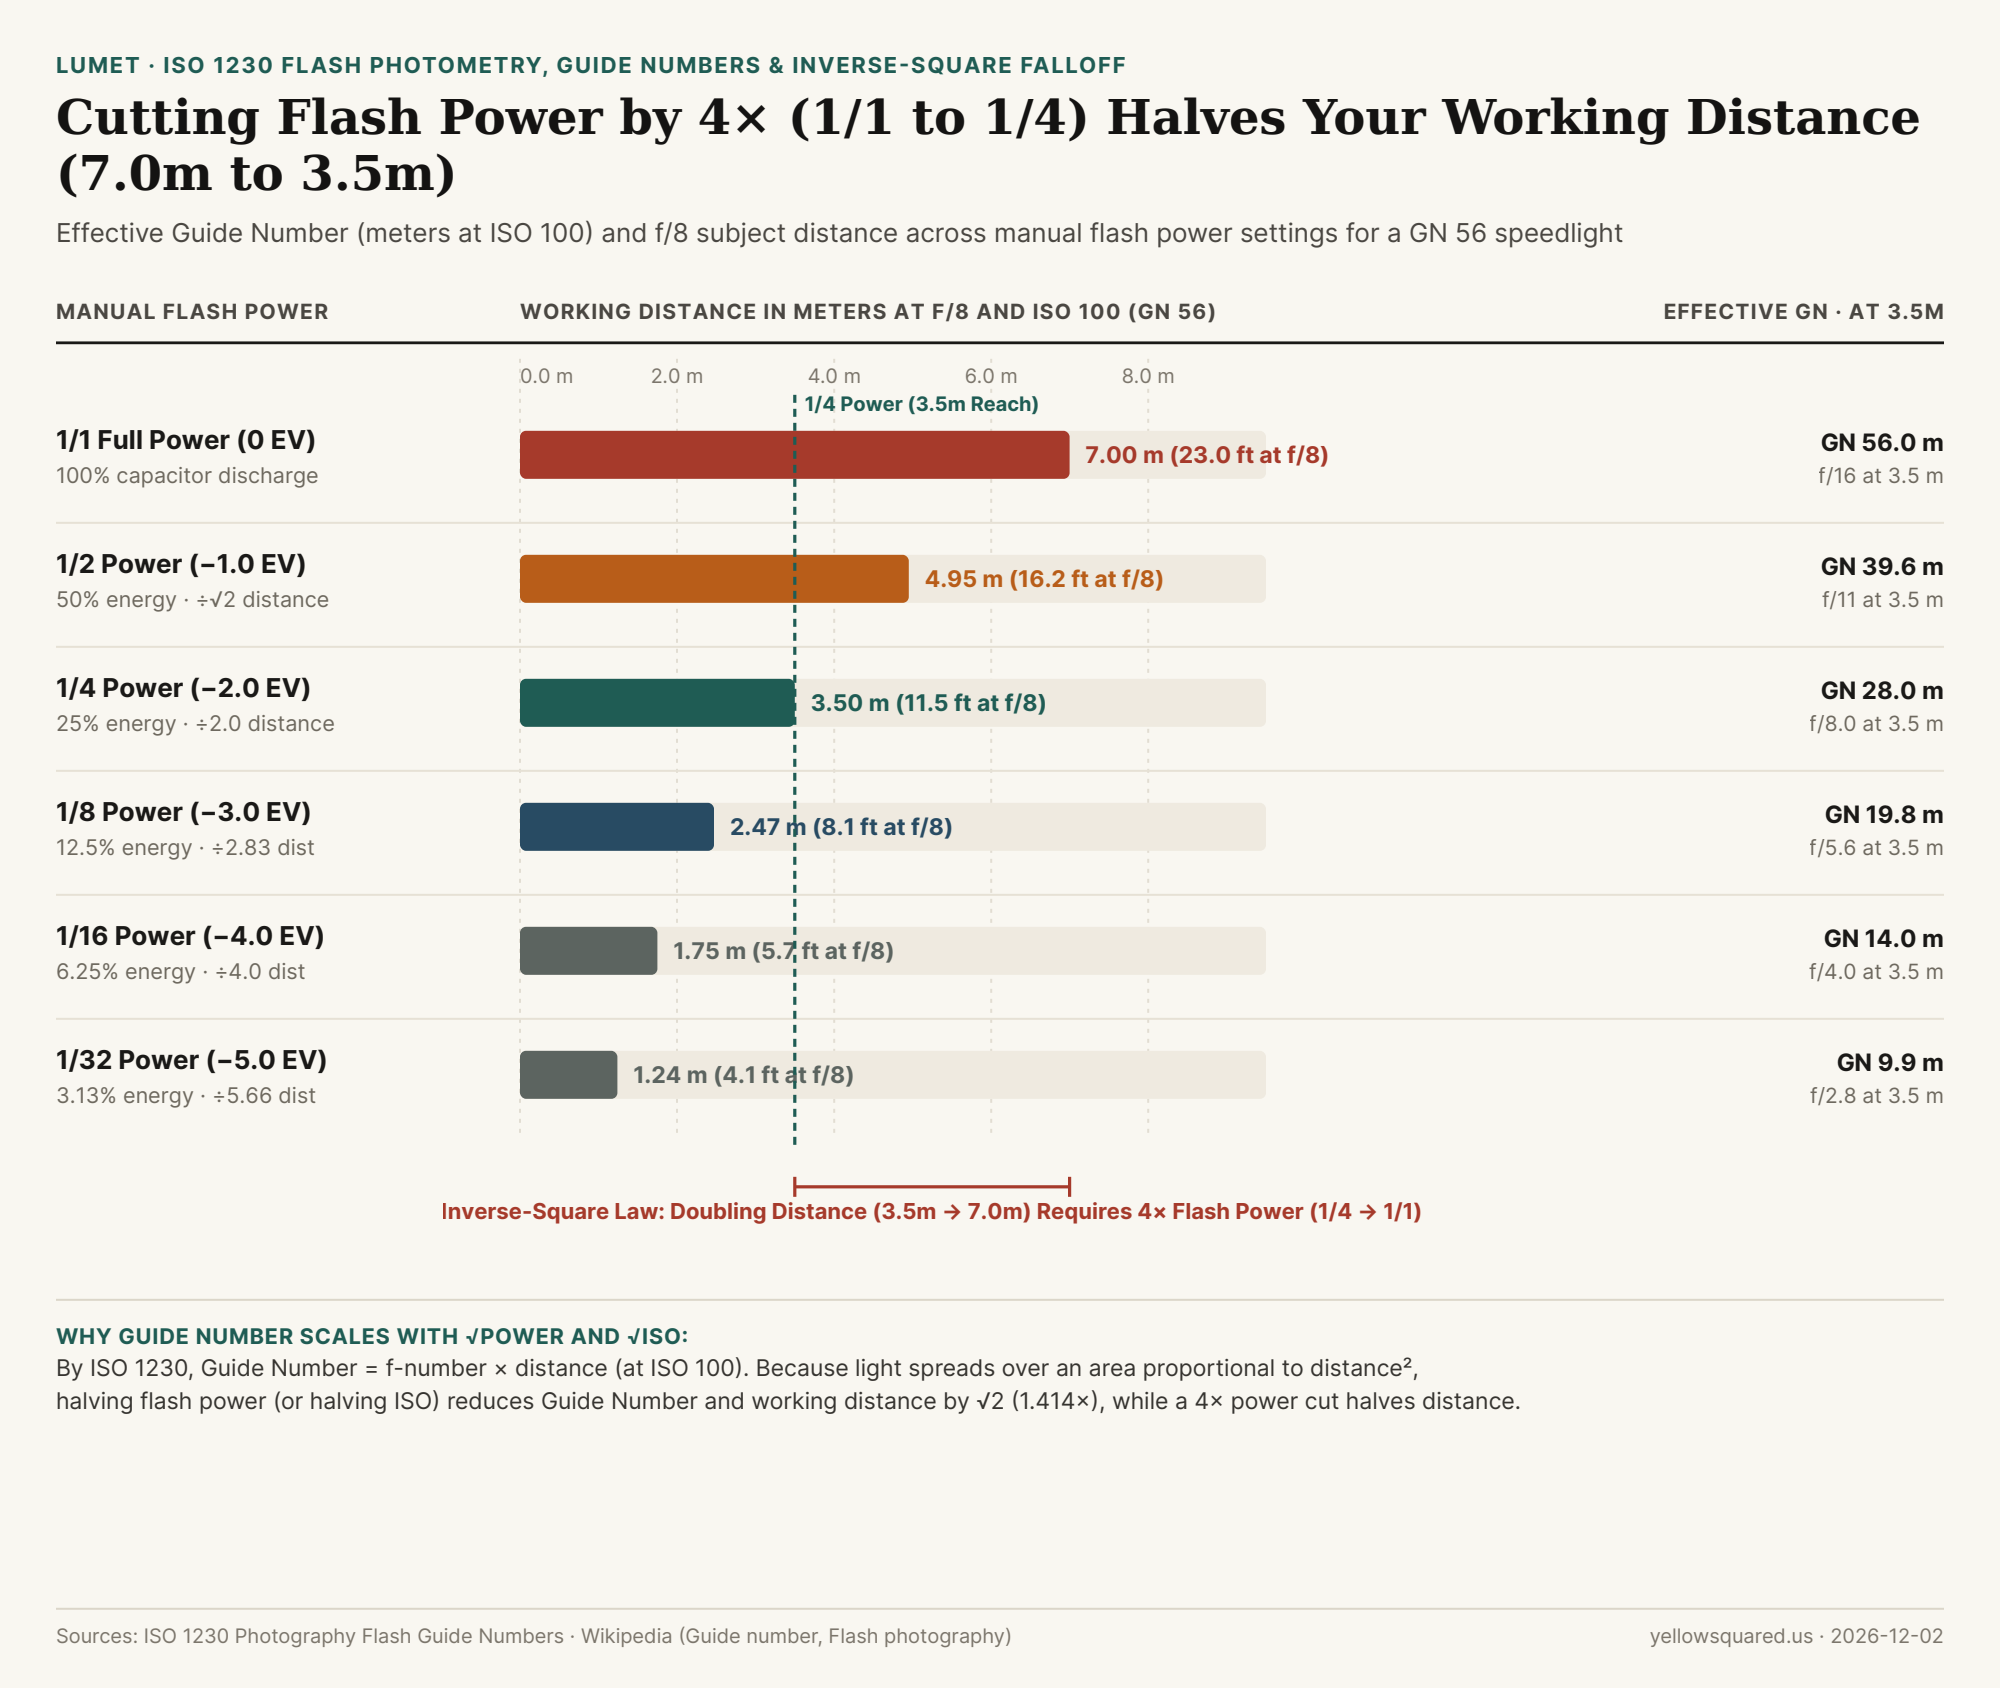
Chart showing working distance in meters at f/8 (ISO 100) and effective Guide Number across manual flash power settings from 1/1 to 1/32 for a GN 56 speedlight
Figure 1: Working distance at f/8 (ISO 100) and effective Guide Number across manual power settings (1/1 to 1/32) for a GN 56 speedlight. Data: flash-guide-number-gn-56-power-stops-working-distance-and-aperture.csv (Guide number - Wikipedia; F-number - Wikipedia).

The Core ISO 1230 Formula: GN = Aperture × Distance

Standardized at ISO 100 (and stated in either meters or feet), a flash's Guide Number is the product of the lens f-number (N) and the flash-to-subject distance (d) that produces a proper middle-gray exposure (Guide number - Wikipedia):

GN = N × d   ·   f-number (N) = GN / d   ·   Distance (d) = GN / N

Why does a simple product of f-number and distance hold constant across every distance? Because both lens aperture and point-source light propagation follow an inverse-square law (F-number - Wikipedia):

  • Distance Falloff (1 / d²): Moving a flash twice as far from your subject (say, from 3.5 meters to 7.0 meters) spreads the beam over 4× the surface area, reducing subject illuminance to 1/4 (−2.0 EV).
  • Aperture Area Scaling (1 / N²): Opening your lens by two full stops—from f/16 to f/8 (dividing the f-number N by 2)—increases the entrance pupil area by 4× (+2.0 EV), exactly canceling the 4× distance loss (Guide number - Wikipedia).

"Because both light falloff (1/d²) and lens pupil area (1/N²) scale with squares, their square roots cancel out—leaving a clean linear equation: Guide Number = f-stop × distance."

Why Halving Manual Flash Power Divides Working Distance by √2 (1.414×), Not 2×

The most common mistake in manual flash photography is assuming that dialing a speedlight from 1/1 full power down to 1/2 power cuts its reach in half. Because illuminance varies with the square of distance, reducing flash energy by one stop (1/2 power, −1.0 EV) divides the effective Guide Number—and therefore your working distance at a fixed aperture—by √2 ≈ 1.414 (Guide number - Wikipedia). To cut working distance in half, you must cut flash power by two full stops (4× energy reduction, from 1/1 to 1/4 power):

Manual Power Setting Relative Flash Energy Stop Offset Effective GN (ISO 100) Reach at f/8 Aperture at 3.5 m
1. 1/1 Full Power 100.0% (1.00×) 0.0 EV GN 56.0 m (184 ft) 7.00 m (23.0 ft) f/16
2. 1/2 Half Power 50.0% (0.50×) −1.0 EV GN 39.6 m (130 ft) 4.95 m (16.2 ft) f/11
3. 1/4 Quarter Power 25.0% (0.25×) −2.0 EV GN 28.0 m (92 ft) 3.50 m (11.5 ft) f/8.0
4. 1/8 Eighth Power 12.5% (0.125×) −3.0 EV GN 19.8 m (65 ft) 2.47 m (8.1 ft) f/5.6
5. 1/16 Sixteenth Power 6.25% (0.063×) −4.0 EV GN 14.0 m (46 ft) 1.75 m (5.7 ft) f/4.0
6. 1/32 Power 3.13% (0.031×) −5.0 EV GN 9.9 m (32 ft) 1.24 m (4.1 ft) f/2.8

How ISO Sensitivity and Zoom Head Spec Tricks Affect Real-World Guide Numbers

Two practical adjustments complete your field Guide Number toolkit (Guide number - Wikipedia):

  1. ISO Scaling by √(ISO / 100): Raising camera sensitivity by one stop (from ISO 100 to ISO 200) multiplies your effective Guide Number by √2 ≈ 1.414; quadrupling sensitivity by two stops (from ISO 100 to ISO 400) doubles your effective Guide Number (turning a GN 28 m setting into GN 56 m, so 1/4 power at ISO 400 reaches the exact same 7.0 m at f/8 as 1/1 full power at ISO 100 while recycling 4× faster).
  2. Watch Out for 200mm Telephoto Zoom-Head Ratings: Modern speedlight manufacturers almost always advertise their headline Guide Number (GN 60 m) with the internal Fresnel zoom head racked all the way out to 200mm. When you zoom the flash head back to a normal 35mm or 50mm coverage angle—or diffuse it through an umbrella or softbox—the effective Guide Number typically drops by 1.0 to 2.0 stops (GN 36 m to GN 42 m).

To measure ambient background lux and balance your manual strobe key light on set or outdoors, Measure ambient and studio lighting in Lumet.

012 / 29

How the Sunny 16 and Looney 11 Rules Calculate Camera Exposure Without a Light Meter

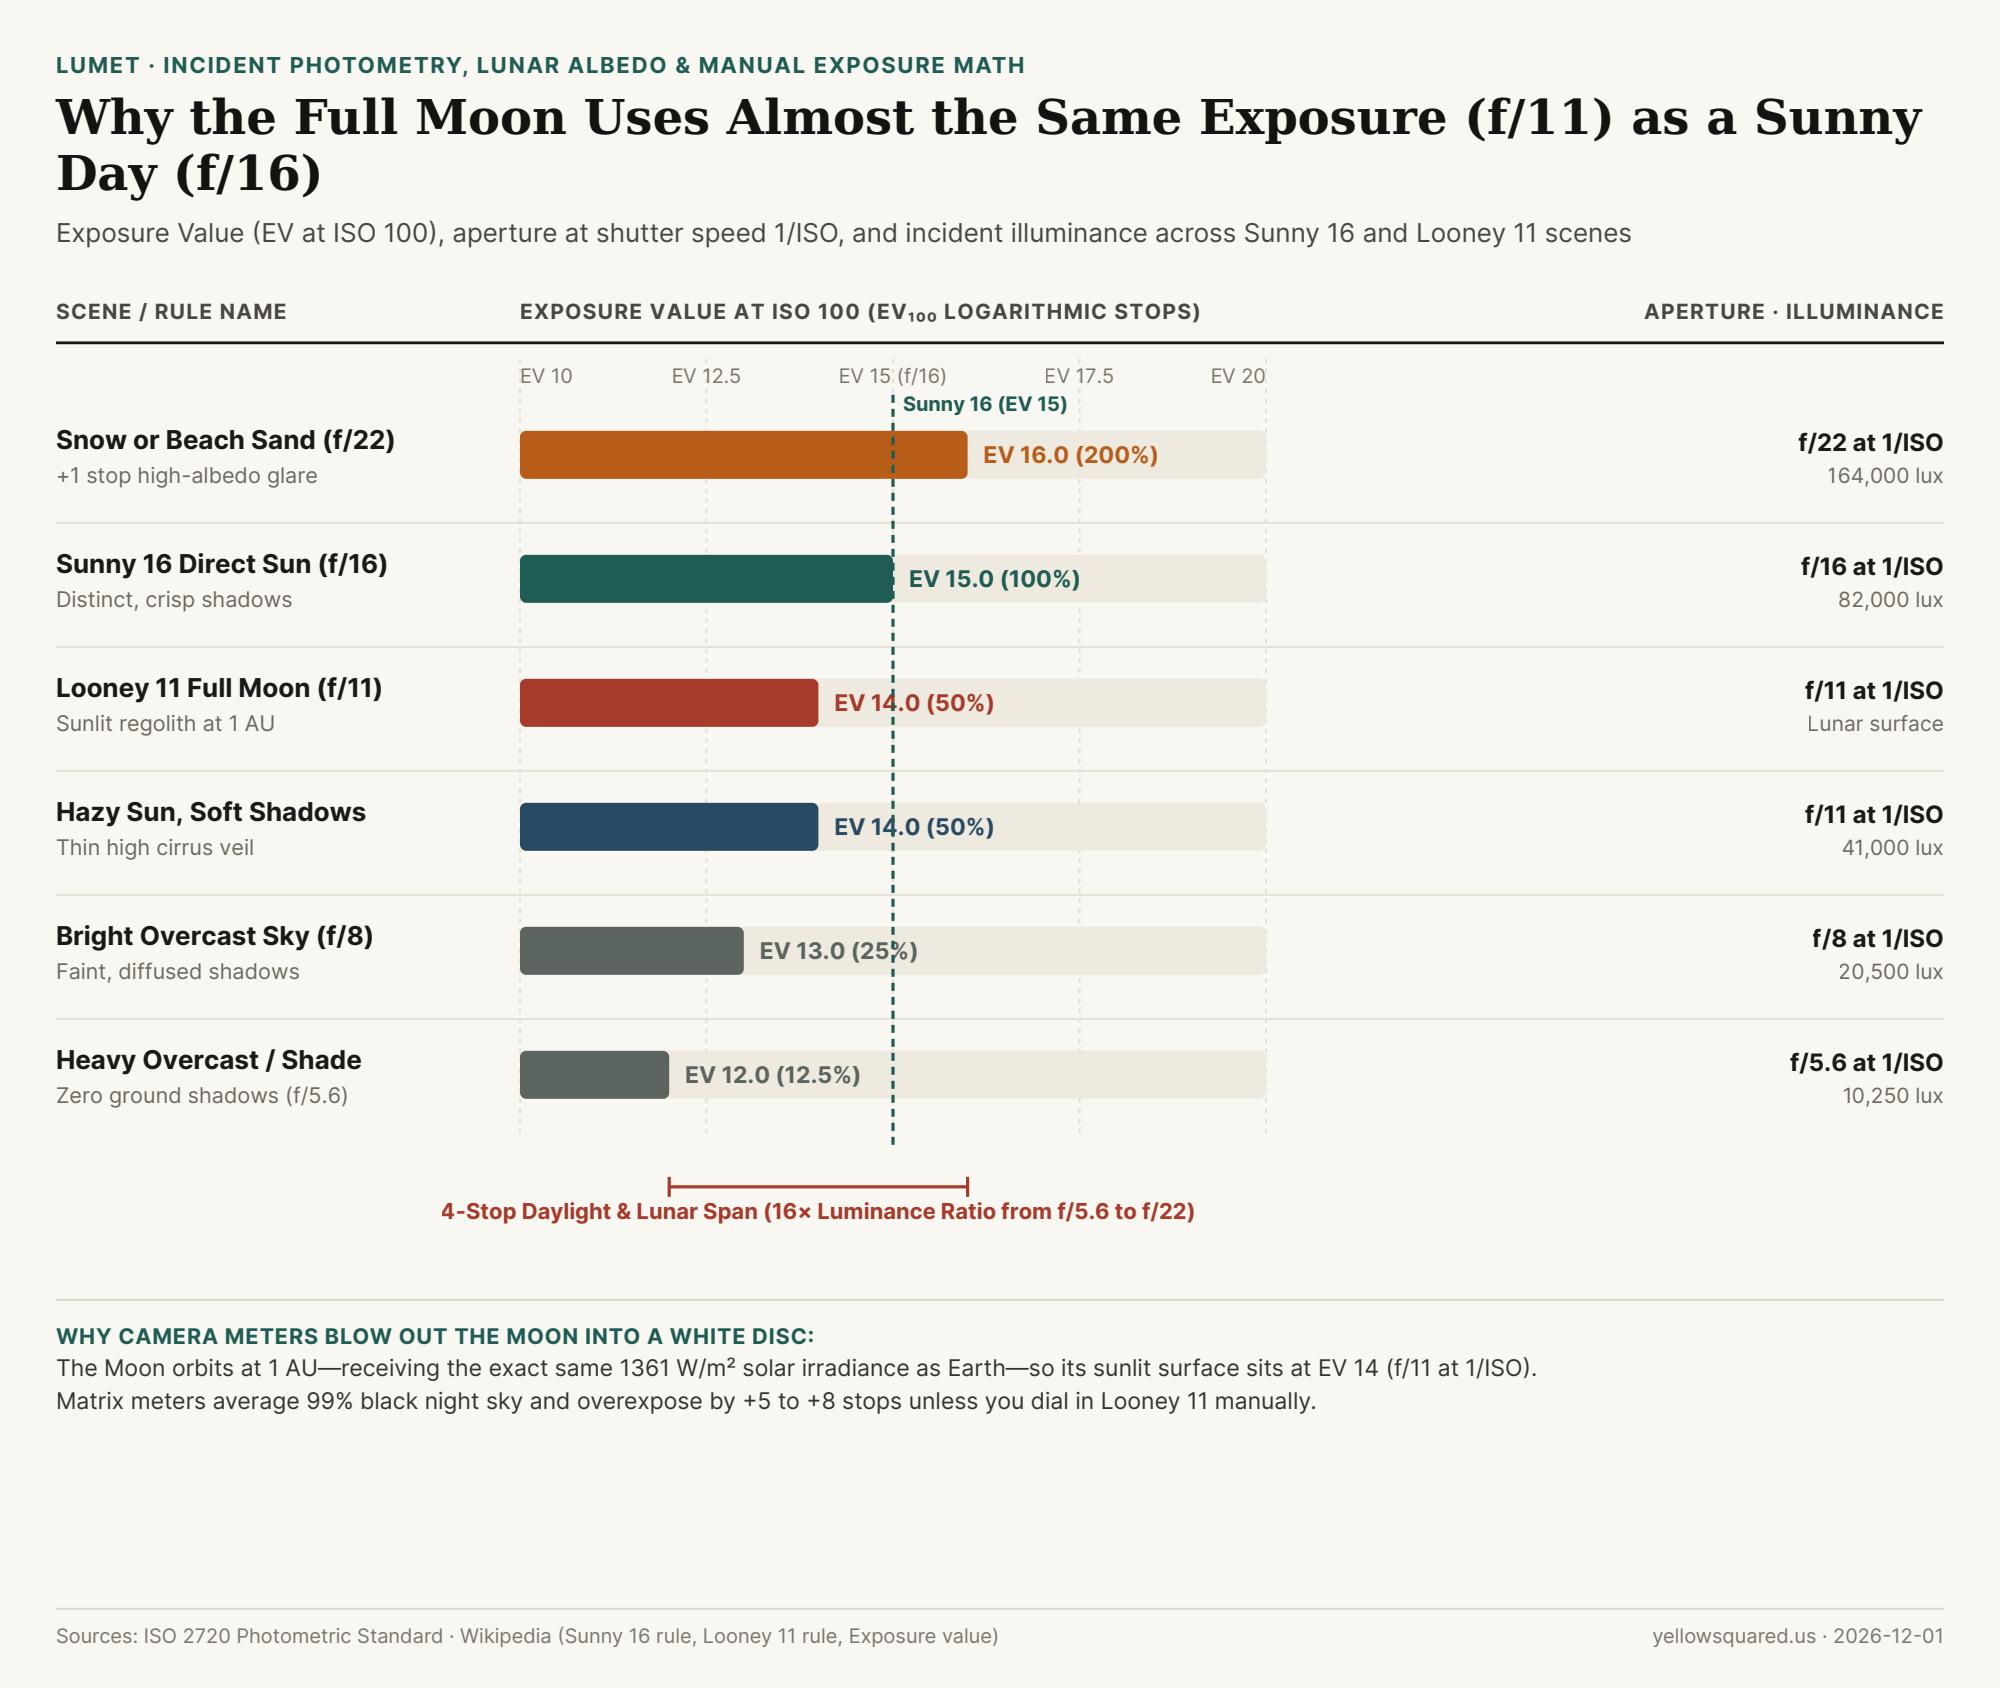
Every photographer who points a camera at the Full Moon in automatic exposure mode encounters the same surprise: instead of crisp craters and dark basalt maria, the camera captures a featureless, blown-out white blob. That happens because the camera's built-in reflective meter averages the 99% black night sky around the lunar disc and boosts exposure by +5 to +8 stops. In reality, the sunlit surface of the Moon is illuminated by the exact same midday Sun as Earth, sitting at Exposure Value 14 (EV 14 at ISO 100)—just one stop below the Sunny 16 rule (EV 15 at ISO 100) (Looney 11 rule - Wikipedia; Sunny 16 rule - Wikipedia).

Once you understand how logarithmic Exposure Values (EV) map to physical illuminance in lux, you can set accurate exposures on mechanical film cameras, manual prime lenses, or telephoto lunar rigs before taking a single test frame—and cross-check real-world ambient lux readings when you Measure ambient and studio lighting in Lumet.

Chart comparing Exposure Value at ISO 100, aperture at 1/ISO shutter speed, and incident lux across Sunny 16 and Looney 11 lighting conditions
Figure 1: Exposure Value (EV at ISO 100), aperture at shutter speed 1/ISO, and incident illuminance across Sunny 16 and Looney 11 scenes. Data: sunny-16-and-looney-11-exposure-value-ev-lux-and-aperture-chart.csv (Sunny 16 rule - Wikipedia; Looney 11 rule - Wikipedia; Exposure value - Wikipedia).

The Photometric Math Behind EV 15 (Sunny 16)

In the international exposure system defined by ISO 2720, Exposure Value (EV) combines relative aperture (f-number N) and exposure time in seconds (t) into a base-2 logarithmic scale (Exposure value - Wikipedia):

EV = log₂(N² / t)

On a clear day with direct sunlight and distinct shadows, incident solar illuminance on Earth's surface reaches approximately 82,000 lux, which corresponds to EV 15 at ISO 100 (Exposure value - Wikipedia). Plugging N = 16 and t = 1/125 s into the formula yields log₂(256 × 125) = log₂(32,000) ≈ 14.97 EV, or EV 15. That relationship gives us the classic Sunny 16 mnemonic: in direct midday sun, set your aperture to f/16 and your shutter speed to the reciprocal of your ISO (1/100 s or 1/125 s at ISO 100; 1/400 s or 1/500 s at ISO 400) (Sunny 16 rule - Wikipedia).

Why the Looney 11 Rule Sits Exactly One Stop Wider (EV 14)

Why does a night-sky object require a daytime shutter speed? By the inverse-square law of electromagnetic radiation, solar irradiance depends only on an object's distance from the Sun—not on the distance from the object to your camera lens. Both Earth and the Moon orbit the Sun at an average distance of 1 Astronomical Unit (1 AU ≈ 149.6 million km), receiving the same 1,361 W/m² solar constant above the atmosphere.

While an average sunlit terrestrial landscape reflects roughly 18% of incident light ("middle gray"), the Moon's dusty basaltic regolith has a slightly darker average geometric albedo of roughly 12%, balanced in part by the opposition surge (retroreflection when the Moon is full) (Looney 11 rule - Wikipedia). As a result, the sunlit lunar surface requires just one stop more exposure than a sunny afternoon on Earth:

  • Looney 11 Rule (Full Moon Surface, EV 14): Set aperture to f/11 and shutter speed to 1/ISO (e.g., f/11 at 1/100 s or 1/125 s at ISO 100, or f/8 at 1/250 s for sharper hand-held telephoto shots) (Looney 11 rule - Wikipedia).
  • Quarter Moon (+1 stop, EV 13): When the solar incidence angle becomes oblique along the lunar terminator, open one additional stop to f/8 at 1/ISO.
  • Crescent Moon (+2 stops, EV 12): For thin crescents low above the twilight horizon, open two stops from Looney 11 to f/5.6 at 1/ISO.

"Photographing the Full Moon is not low-light photography—it is daylight photography of a sunlit rock 384,400 kilometers away."

Complete Sunny 16 & Looney 11 Exposure Reference Table (EV 16 to EV 12)

Each 1.0 EV step down from EV 16 halves the physical illuminance in lux and opens the lens aperture by one full f-stop at a constant 1/ISO shutter speed (Sunny 16 rule - Wikipedia; Exposure value - Wikipedia):

Lighting Condition / Scene Rule Name Aperture at 1/ISO EV at ISO 100 Incident Illuminance Shadow & Surface Cue
1. Snow or White Beach Sand Snowy / Sandy f/22 f/22 16.0 EV 164,000 lux (200%) High-albedo glare; hard black shadows
2. Direct Midday Sunlight Sunny 16 Baseline f/16 15.0 EV 82,000 lux (100%) Clear sky; crisp, distinct shadow edges
3. Full Moon Surface (Night) Looney 11 Rule f/11 14.0 EV 41,000 lux eq (50%) Sunlit lunar regolith at 1 AU (~12% albedo)
4. Hazy Sun / Thin High Clouds Slight Overcast f/11 f/11 14.0 EV 41,000 lux (50%) Soft, diffused shadow edges
5. Bright Overcast Daylight Overcast f/8 f/8 13.0 EV 20,500 lux (25%) Faint shadows under bright cloud deck
6. Heavy Overcast / Open Shade Shady f/5.6 f/5.6 12.0 EV 10,250 lux (12.5%) Zero ground shadows; open north shade

Reciprocity Equivalents for Portrait and Telephoto Shooting

You never have to shoot at f/16 to use the Sunny 16 rule. By the law of exposure reciprocity, every full-stop wider aperture (from f/16 → f/11 → f/8 → f/5.6 → f/4 → f/2.8 → f/2) doubles the required shutter speed. In EV 15 direct sunlight at ISO 100, f/16 at 1/125 s delivers the exact same sensor exposure as f/8 at 1/500 s, f/4 at 1/2000 s, or f/2 at 1/8000 s. To verify real-time incident illuminance and exposure reciprocity on location before shooting film or digital portraits, Measure ambient and studio lighting in Lumet.

013 / 29

What Is the Difference Between Civil, Nautical, and Astronomical Twilight—And When Does Blue Hour Actually Start?

Check a weather forecast or astronomy app before an evening cityscape or Milky Way shoot, and you will see three different sunset-to-night timestamps listed one after another: Civil Dusk, Nautical Dusk, and Astronomical Dusk—alongside photography apps quoting a separate window for Blue Hour. Because twilight duration stretches and shrinks with latitude and season (lasting 22 minutes per stage at the Equator, 30+ minutes at 40°N, and all night in summer above 48.6°N), clock minutes after sunset are a noisy guide. Instead, the U.S. Naval Observatory (USNO) and the National Weather Service (NWS) define every phase of twilight by the exact geometric depression angle of the Sun's center below the horizon—in three clean 6-degree steps from 0° down to -18°.

Reader outcome: You will learn what the sky and ground look like during Civil (0° to -6°), Nautical (-6° to -12°), and Astronomical (-12° to -18°) twilight, why Chappuis ozone absorption turns the sky deep cobalt blue between -4° and -6°, and how to time cityscapes and dark-sky astrophotography to the minute.

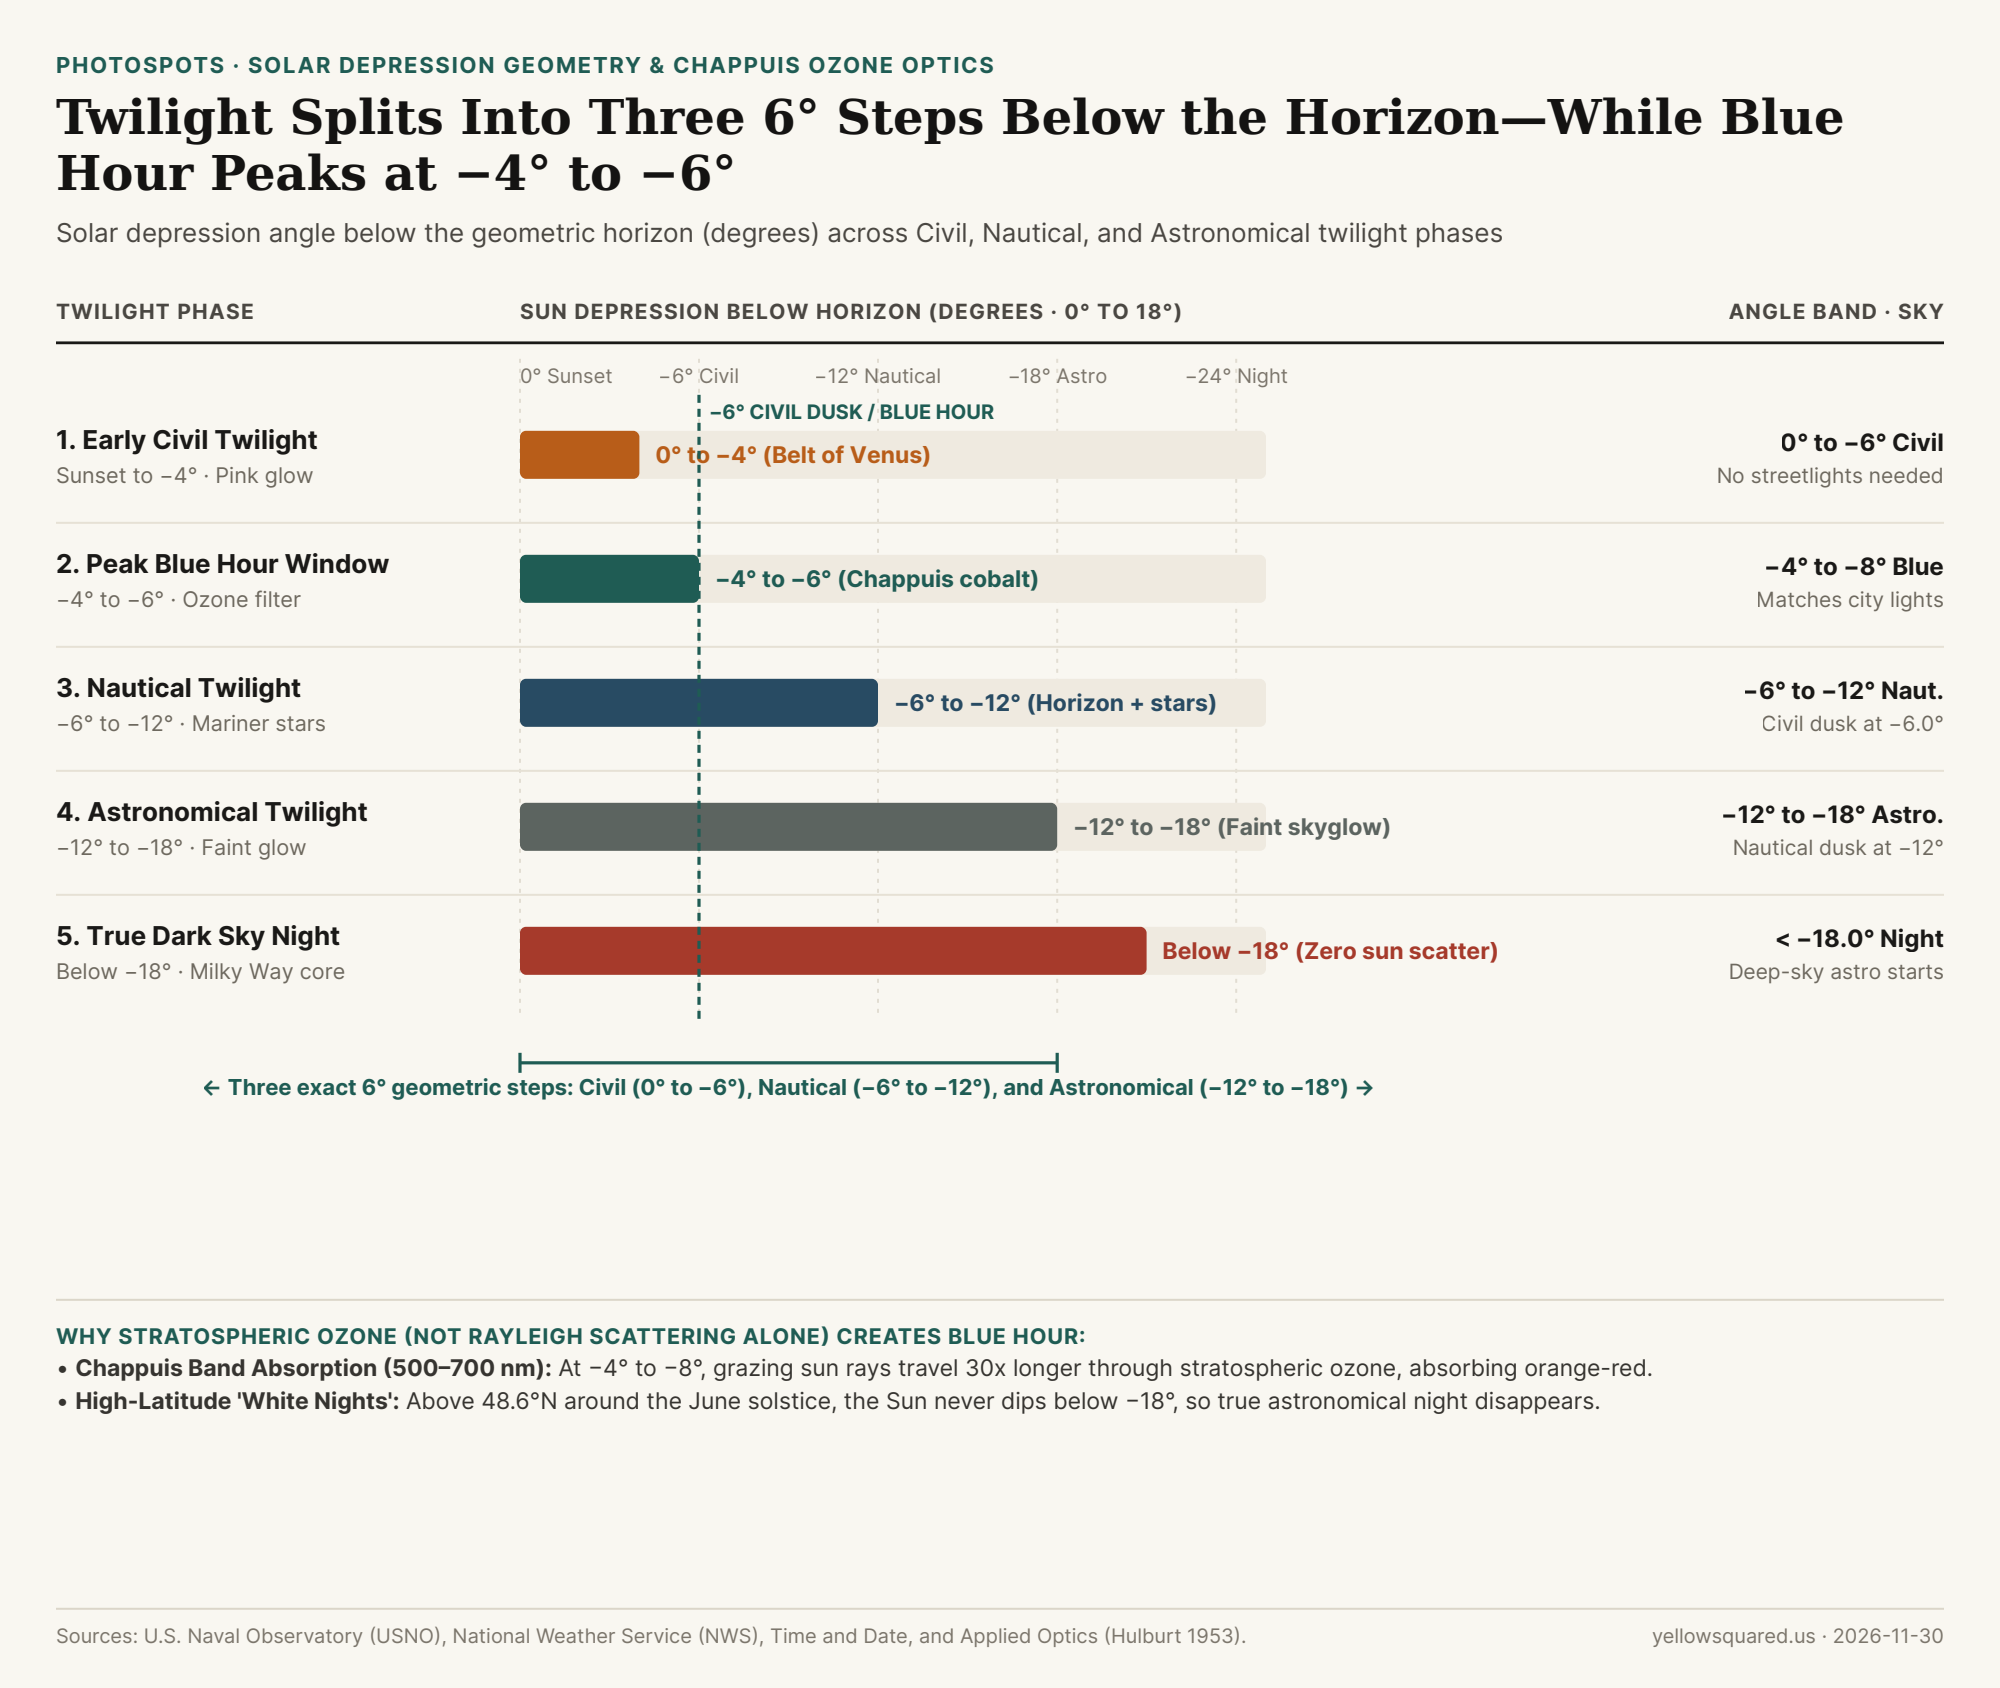
Chart showing solar depression angles below the horizon for Early Civil Twilight, Peak Blue Hour (-4 to -6 degrees), Nautical Twilight (-6 to -12 degrees), Astronomical Twilight (-12 to -18 degrees), and True Night
Each official twilight phase spans exactly 6 degrees of solar depression below the geometric horizon. Peak photographic Blue Hour straddles the late-civil to early-nautical transition (−4° to −6°), where upper-atmosphere ozone filters out orange-red light. Data: Download CSV dataset.

The Three 6-Degree Twilight Steps: Civil, Nautical, and Astronomical

Official sunrise and sunset occur when the upper limb of the Sun touches the horizon (when the Sun's geometric center sits at -0°50' due to 34' of atmospheric refraction plus the Sun's 16' semi-diameter). Once the Sun's center drops below the geometric horizon (0.0°), direct sunlight leaves the ground, but sunbeams continue to illuminate the stratosphere and mesosphere overhead. The three astronomical twilight stages divide that fade into 6° increments:

  • 1. Civil Twilight (0° to -6° Below the Horizon): From sunset until the Sun's center reaches -6.0° (ending at Civil Dusk, or beginning in the morning at Civil Dawn). Ambient scattered light remains bright enough to read outside and conduct outdoor activities without artificial lighting. In the first half (0° to -4°), looking away from the sunset reveals the pink-rose Belt of Venus arch hovering above Earth's rising dark-blue shadow wedge. Statutes frequently tie streetlamp activation, aviation VFR night rules, and hunting hours to Civil Dawn and Civil Dusk.
  • 2. Nautical Twilight (-6° to -12° Below the Horizon): When the Sun sits between -6.0° and -12.0°. Named for classic sextant navigation at sea, this is the window where first- and second-magnitude navigation stars become clearly visible overhead while the line of the sea horizon is still distinct enough to measure star altitudes. On land, artificial lights dominate and landscape silhouettes lose unlit detail by -12° (Nautical Dusk).
  • 3. Astronomical Twilight (-12° to -18° Below the Horizon): When the Sun sits between -12.0° and -18.0°. To the casual human eye in a city or suburb, the sky already looks completely black at -12°. However, faint scattered sunlight high in the upper atmosphere still washes out diffuse nebulae, galaxies, and the zodiacal light until the Sun drops past -18.0° (Astronomical Dusk), marking the start of true astronomical night.

Civil dusk (−6°) is when you need a headlamp on the trail; Nautical dusk (−12°) is when the sea horizon disappears; Astronomical dusk (−18°) is when the last solar glow leaves the Milky Way.

Why the Sky Turns Deep Cobalt During 'Blue Hour' (−4° to −8°)

Why doesn't the twilight sky simply fade from sunset orange to neutral gray? For decades, textbooks credited Rayleigh scattering alone (which scatters short blue wavelengths `~5.5x` more strongly than red). Yet in 1953, physicist E. O. Hulburt proved in the Journal of the Optical Society of America that Rayleigh scattering by itself would produce a pale yellowish-gray zenith at dusk. The rich, saturated royal blue of the Blue Hour (which spans roughly -4° to -8° and peaks between -4° and -6° right before Civil Dusk) is actually caused by Chappuis absorption in the stratospheric ozone layer (`15 to 35 km` altitude):

  • The Grazing Ozone Path Length: When the Sun sits 4° to 6° below your horizon, its rays must travel nearly horizontally through hundreds of kilometers of the stratospheric ozone layer before scattering downward to your camera sensor.
  • The 500–700 nm Chappuis Band: Ozone is nearly transparent to blue light (400–480 nm), but it possesses a broad absorption band—the Chappuis band between 500 nm and 700 nm—that selectively swallows yellow, orange, and red photons over long grazing paths, acting as a giant natural cyan-blue optical filter across the zenith sky.
Twilight / Lighting Phase Solar Elevation Angle Mid-Latitude Duration (40°N) Atmospheric Optics & Sky Appearance Photography & Navigation Use Case
Golden Hour (Low Sun) +6.0° to 0.0° 32 to 40 minutes Rayleigh scattering strips blue; warm 3000K–4000K sun Directional warm rim light and long soft shadows
Early Civil Twilight 0.0° to -4.0° 16 to 20 minutes Pink-orange Belt of Venus opposite Earth's shadow Pastel sky gradients; zero exposure clipping
Peak Blue Hour (Chappuis) -4.0° to -6.0° 8 to 12 minutes Stratospheric ozone absorbs 500–700 nm orange-red Cobalt sky matches 2700K city window exposure
Nautical Twilight -6.0° to -12.0° 26 to 32 minutes Horizon line still visible alongside bright nav stars Cityscapes transition to night; first star trails
Astronomical Twilight -12.0° to -18.0° 26 to 34 minutes Sky looks dark to eye, but faint upper skyglow remains Moonlit landscapes; faint Milky Way still washed
True Astronomical Night Below -18.0° Until Astro Dawn Zero scattered solar radiation in upper atmosphere Deep-sky astrophotography & Milky Way core

Why the −4° to −6° Window Is the 'Dynamic Range Sweet Spot' for Cityscapes

If you photograph a city skyline after Nautical Dusk (below -12°), the unlit sky is pitch black while illuminated office windows and neon signs are 10 to 14 stops brighter—causing either blown-out highlights or muddy shadows. Between -4° and -6° solar elevation (the final 10 minutes of Civil Twilight), the luminance of the Chappuis-filtered cobalt sky equals the luminance of warm 2700K–3200K architectural lighting on the ground, compressing the entire scene into a single 8-stop exposure with complimentary blue-and-gold color contrast. Also watch high latitudes in summer: anywhere above 48.56°N (`66.56° - 18°`, including Vancouver, London, Paris, and Berlin), the Sun never dips below -18° around the June solstice—meaning true astronomical night vanishes for weeks. To check exact Civil, Nautical, and Astronomical twilight timestamps and 3D sun paths offline at any location, Scout golden hour and blue hour angles in PhotoSpots.
014 / 29

What Is Moiré in Digital Photography? Why Fine Fabric Patterns and Screens Create Wavy Rainbow Stripes

You are photographing a groom in a fine wool sharkskin suit, a bride behind a tulle veil, a model wearing a ribbed knit sweater, or a corporate speaker standing in front of an LED wall. Everything looks razor-sharp through the viewfinder—until you open the files on your computer and discover swirling, topographical rainbow oil-slick waves rippled across the fabric. That psychedelic pattern does not exist anywhere on the real clothing: it is moiré (accompanied by its chromatic twin, false color). Why does a $3,500 modern mirrorless camera invent rainbow stripes on a plain grey suit when older 12-megapixel DSLRs rarely did? As explained in optical engineering analyses by Telycam, Photography Life, Webiano, Spéos, and Tucsen Scientific Imaging, moiré is the direct consequence of two design choices in modern cameras: Nyquist spatial aliasing on a discrete Bayer pixel grid, and the industry-wide removal of Optical Low-Pass Filters (OLPF).

1. The Nyquist-Shannon Sampling Limit (fN = 1 / 2p): What Happens When Detail Beats the Grid

Your camera's CMOS sensor is a rigid two-dimensional checkerboard of square photosites spaced at a fixed center-to-center distance called the pixel pitch (p)—for example, 5.94 μm on a 24-megapixel full-frame camera (6000 × 4000 pixels across 36 × 24 mm), 4.35 μm on a 45-megapixel camera (like the Nikon Z8 or Canon EOS R5), and 3.76 μm on a 61-megapixel camera (like the Sony a7R V).

According to the Nyquist-Shannon sampling theorem (Telycam; Tucsen), to record a repeating wave pattern (such as alternating dark and light threads in a woven shirt) without distortion, your sensor must sample at least two pixels per cycle (one pixel for the light thread, one pixel for the dark gap). That sets an absolute mathematical ceiling called the Nyquist frequency:

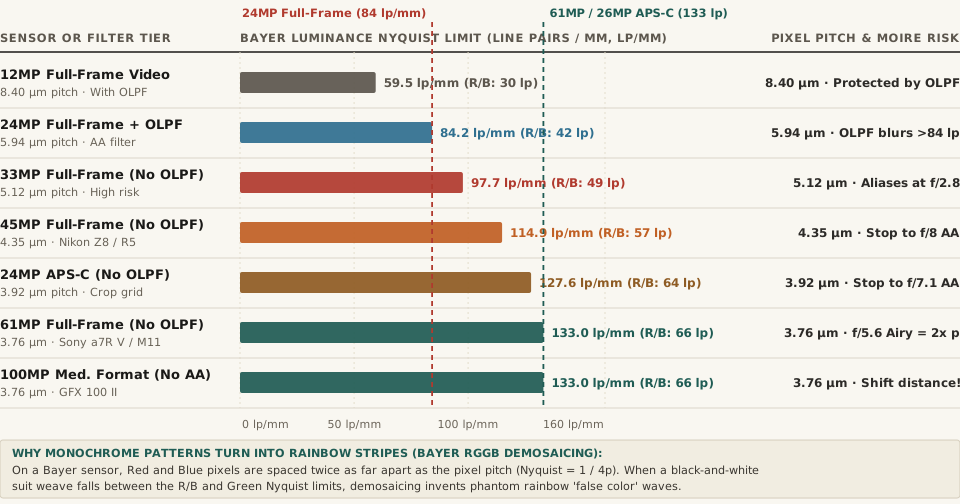
  • Luminance Nyquist Formula: f_Nyquist = 1,000 / (2 × p_micrometers) line pairs per millimeter (lp/mm). On a 45MP full-frame sensor (p = 4.35 μm), the luminance Nyquist limit is 1,000 / 8.70 = 114.9 lp/mm.
  • Frequency Fold-Back (Aliasing): What happens when a razor-sharp prime lens projects a fabric weave onto the sensor at 125 lp/mm—just above the 114.9 lp/mm Nyquist ceiling? As Telycam explains, the excess spatial frequency does not vanish: it folds back across the Nyquist boundary as a low-frequency beat pattern (125 - 114.9 = 10.1 lp/mm), creating giant, slow-moving wavy bands across the garment!
Chart comparing Bayer Luminance Nyquist limits in line pairs per millimeter (lp/mm) across seven sensor tiers from 12MP Full-Frame (59.5 lp/mm) and 24MP Full-Frame with OLPF (84.2 lp/mm) to 45MP Full-Frame without OLPF (114.9 lp/mm) and 61MP Full-Frame / 100MP Medium Format (133.0 lp/mm)
Figure 1: Luminance vs. Red/Blue channel Nyquist spatial frequency ceilings (lp/mm) and Optical Low-Pass Filter status across seven digital camera tiers (Telycam; Photography Life; Tucsen).

2. Why Grey Pinstripes Turn Into Rainbow Mazes: Bayer Demosaicing & OLPF Removal

If moiré is just a geometric beat pattern between two grids, why does a neutral black-and-white or charcoal-grey suit jacket erupt in magenta, cyan, yellow, and green rainbows?

  1. The Bayer RGGB Sub-Sampling Trap: As detailed by Webiano and Telycam, a standard color CMOS sensor does not measure Red, Green, and Blue at every pixel. Instead, a Bayer Color Filter Array (CFA) covers 50% of the pixels with Green filters, 25% with Red filters, and 25% with Blue filters. Because same-color Red or Blue photosites are separated by twice the pixel pitch (2p), the Nyquist limit for Red and Blue is half the luminance Nyquist limit (f_RB = 1 / 4p)! When a fine black-and-white thread pattern lands on a Red photosite on row 1, a Green photosite on row 3, and a Blue photosite on row 5, the camera's demosaicing algorithm mistakenly concludes that the suit is changing color every few millimeters—inventing chromatic false color.
  2. Why Camera Makers Removed the Optical Low-Pass Filter (OLPF): For decades, camera manufacturers placed a two-layer birefringent quartz or lithium niobate crystal—an Optical Low-Pass Filter (OLPF / Anti-Aliasing filter)—in front of the sensor to split every incoming point of light across adjacent pixels, blurring out spatial frequencies above Nyquist before they could alias (Photography Life). Starting in the 2010s (with the Nikon D800E, D810, Z7, Z8, and Sony a7R series), manufacturers omitted the OLPF on nearly all 24MP+ APS-C and 36MP+ full-frame cameras (Spéos) to deliver biting pixel-level sharpness on landscapes and eyelashes—leaving photographers exposed to moiré whenever a sharp lens encounters a fine repeating textile.

"An anti-aliasing filter — the OLPF — intervenes before aliasing can occur, removing the spatial frequencies that would exceed the sensor's Nyquist limit before they ever reach the photosite array... Today, most modern high-resolution APS-C (24 MP and higher) and full-frame cameras (36 MP and higher) have no blur filters in them."

3. Four Field Techniques to Stop Moiré Before It Hits Your RAW File

Because baked-in luminance moiré alters the underlying texture values in your RAW file, Webiano and Spéos emphasize that preventing moiré at capture is far cleaner than painting over it with a post-processing brush:

  • Rule 1 — Always Zoom to 100% (1:1) Before Panicking ("Display Moiré"): When you view a 45-megapixel photo zoomed out to fit a 2-megapixel camera LCD or laptop screen, the downsampling grid of your monitor clashes with the fabric and creates display moiré. Zoom in to 100% (1:1): if the rainbow waves vanish at 100% zoom, your RAW file is completely clean!
  • Rule 2 — Step 6 to 12 Inches Closer or Farther (or Zoom 2–3mm): Moiré only occurs when the projected size of the fabric weave on the sensor closely matches a harmonic of your pixel pitch. Taking half a step forward or backward immediately shifts the spatial frequency out of the danger zone (Spéos).
  • Rule 3 — Rotate the Camera Angle by 5° to 15°: Because sensor pixels sit in a strict 0°/90° horizontal-vertical grid, tilting your composition slightly diagonal breaks the parallel alignment with vertical pinstripes or window screens.
  • Rule 4 — Stop Down to f/8 or f/11 to Use Natural Diffraction as an OLPF: At f/2.8 or f/4, a modern prime lens projects an Airy diffraction disk smaller than a single pixel. If you stop down to f/8 or f/11 (Airy disk = 10.7 µm to 14.8 µm, or 2.5× to 3.4× a 45MP pixel), wave diffraction naturally softens frequencies above Nyquist—acting as a free, built-in Optical Low-Pass Filter (Webiano)!

4. Complete Data Table: Sensor Nyquist Limits, OLPF Status & Natural Diffraction Cutoffs

The reproducible table below—matching the companion CSV (digital-camera-nyquist-frequency-pixel-pitch-olpf-and-diffraction-moire-thresholds.csv)—lists the pixel pitch, luminance and Red/Blue Nyquist limits, and natural diffraction anti-aliasing apertures across seven sensor tiers:

Sensor & Filter Tier Pixel Pitch (p) Luminance Nyquist (1/2p) Red/Blue Nyquist (1/4p) OLPF Status Natural Diffraction AA Aperture (Airy ≥ 2p)
12MP Full-Frame (a7S III / FX3) 8.40 μm 59.5 lp/mm 29.8 lp/mm OLPF Present f/13.0 (17.4 μm Airy disk)
24MP Full-Frame + OLPF (R6 II / Z6 III) 5.94 μm 84.2 lp/mm 42.1 lp/mm Birefringent OLPF f/9.0 (12.1 μm Airy disk)
33MP Full-Frame (Sony a7 IV) 5.12 μm 97.7 lp/mm 48.8 lp/mm Weak / No Blur Filter f/7.6 (10.2 μm Airy disk)
45MP Full-Frame (Nikon Z8 / Zf / R5) 4.35 μm 114.9 lp/mm 57.5 lp/mm No OLPF f/6.5 (8.7 μm Airy disk; use f/8)
24MP APS-C (No OLPF) 3.92 μm 127.6 lp/mm 63.8 lp/mm No OLPF f/5.8 (7.8 μm Airy disk; use f/7.1)
61MP Full-Frame (Sony a7R V / M11) 3.76 μm 133.0 lp/mm 66.5 lp/mm No OLPF f/5.6 (7.5 μm Airy disk; use f/8)
100MP Medium Format (GFX 100 II) 3.76 μm 133.0 lp/mm 66.5 lp/mm No OLPF f/5.6 (7.5 μm Airy disk; use f/8)

When you are exporting multi-image carousels or side-by-side portrait grids and want to verify that downscaled images do not introduce resizing moiré on social feeds, Compare multi-photo grids in BatchPad before publishing.

015 / 29

Why Does the Sun Rise and Set at Different Compass Angles All Year—And How Far North Does It Swing in Summer?

Ask almost anyone where the Sun rises and sets, and they will recite the childhood proverb: "The Sun rises in the East and sets in the West." Yet if you stand on a west-facing beach in Seattle, San Francisco, New York, or London in late June to photograph a summer sunset over the water, the Sun does not set anywhere near due West (270°)—it sinks below the horizon far to the northwest (298° to 310°). Six months later in December, from that exact same tripod spot, the Sun sets far to the southwest (230° to 242°), often hidden behind a completely different headland or city skyline! As derived in standard spherical astronomy references including Harth's Solar Altitude and Azimuth Engineering Guide, SurgePV's Solar Angles Reference, Monash University's Lens, and Wikipedia's Position of the Sun, the Sun rises due East (90°) and sets due West (270°) on only two days of the year—and the further you live from the Equator, the wider the Sun's seasonal compass swing becomes.

Why does a 23.44° planetary tilt produce a 62.6° horizon swing in New York (40°N), a 72.2° swing in Seattle and Paris (47.6°N), and a 130.8° swing in Reykjavik (64.1°N)? Here is the exact equation every portrait and landscape photographer needs.

1. The Sunrise Azimuth Equation: cos(A) = sin(δ) / cos(φ)

In navigation and photography, azimuth (A) is the compass bearing measured clockwise from True North (0° = North, 90° = East, 180° = South, 270° = West). Throughout the year, as Earth orbits the Sun with its rotational axis tilted at 23.44° (Wikipedia; PVEducation), the Sun's declination (δ)—the latitude on Earth where the Sun is directly overhead at solar noon—oscillates smoothly between +23.44° on the June summer solstice, 0.00° on the March and September equinoxes, and -23.44° on the December winter solstice.

As derived from the fundamental spherical law of cosines when the geometric center of the Sun crosses a flat horizon (altitude α = 0°, zenith angle θz = 90°, per Harth and SurgePV), the compass azimuth of sunrise (A_rise) at any observer latitude (φ) simplifies to one elegant ratio:

  • The Horizon Azimuth Formula: cos(A_rise) = sin(δ) / cos(φ) (and because the Sun's daily path is symmetric about due South, the sunset azimuth is simply A_set = 360° - A_rise).
  • Why the Equinoxes Always Equal 90° and 270° Everywhere: On the March and September equinoxes, solar declination is δ = 0°, so sin(0°) = 0. Regardless of your latitude φ, cos(A_rise) = 0, which means A_rise = 90.0° (due East) and A_set = 270.0° (due West) everywhere on Earth outside the poles (Monash Lens).
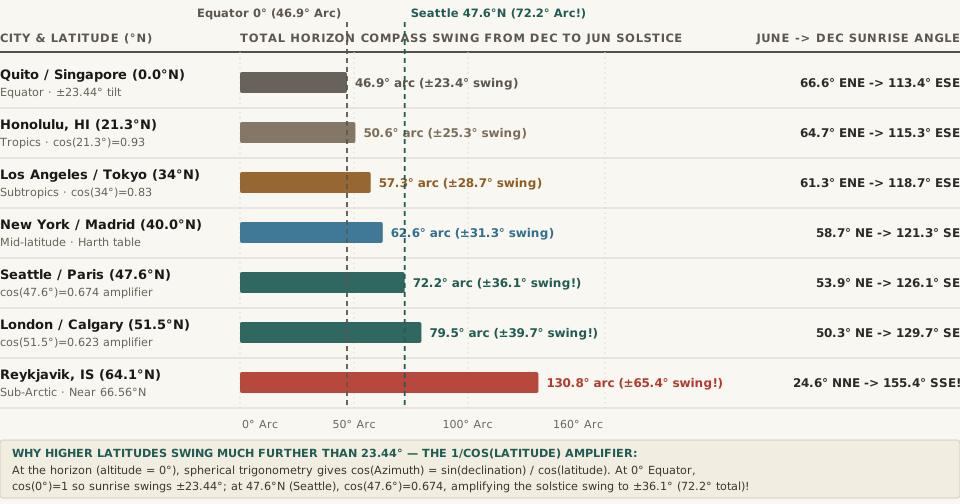
Chart comparing total horizon compass swing in degrees between the June and December solstices across seven latitudes: Equator 0 deg (46.9 deg arc), Honolulu 21.3 deg N (50.6 deg arc), Los Angeles 34 deg N (57.3 deg arc), New York 40 deg N (62.6 deg arc), Seattle/Paris 47.6 deg N (72.2 deg arc), London 51.5 deg N (79.5 deg arc), and Reykjavik 64.1 deg N (130.8 deg arc)
Figure 1: Total annual compass swing along the horizon (degrees from June solstice to December solstice sunrise/sunset) as a function of latitude (Harth Solar Geometry; Monash Lens).

2. The 1 / cos(φ) Latitude Amplifier: Why Seattle Swings 72.2° While the Equator Swings 46.9°

Look closely at the denominator of cos(A_rise) = sin(δ) / cos(φ). Why does the Sun swing so much further north and south along the horizon in Seattle, London, or Reykjavik than it does in Singapore or Honolulu? As Monash University's astrophysical derivation explains, at the Equator (φ = 0°), the celestial sphere rises straight up at a 90° angle to the horizon (cos(0°) = 1.000). At higher latitudes, the Sun's daily path slices across the horizon at a shallow oblique angle (cos(φ) < 1)—acting as a geometric lever that stretches a 23.44° declination shift across a huge horizontal arc:

  1. At the Equator (0.0°N — Quito / Singapore): Since cos(0°) = 1.000, the June solstice sunrise sits at 90° - 23.44° = 66.56° (ENE) and the December solstice sunrise sits at 90° + 23.44° = 113.44° (ESE)—a total annual horizon arc of 46.9°.
  2. At 40.0°N (New York City / Madrid / Beijing): Because cos(40.0°) = 0.7660, on June 21 cos(A_rise) = sin(23.44°) / 0.7660 = 0.3978 / 0.7660 = 0.5193, yielding a sunrise bearing of 58.7° NE and a sunset bearing of 301.3° NW (Harth worked example). In December, sunrise shifts to 121.3° SE and sunset to 238.7° SW—a total horizon swing of 62.6°.
  3. At 47.6°N (Seattle / Paris / Munich): Because cos(47.6°) = 0.6743, on June 21 cos(A_rise) = 0.3978 / 0.6743 = 0.5899, pushing summer sunrise all the way north to 53.9° NE and summer sunset to 306.1° NW! On December 21, sunrise drops to 126.1° SE and sunset to 233.9° SW—a massive 72.2° seasonal arc across the Puget Sound and Olympic Mountains!
  4. At 64.1°N (Reykjavik) & 66.56°N (The Arctic Circle): At Reykjavik (cos(64.1°) = 0.4368), June sunrise swings to 24.6° NNE and sunset to 335.4° NNW (a 130.8° annual swing). Once you reach the Arctic Circle (φ = 66.56°N), cos(66.56°) = 0.3978 = sin(23.44°), so cos(A_rise) = 1.000 and A_rise = 0.0° (Due North)—the exact latitude where the midnight sun skims due North on the horizon without setting!

"At the equinoxes the sun rises at about 90 degrees (due east) and sets at about 270 degrees (due west) everywhere. Away from the equinoxes, cos(sunrise azimuth) = sin(declination) / cos(latitude), and sunset is 360 minus the sunrise azimuth. At 40 degrees N the June sun rises at about 58.7 degrees and sets at 301.3 degrees."

3. Complete Data Table: Solstice vs. Equinox Sunrise & Sunset Bearings by Latitude

The reproducible table below—matching the companion CSV (sunrise-and-sunset-compass-azimuth-swing-by-latitude-june-vs-december-solstice.csv)—lists the exact geometric sunrise and sunset compass bearings across seven major latitude bands:

City / Latitude Band Latitude (φ) June 21 Sunrise / Sunset Equinox Sunrise / Sunset Dec 21 Sunrise / Sunset One-Way Swing Total Horizon Arc
Quito / Singapore 0.0°N 66.6° ENE / 293.4° WNW 90.0° E / 270.0° W 113.4° ESE / 246.6° WSW ±23.4° 46.9°
Honolulu / Mexico City 21.3°N 64.7° ENE / 295.3° WNW 90.0° E / 270.0° W 115.3° ESE / 244.7° WSW ±25.3° 50.6°
Los Angeles / Tokyo 34.0°N 61.3° ENE / 298.7° WNW 90.0° E / 270.0° W 118.7° ESE / 241.3° WSW ±28.7° 57.3°
New York / Madrid / Beijing 40.0°N 58.7° NE / 301.3° NW 90.0° E / 270.0° W 121.3° SE / 238.7° SW ±31.3° 62.6°
Seattle / Paris / Munich 47.6°N 53.9° NE / 306.1° NW 90.0° E / 270.0° W 126.1° SE / 233.9° SW ±36.1° 72.2°
London / Calgary / Berlin 51.5°N 50.3° NE / 309.7° NW 90.0° E / 270.0° W 129.7° SE / 230.3° SW ±39.7° 79.5°
Reykjavik / Fairbanks 64.1°N 24.6° NNE / 335.4° NNW 90.0° E / 270.0° W 155.4° SSE / 204.6° SSW ±65.4° 130.8°

4. Why "Manhattanhenge" and Keyhole Arch Alignments Always Happen in Pairs

Because solar declination (δ) follows a symmetric sine-like wave between -23.44° and +23.44°, any street grid, sea arch, or mountain peak whose compass bearing lies between your latitude's winter and summer solstice extremes will align with the rising or setting Sun on two calendar dates every year, spaced equally before and after the solstice! For example, Manhattan's street grid in New York City (40.7°N) is rotated 29° north of due West (299° azimuth)—just inside New York's June 21 solstice sunset maximum of 301.3°—causing the setting sun to align straight down the canyons of 14th, 23rd, 34th, and 42nd Streets roughly three weeks before the June solstice (around May 28–29) and three weeks after the June solstice (around July 12–13).

To check the exact sunrise and sunset compass bearing for any date of the year before scouting a beach, viewpoint, or urban portrait backdrop, Plan natural-light sessions in PhotoSpots.

016 / 29

Why Do Circular Polarizer Filters Make Wide-Angle Skies Look Uneven—And What Is Brewster's 53° Glare Angle?

Thread a Circular Polarizer (CPL) filter onto the front of your lens beside an alpine lake or tidal pool, rotate the outer ring, and the transformation feels like optical magic: blinding white surface glare vanishes, revealing submerged river stones and trout beneath crystal-clear water. Yet if you leave that exact same polarizer rotated to maximum strength on a 16mm or 20mm wide-angle lens under a cloudless afternoon sky, your photo comes back with an ugly, unnatural dark-blue band cutting across the middle of the sky while the left and right corners stay pale. Why does a polarizing filter only erase water reflections at a specific camera tilt, why does it fail completely on bare metal, and why does it band wide-angle skies? As derived in Sir David Brewster's 1815 optical law, Optica's Applied Optics analysis of water reflection geometry, Luminous Landscape, and Photography Life, two exact geometric angles govern everything a polarizer does: Brewster's Angle (53.1° for water and 56.6° for glass) and the 90° Rayleigh Sky Scattering Rule.

1. How a Circular Polarizer Works—And Why Digital Cameras Need the Quarter-Wave Plate

Sunlight leaves the Sun as unpolarized electromagnetic waves whose electric fields vibrate in every plane perpendicular to the beam. When those waves bounce off a dielectric (electrically insulating, non-metallic) surface like water, glass, wet leaves, or automotive clearcoat—or scatter off nitrogen and oxygen molecules in the atmosphere—they become linearly polarized, vibrating predominantly in a single plane.

As explained in optical filter architecture analyses, a modern Circular Polarizer (CPL) is actually a two-layer sandwich:

  • Front Layer — The Linear Polarizer: Rotating the front ring aligns microscopicdichroic polymer chains perpendicular to the polarized glare wave, blocking the reflection while transmitting unpolarized diffuse light from the subject underneath.
  • Rear Layer — The Quarter-Wave Retarder Plate (λ/4): Older SLR autofocus and metering beam-splitters (and some phase-detect optical paths) are themselves polarization-sensitive and could misread exposure if fed purely linearly polarized light. The rear quarter-wave plate spins the filtered light into circularly polarized light before it enters the lens, without changing the glare-removal effect at all.
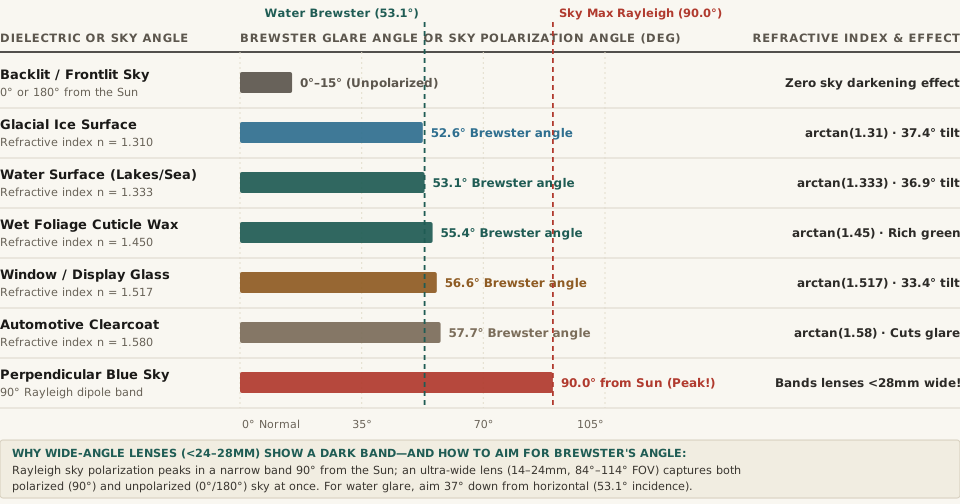
Chart showing Brewster's polarizing angle in degrees across glacial ice (52.6 deg), water (53.1 deg), wet foliage wax (55.4 deg), window glass (56.6 deg), and automotive clearcoat (57.7 deg) alongside the 90.0 deg Rayleigh sky polarization peak
Figure 1: Exact Brewster angle of incidence (θB = arctan(n2/n1)) for 100% polarized surface glare compared against the 90° solar scattering peak in blue skies (Wikipedia — Brewster's Angle; Optica Applied Optics; Luminous Landscape).

2. Brewster's Law (θB = arctan(n2/n1)): Why Water Glare Vanishes at 53.1°

Have you ever noticed that a polarizer removes zero reflection when you shoot straight down into a puddle (0° angle of incidence) or skim right along the horizon (85°–90°), but wipes out 100% of the reflection when you look down at a moderate diagonal angle? In 1814–1815, Scottish physicist Sir David Brewster proved that when unpolarized light strikes a transparent dielectric boundary where the reflected ray and the refracted ray inside the material form an exact 90° right angle, the oscillating surface electrons cannot radiate parallel (p-polarized) waves into the reflected beam (Wikipedia — Brewster's Angle; Brewster dipole derivation). At that exact angle, 100% of the reflected glare is s-polarized (vibrating horizontally parallel to the surface) and can be completely extinguished by a polarizer!

By Snell's Law, Brewster's angle depends solely on the ratio of the refractive index of the reflecting surface (n2) to air (n1 ≈ 1.000): θB = arctan(n2 / n1) (measured from the perpendicular surface normal):

  • Freshwater & Seawater (n2 = 1.333): θB = arctan(1.333) = 53.1° from the vertical normal—which means aiming your camera downward at an angle of 36.9° (~37°) below the horizontal plane of the water. As noted in Optica's Applied Optics study, this 53.1° zone creates the classic dark, transparent patch on lakes and tidal pools.
  • Wet Plant Leaves & Waxy Cuticles (n2 ≈ 1.45): θB = arctan(1.45) = 55.4°. Rotating a CPL in a rainforest or autumn woodland strips the white specular sky sheen off the waxy leaf cuticle so the underlying green or gold pigments saturate naturally.
  • Storefront & Museum Window Glass (n2 = 1.517): θB = arctan(1.517) = 56.6° from the normal—which means standing at a 33.4° oblique angle to the glass pane (not straight on!) to erase street reflections completely (StackExchange Optics Reference).
  • Why Bare Metal Never Polarizes: Because free conduction electrons in unpainted aluminum, chrome, or silver mirrors do not obey dielectric dipole locking, specular reflections off bare metal remain unpolarized at every angle.

"Brewster's angle is often referred to as the 'polarizing angle', because light that reflects from a surface at this angle is entirely polarized perpendicular to the plane of incidence ('s-polarized')."

3. The 90° Rayleigh Sky Rule—And Why Ultra-Wide Lenses (<28mm) Band the Sky

The second physical mechanism occurs high in the atmosphere. Under Rayleigh scattering, sunlight striking air molecules scatters polarized light maximally at a 90° right angle to the Sun's rays, while light scattered directly toward the Sun (0°) or directly away from the Sun (180°) is virtually unpolarized (Luminous Landscape; Kase Filters CPL Guide):

  1. The Thumb-and-Index "L" Rule: Point your index finger directly at the Sun and extend your thumb at a 90° angle. Whatever direction your thumb points as you rotate your wrist traces the circular band across the sky where a polarizer will turn the sky its deepest navy blue. (Note that at solar noon when the Sun is directly overhead, the entire horizon 360° around you sits 90° from the Sun!).
  2. Why Lenses Wider Than 24mm–28mm Create the "Dreaded Polarizer Blob": A 50mm or 85mm lens covers a narrow horizontal field of view (40° or 24°), so the polarization across the frame is uniform. By contrast, a 16mm full-frame lens spans a massive 96.7° horizontal field of view (Photo Cascadia; Ken Koskela Photography). If part of your 16mm frame points at 90° to the Sun (where the sky is 80% polarized) while the edges of the frame reach toward 30° or 150° from the Sun (where the sky is barely polarized), a fully rotated CPL will carve a dark V-shaped or oval inkblot across the middle of the sky.
  3. How to Shoot Wide With a CPL Without Banding: When shooting wider than 24mm with open blue sky in the frame, rotate the CPL only halfway to maximum—or orient the filter to suppress foreground water/foliage glare during golden hour or overcast conditions when the sky is covered by clouds.

4. Complete Data Table: Brewster Glare Angles & Sky Polarization Benchmarks

The reproducible table below—matching the companion CSV (circular-polarizer-brewsters-angle-water-glass-and-90-degree-sky-polarization.csv)—lists the refractive indices, exact Brewster incidence angles, camera tilt angles, and sky scattering zones:

Surface or Sky Zone Refractive Index (n2) / Geometry Optical Formula Brewster / Peak Angle Angle From Surface Plane Polarized Share Field Photography Application
Frontlit / Backlit Sky 0° or 180° from Sun Forward/backward Rayleigh 0°–15° Along solar azimuth < 10% Zero sky darkening; costs ~1.5 stops of light
Glacial Ice / Wet Snow n2 = 1.310 arctan(1.310) 52.6° 37.4° depression tilt ~100% at 52.6° Cuts specular sheen on blue glacier ice
Freshwater / Seawater n2 = 1.333 arctan(1.333) 53.1° 36.9° depression tilt 100% at 53.1° Erases lake & stream reflections completely
Waxy Foliage Cuticle n2 ≈ 1.450 arctan(1.450) 55.4° 34.6° grazing angle 95%–100% Removes silver sky glare from wet forest leaves
Window / Display Glass n2 = 1.517 (Crown) arctan(1.517) 56.6° 33.4° off window plane 100% at 56.6° Stand ~33° sideways to see through glass windows
Automotive Clearcoat n2 ≈ 1.580 arctan(1.580) 57.7° 32.3° off body panel 100% (Non-metal) Eliminates windshield & clearcoat reflections
Perpendicular Blue Sky 90° orthogonal to Sun Rayleigh dipole scattering 90.0° Thumb-index "L" rule 75%–85% Peak sky contrast; dial back on lenses <28mm

Before heading out with a polarizer for reflection-free lake views or golden-hour portraits, Plan natural-light sessions in PhotoSpots to check the exact solar azimuth and elevation angle at your shooting location.