YellowSquared  /  Field notes

Notes from the workshop

28 posts, newest first. Choose an app to narrow the feed.

009 / 28

Why Do Resized Images Look Blurry or Jagged? Bicubic vs. Lanczos vs. Bilinear Downsampling Explained

Every time you export a 24-megapixel camera image (6000×4000 pixels) down to a 1200×800 web hero or a 400×400 product thumbnail, the resizer must discard more than 96% of the original pixel samples. If you pick the wrong image scaling algorithm—or rely on a browser’s default 4-tap bilinear pass—fine eyelashes, fabric weaves, and UI typography either turn into a soft, muddy blur or break into jagged stair-step moiré patterns. Understanding the mathematical difference between Nearest-Neighbor, Bilinear, Bicubic (Mitchell-Netravali vs. Catmull-Rom), and Lanczos-3 resampling lets you keep maximum edge sharpness without ringing halos.

When processing image sets in BatchPad, selecting the right 2D convolution kernel for your source material—photographs, vector-style UI screenshots, or pixel art—eliminates the need for destructive post-resize unsharp masking.

Why Downsampling Requires a Low-Pass Reconstruction Filter

According to the Nyquist–Shannon sampling theorem, shrinking an image by a factor of S (for example, S = 4 when resizing 4000px → 1000px) lowers the maximum spatial frequency the output grid can represent by 1 / S. Any detail in the source image with a spatial frequency higher than the new Nyquist limit must be attenuated before or during resampling, or it will fold back into the output as spatial aliasing (jagged diagonal edges and false moiré patterns):

  • The Ideal sinc(x) = sin(πx) / (πx) Filter: In continuous signal theory, the ideal brick-wall low-pass filter is the infinite sinc function, which passes 100% of frequencies below the Nyquist cutoff and 0% above it. Because an image grid is finite, practical resizers approximate sinc(x) using compact piecewise polynomials or windowed sinc kernels across a 1×1, 2×2, 4×4, or 6×6 tap neighborhood.
  • Why Positive-Only Kernels Blur Edges: Any kernel whose weights are strictly non-negative (such as Bilinear or a pure Cubic B-Spline) acts as a local moving average, rolling off mid-band frequencies well below the Nyquist limit and making sharp edges look out of focus.
  • Why Negative Side-Lobes Preserve Acutance: Kernels like Catmull-Rom and Lanczos-3 dip slightly negative (-0.06 to -0.13) at distance 1 < |x| < 2, boosting micro-contrast right at step edges so textures look crisp at smaller pixel dimensions.
Chart comparing Nyquist fine-detail retention, tap window size, and step-edge ringing across seven image resampling kernels
Figure 1: Passband detail retention near the target Nyquist limit (MTF50 %), 2D tap window size, and step-edge ringing overshoot across seven image scaling kernels. Download the complete kernel benchmark table in image-resampling-kernels-lanczos-bicubic-bilinear-comparison.csv.

7 Image Resampling Kernels Compared: Tap Window, Sharpness, and Ringing

In their classic 1988 SIGGRAPH paper, Don Mitchell and Arun Netravali parameterized the entire family of bicubic filters using two constants (B, C) subject to B + 2C = 1. Comparing those cubic splines against Nearest-Neighbor, Bilinear, and windowed Lanczos sinc filters reveals the exact sharpness-versus-ringing trade-off:

Resampling Kernel 2D Support Window Passband MTF Retention Step-Edge Ringing Relative CPU Cost Best Production Use Case
Lanczos-3 (a = 3 sinc) 6×6 (36 taps) 88.5% 9.4% overshoot 3.4× Photographic downsampling, foliage, skin & print/web export
Lanczos-2 (a = 2 sinc) 4×4 (16 taps) 81.0% 5.2% overshoot 2.1× Sharp photo downscaling with reduced high-contrast halos
Catmull-Rom (B=0, C=0.5) 4×4 (16 taps) 78.5% 4.6% overshoot 1.8× Default “Bicubic Sharper” for product photos & thumbnails
Mitchell-Netravali (B=1/3, C=1/3) 4×4 (16 taps) 68.0% 1.8% overshoot 1.8× UI screenshots, typography, CG renders & clean gradients
Bilinear (Triangle Tent) 2×2 (4 taps) 56.0% 0.0% overshoot 1.0× Real-time GPU mipmapping (visibly soft on standalone photos)
Cubic B-Spline (B=1, C=0) 4×4 (16 taps) 51.0% 0.0% overshoot 1.7× Noisy source smoothing (too blurry for general resizing)
Nearest-Neighbor (Box) 1×1 (1 tap) 42.0% 0.0% (Hard aliasing) 0.3× 8-bit pixel art, sprites, QR codes & exact 2×/4× integer UI

“When people say ‘Bicubic,’ they could mean three completely different filters: Cubic B-Spline (B=1, C=0) blurs more than Bilinear, Mitchell-Netravali (B=1/3, C=1/3) balances smoothness and edge control, and Catmull-Rom (B=0, C=0.5) acts as a high-acutance interpolating spline.”

Three Rules for Artifact-Free Batch Image Resizing

  1. Match the Kernel to Edge Contrast (Photos vs. UI Text): Continuous-tone photographs rarely contain 1-pixel jumps from pure black (#000000) to pure white (#FFFFFF), so Lanczos-3 (36 taps) or Catmull-Rom (16 taps) produces crisp eyelashes, hair, and architecture with negligible visible ringing. On synthetic UI screenshots, dark-mode code blocks, or vector logos, however, a 9.4% step-edge overshoot creates a faint bright halo around text—making Mitchell-Netravali or Lanczos-2 the cleaner choice.
  2. Never Multi-Pass Resize Without a Master File: Every non-integer resampling pass multiplies its modulation transfer function (MTF) loss: running three sequential Bilinear resizes (0.56 × 0.56 × 0.56 = 0.175) destroys over 82% of fine passband contrast. Always batch-generate every target size (1600w, 800w, 400w) in a single pass directly from the full-resolution master.
  3. Watch Gamma Encoding on Specular Highlights: Standard JPEG and PNG files store pixel values in non-linear sRGB (γ ≈ 2.2). Averaging dark and bright pixels directly in gamma-encoded space underweights bright specular highlights (such as night city lights or starry skies); resizing in linear light (or using high-precision floating-point convolution) preserves highlight energy and color saturation.

Need to resize, crop, or convert dozens of product photos, screenshots, or responsive web assets locally in your browser without uploading files to an external server? Open BatchPad to batch-process your images with clean scaling presets, or browse our image workflow guides.
010 / 28

Why Do Images Look Washed Out After Uploading to the Web? Display P3 vs. sRGB Color Profiles Explained

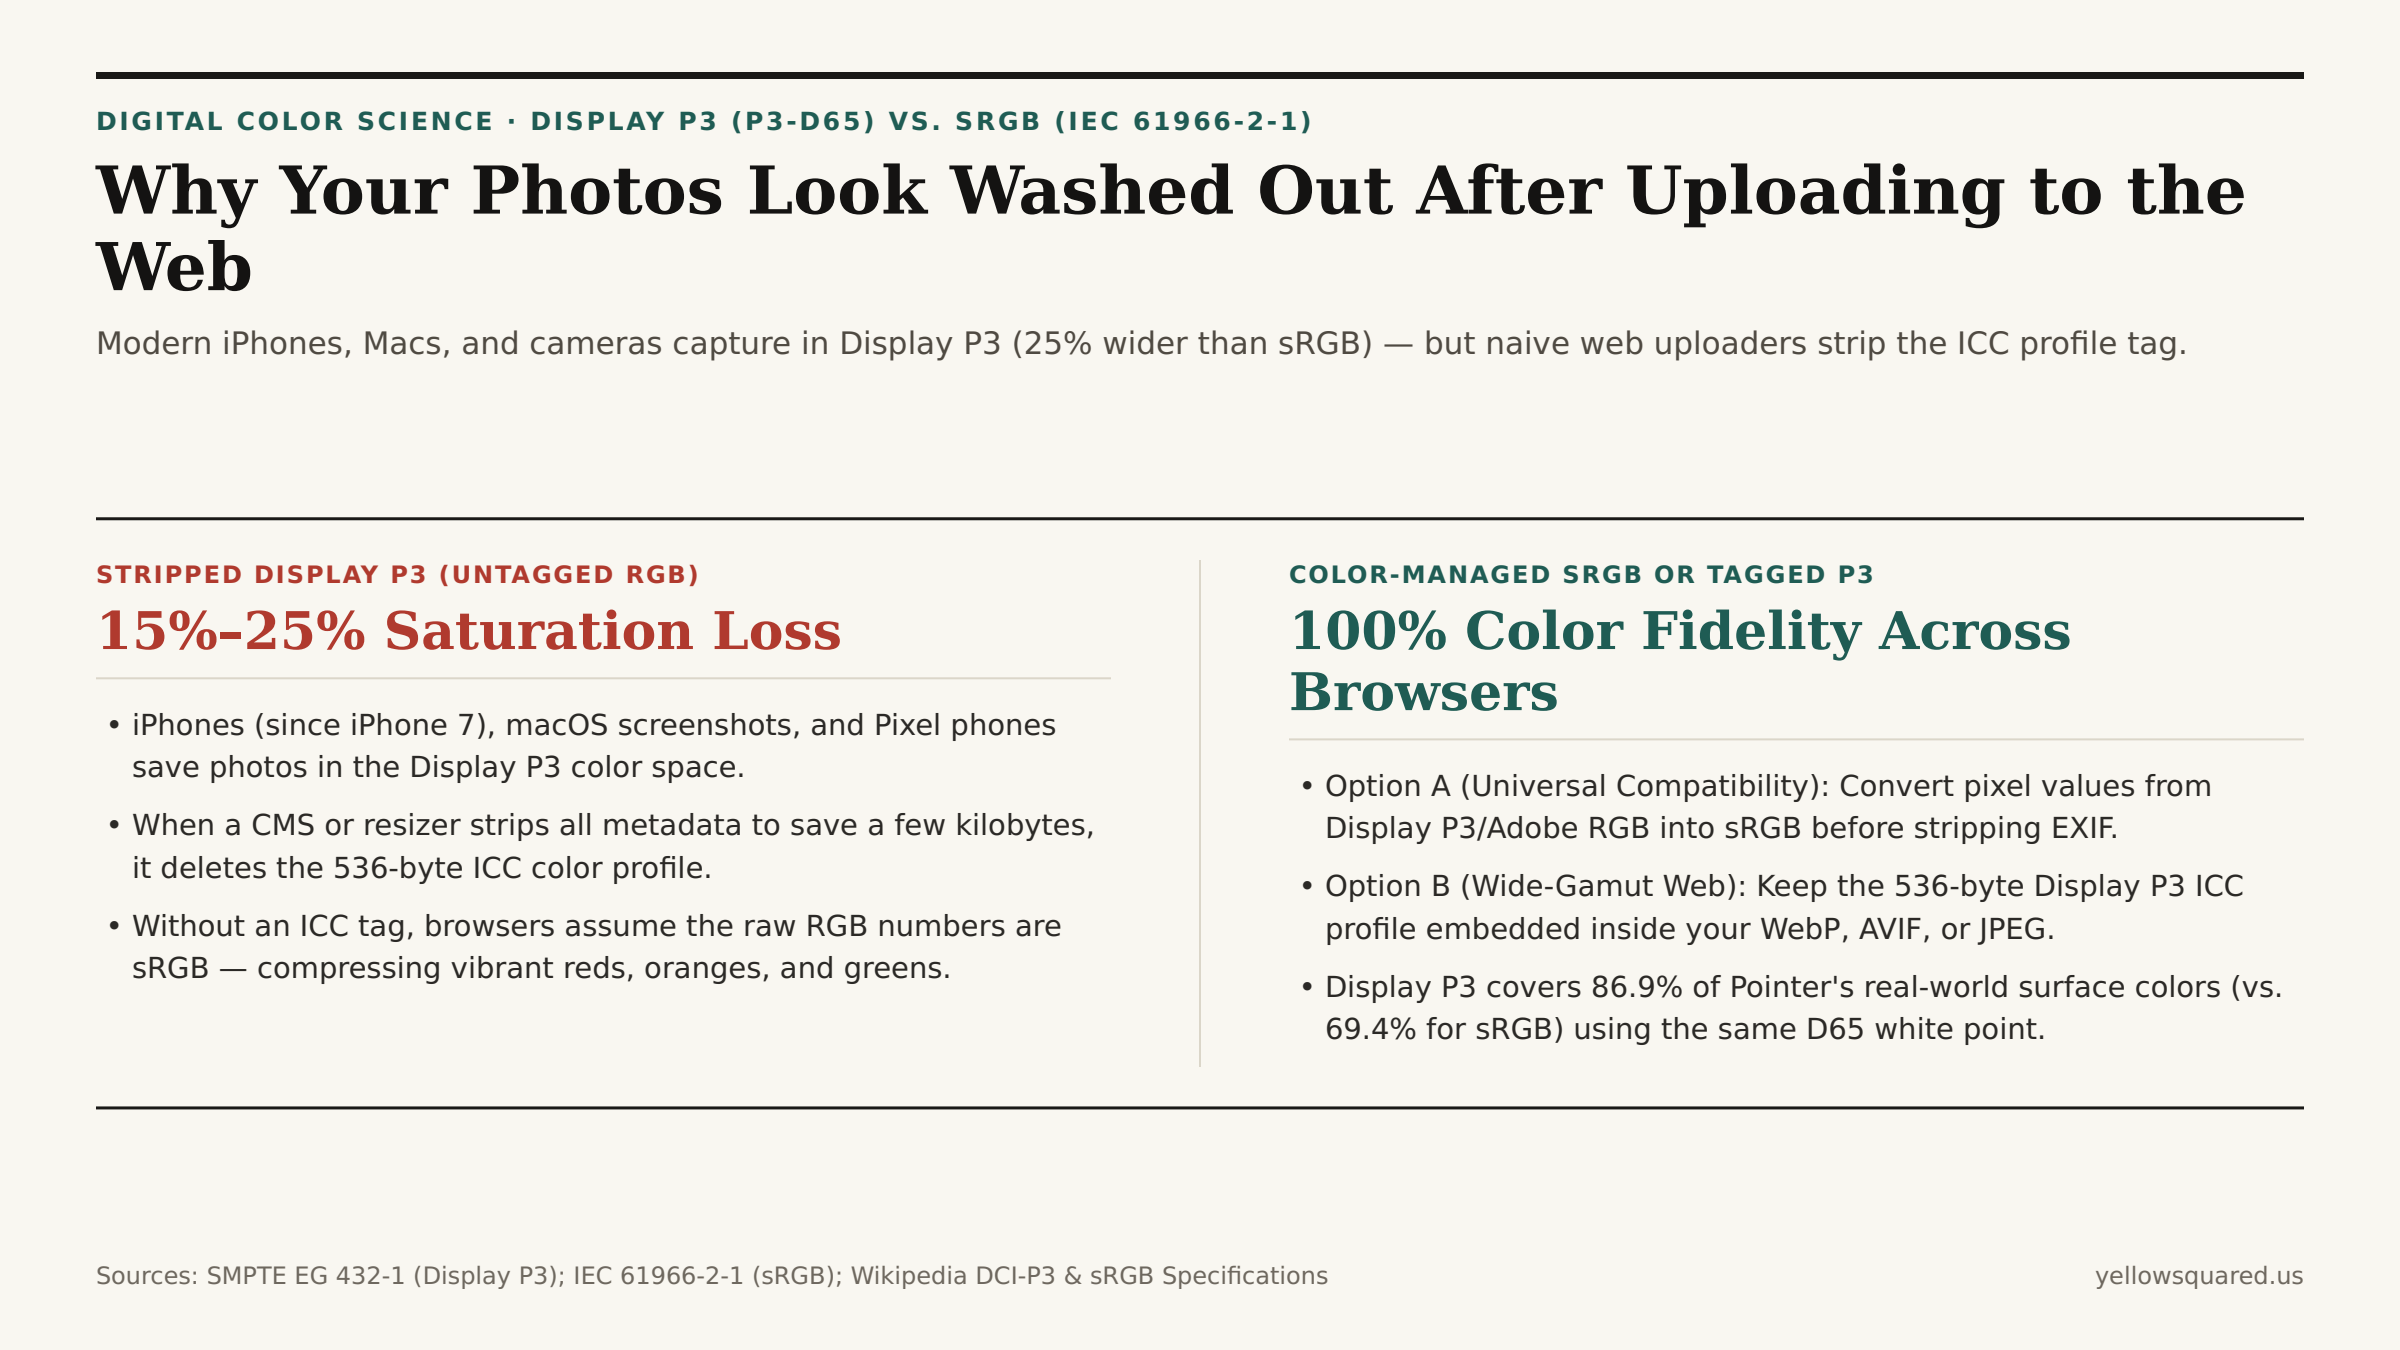
You spend twenty minutes color-grading a product photo, sunset landscape, or macOS UI screenshot on a modern MacBook Pro, iMac, or iPhone. On your screen, the coral reds, emerald greens, and golden skin tones look rich and luminous. Then you upload the image to a website CMS, social scheduler, or e-commerce store — and the published image suddenly looks 15% to 25% desaturated, muddy, and pale. Nothing happened to your monitor: your upload pipeline stripped the file's Display P3 ICC color profile and forced the browser to interpret wide-gamut RGB numbers as narrow 1996 sRGB.

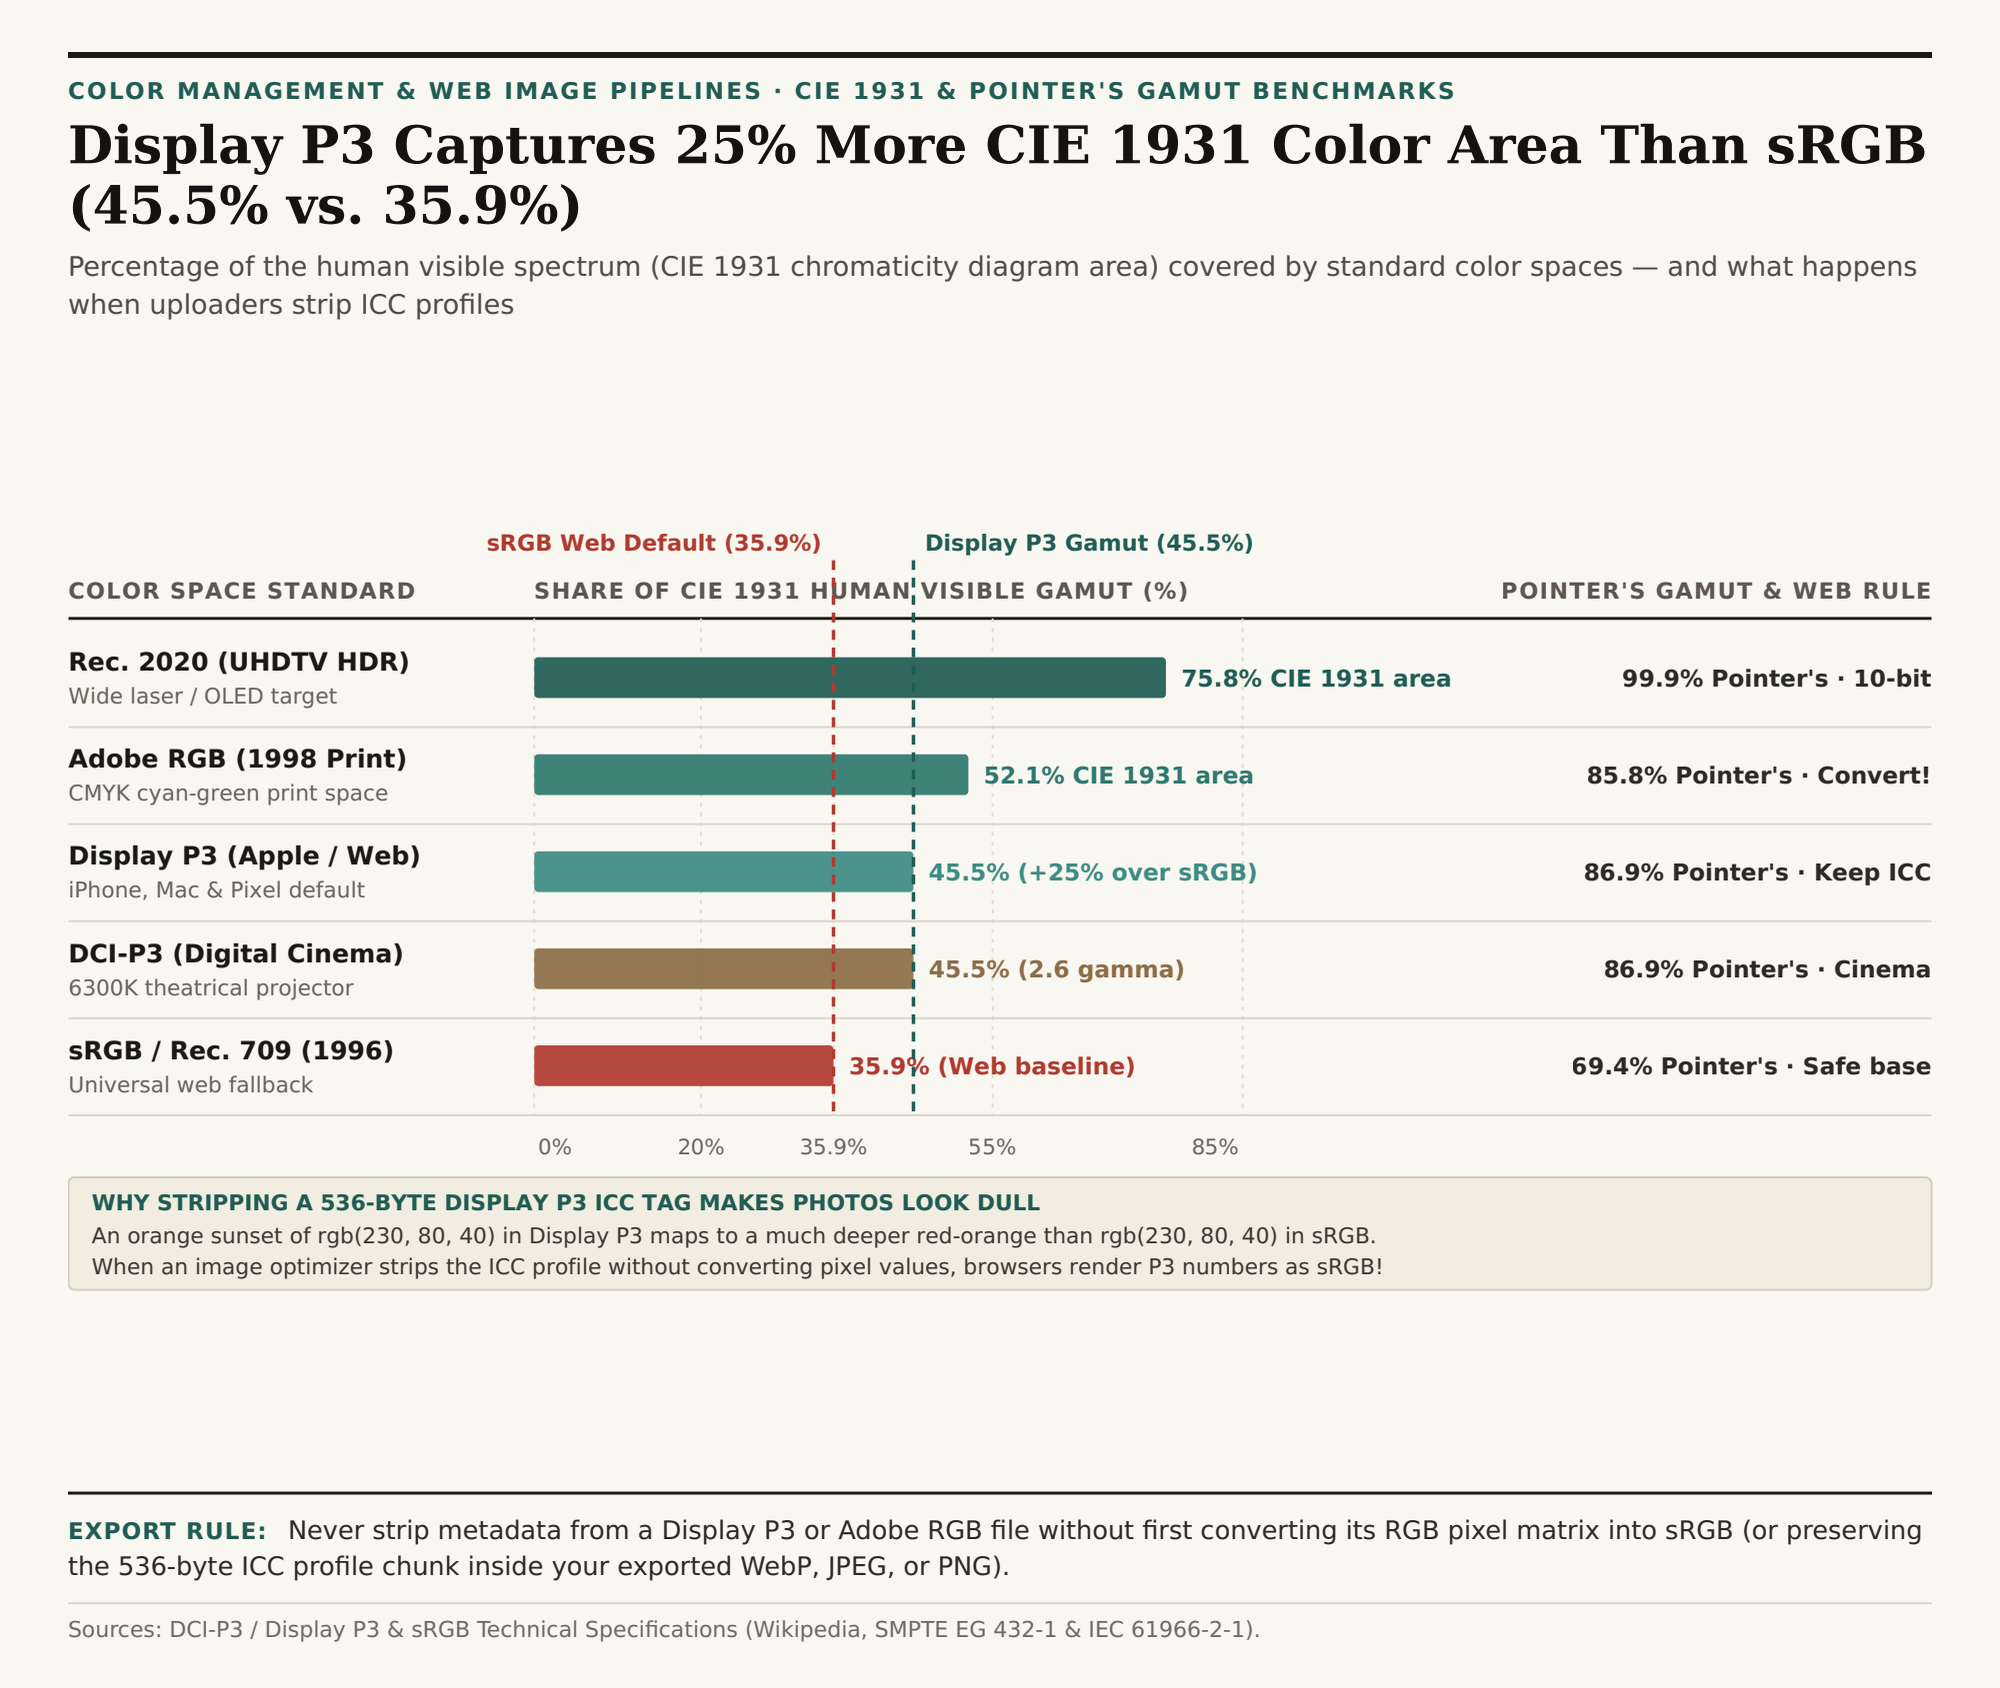
As documented in Wikipedia's Technical Specification for DCI-P3 and Apple Display P3 (SMPTE EG 432-1) and the IEC 61966-2-1 sRGB Standard Reference, Display P3 covers 45.5% of the CIE 1931 human visible chromaticity diagram — a 25% larger surface area (and ~50% larger 3D color volume) than sRGB (35.9%). To batch-convert images cleanly for the web without losing color accuracy or exposing private files to a remote cloud server, Batch-convert and optimize web images in BatchPad.

Comparison between an untagged Display P3 image whose ICC profile was stripped during upload (causing 15% to 25% saturation loss) versus a properly converted sRGB or ICC-tagged Display P3 image
When an image processor strips a 536-byte Display P3 ICC profile without converting the underlying RGB matrix, web browsers treat wide-gamut P3 coordinates as narrow sRGB — washing out reds, oranges, and greens by up to 25%.

1. The Chromaticity Math: Why rgb(230, 80, 40) Means Two Different Colors in P3 vs. sRGB

A raw RGB pixel triplet like rgb(230, 80, 40) is not an absolute physical color — it is a set of relative coordinates ("90% of this color space's red primary, 31% of its green primary, 16% of its blue primary"). Which actual wavelengths of light your screen emits for rgb(230, 80, 40) depends entirely on the chromaticity primaries defined by the file's embedded ICC profile:

  • sRGB / Rec. 709 (1996 Web Baseline, 35.9% CIE 1931 Area): Designed in 1996 by HP and Microsoft around the phosphor limits of 1990s CRT monitors (Wikipedia sRGB). It covers 35.9% of the CIE 1931 chromaticity diagram and 69.4% of Pointer's gamut (the catalog of real-world reflective surface colors).
  • Display P3 / P3-D65 (Modern Wide Gamut, 45.5% CIE 1931 Area): Standardized in SMPTE EG 432-1 and adopted across Apple iPhones (since iPhone 7), Macs (since 2015), and Google Pixel flagships (Wikipedia DCI-P3 / Display P3). Display P3 keeps the exact same D65 (6504 K) daylight white point and ~2.2 sRGB transfer curve as sRGB, but pushes the red primary (615 nm) and green primary (544.2 nm) 25% further out toward pure spectral laser light — covering 45.5% of CIE 1931 and 86.9% of Pointer's real-world surface colors.
  • Adobe RGB (1998) (52.1% CIE 1931 Area): Built for CMYK print prepress with a bluish-green primary (534.7 nm), covering 52.1% of CIE 1931 and 85.8% of Pointer's gamut.
Horizontal bar chart comparing percentage of the CIE 1931 human visible color gamut covered by Rec. 2020 (75.8%), Adobe RGB (52.1%), Display P3 (45.5%), DCI-P3 Cinema (45.5%), and sRGB (35.9%)
Percentage of the CIE 1931 visible color diagram and Pointer's real-world surface gamut covered by five major color spaces. Download the Display P3 vs. sRGB color gamut dataset (CSV).

2. What Happens When a CMS or Script Strips the 536-Byte ICC Profile

To reach the exact same moderately saturated skin tone or coral button color that represents 100% red in sRGB, a Display P3 file only needs to dial its wider red channel to roughly 82%. As long as the 536-byte Display P3 ICC profile header remains attached to the .jpg, .png, or .webp file, Safari, Chrome, Edge, and Firefox read the profile and expand that 82% P3 value to its true vivid color.

However, many server-side thumbnail generators and command-line minifiers run a blanket "strip all metadata" flag (-strip) to scrub EXIF camera tags. When that flag deletes the ICC profile chunk without performing a mathematical 3×3 matrix conversion of the pixels:

  1. The W3C CSS and HTML specification mandates that any untagged image on the web must be rendered as sRGB;
  2. Your 82% Display P3 red value is now displayed as 82% of the much narrower sRGB red primary;
  3. Every saturated red, orange, golden skin tone, and lime green drops in chroma by 15% to 25%, turning warm skin grayish-tan and vibrant product photos dull!

"Stripping GPS and camera EXIF tags saves privacy and bytes — but stripping the 536-byte ICC color profile from a Display P3 image without converting its pixels to sRGB silently drains 20% of the saturation out of every photo."

Color Space White Point & Curve CIE 1931 Area Pointer's Gamut vs. sRGB Area Web Upload Best Practice
sRGB (IEC 61966-2-1) D65 / ~2.2 sRGB curve 35.9% 69.4% 1.00x (Baseline) Safe everywhere, even if untagged
Display P3 (P3-D65) D65 / ~2.2 sRGB curve 45.5% 86.9% 1.25x (+50% vol) Must keep ICC tag OR convert to sRGB
DCI-P3 (SMPTE 431-2) ~6300K / 2.6 gamma 45.5% 86.9% 1.25x (Cinema) For digital cinema projectors only
Adobe RGB (1998) D65 / 2.2 pure gamma 52.1% 85.8% 1.45x (Print) Always convert to sRGB before web export
Rec. 2020 (UHDTV) D65 / 10–12 bit HDR 75.8% 99.9% 2.11x (HDR) 10-bit HDR video & AVIF/HEIC masters

How to Batch-Convert Web Images Without Washing Out Colors

When preparing a folder of iPhone .heic photos, macOS screenshots, or Lightroom exports for a website, use a browser-side pipeline that renders images through a color-managed canvas into standard sRGB WebP, JPEG, or PNG — locking in consistent colors across every device even when EXIF metadata is removed. Batch-convert and optimize web images in BatchPad locally in your browser, and download the Display P3 vs. sRGB color gamut CSV table.

011 / 28

Why Do iPhones Save Photos as HEIC Instead of JPG? File Size, 10-Bit HDR, and When to Convert

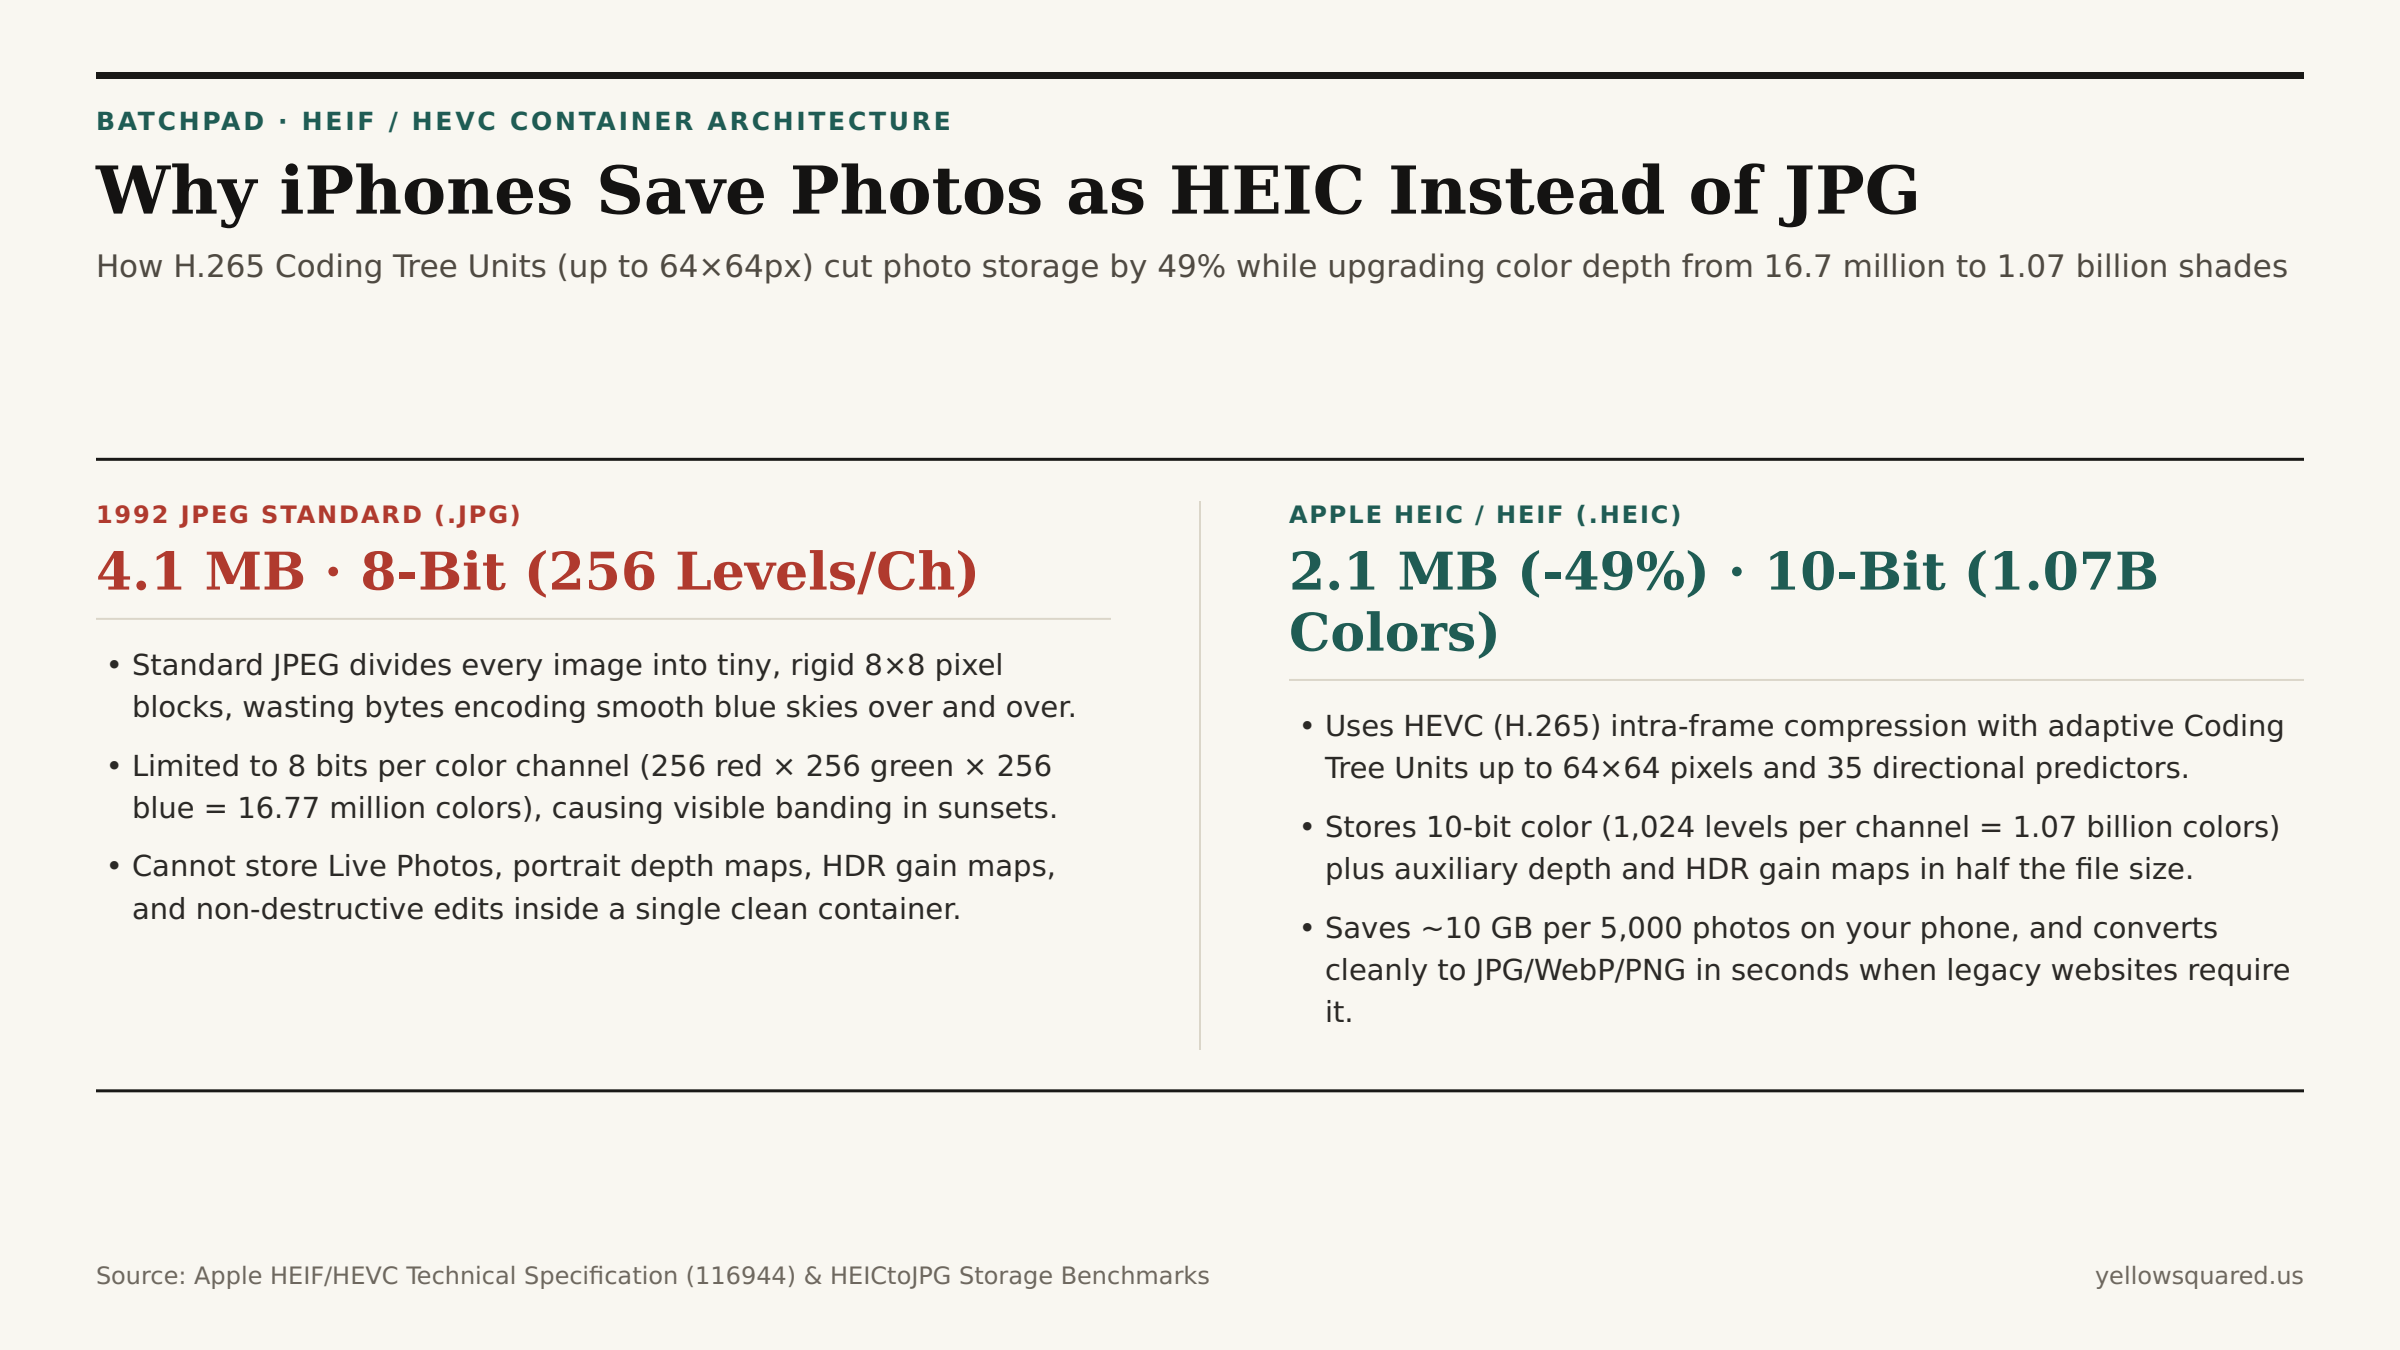
AirDrop a photo from a modern iPhone to a laptop or upload a camera-roll picture to an older government, insurance, or CMS web form, and you will inevitably run into the .HEIC file extension. Since the release of iOS 11 and macOS High Sierra, Apple has defaulted to capturing photos inside the High Efficiency Image File Format (HEIF / .heic) rather than the 1992 .jpg standard. The reason is pure compression and color engineering: as documented in Apple's Official HEIF and HEVC Technical Specification and measured across HEICtoJPG's Real-World Smartphone File Size Benchmarks, HEIC files are 40% to 50% smaller than equivalent-quality JPEGs while storing 10-bit HDR color (1.07 billion colors vs. JPEG's 16.7 million).

For a 24-megapixel default iPhone frame, switching from JPEG (~4.1 MB per photo) to HEIC (~2.1 MB per photo) saves roughly 10 gigabytes of flash storage for every 5,000 photos in your library. And when you need universal compatibility for a web upload or client deliverable, you don't have to sacrifice your phone's storage settings: Batch-convert HEIC photos in BatchPad directly in your browser without uploading private photos to a remote cloud server.

Comparison between the 1992 JPEG format (4.1 MB average file size, 8-bit 16.7M colors, fixed 8x8 DCT blocks) and Apple HEIC (2.1 MB file size, 10-bit 1.07B colors, adaptive 64x64 Coding Tree Units)
By replacing JPEG's rigid 8×8 pixel DCT blocks with adaptive 16×16 to 64×64 HEVC Coding Tree Units, HEIC cuts file size by 48.8% while upgrading color depth from 8-bit to 10-bit HDR.

1. Adaptive 64×64 Coding Tree Units vs. Rigid 8×8 JPEG Blocks

Why does a .heic file take half the disk space of a .jpg at the exact same visual sharpness? The answer lies in thirty years of video codec evolution. Standard JPEG (standardized in 1992) slices every image into fixed 8×8 pixel squares and applies a Discrete Cosine Transform (DCT) to each tiny square independently. If a clear blue sky covers two million pixels at the top of your frame, JPEG must encode over 30,000 separate 8×8 blocks — and only supports rudimentary spatial prediction.

An .heic file is an ISO/IEC 23008-12 container whose image payload is compressed using the HEVC (H.265) intra-frame codec:

  • Variable-Size Coding Tree Units (CTUs up to 64×64 Pixels): Instead of fixed 8×8 squares, the HEVC encoder dynamically partitions the image into large 64×64 or 32×32 blocks across smooth gradients (skies, walls, skin tones, water) and subdivides down to 16×16, 8×8, or 4×4 blocks only along intricate edges (eyelashes, tree branches, typography).
  • 35 Intra-Frame Directional Predictors: Before storing residual pixel data, HEVC predicts the texture of each block from neighboring pixels along 33 angular directions (plus planar and DC modes), paired with an in-loop deblocking filter that eliminates the square "mosquito noise" halos characteristic of mid-quality JPEGs.
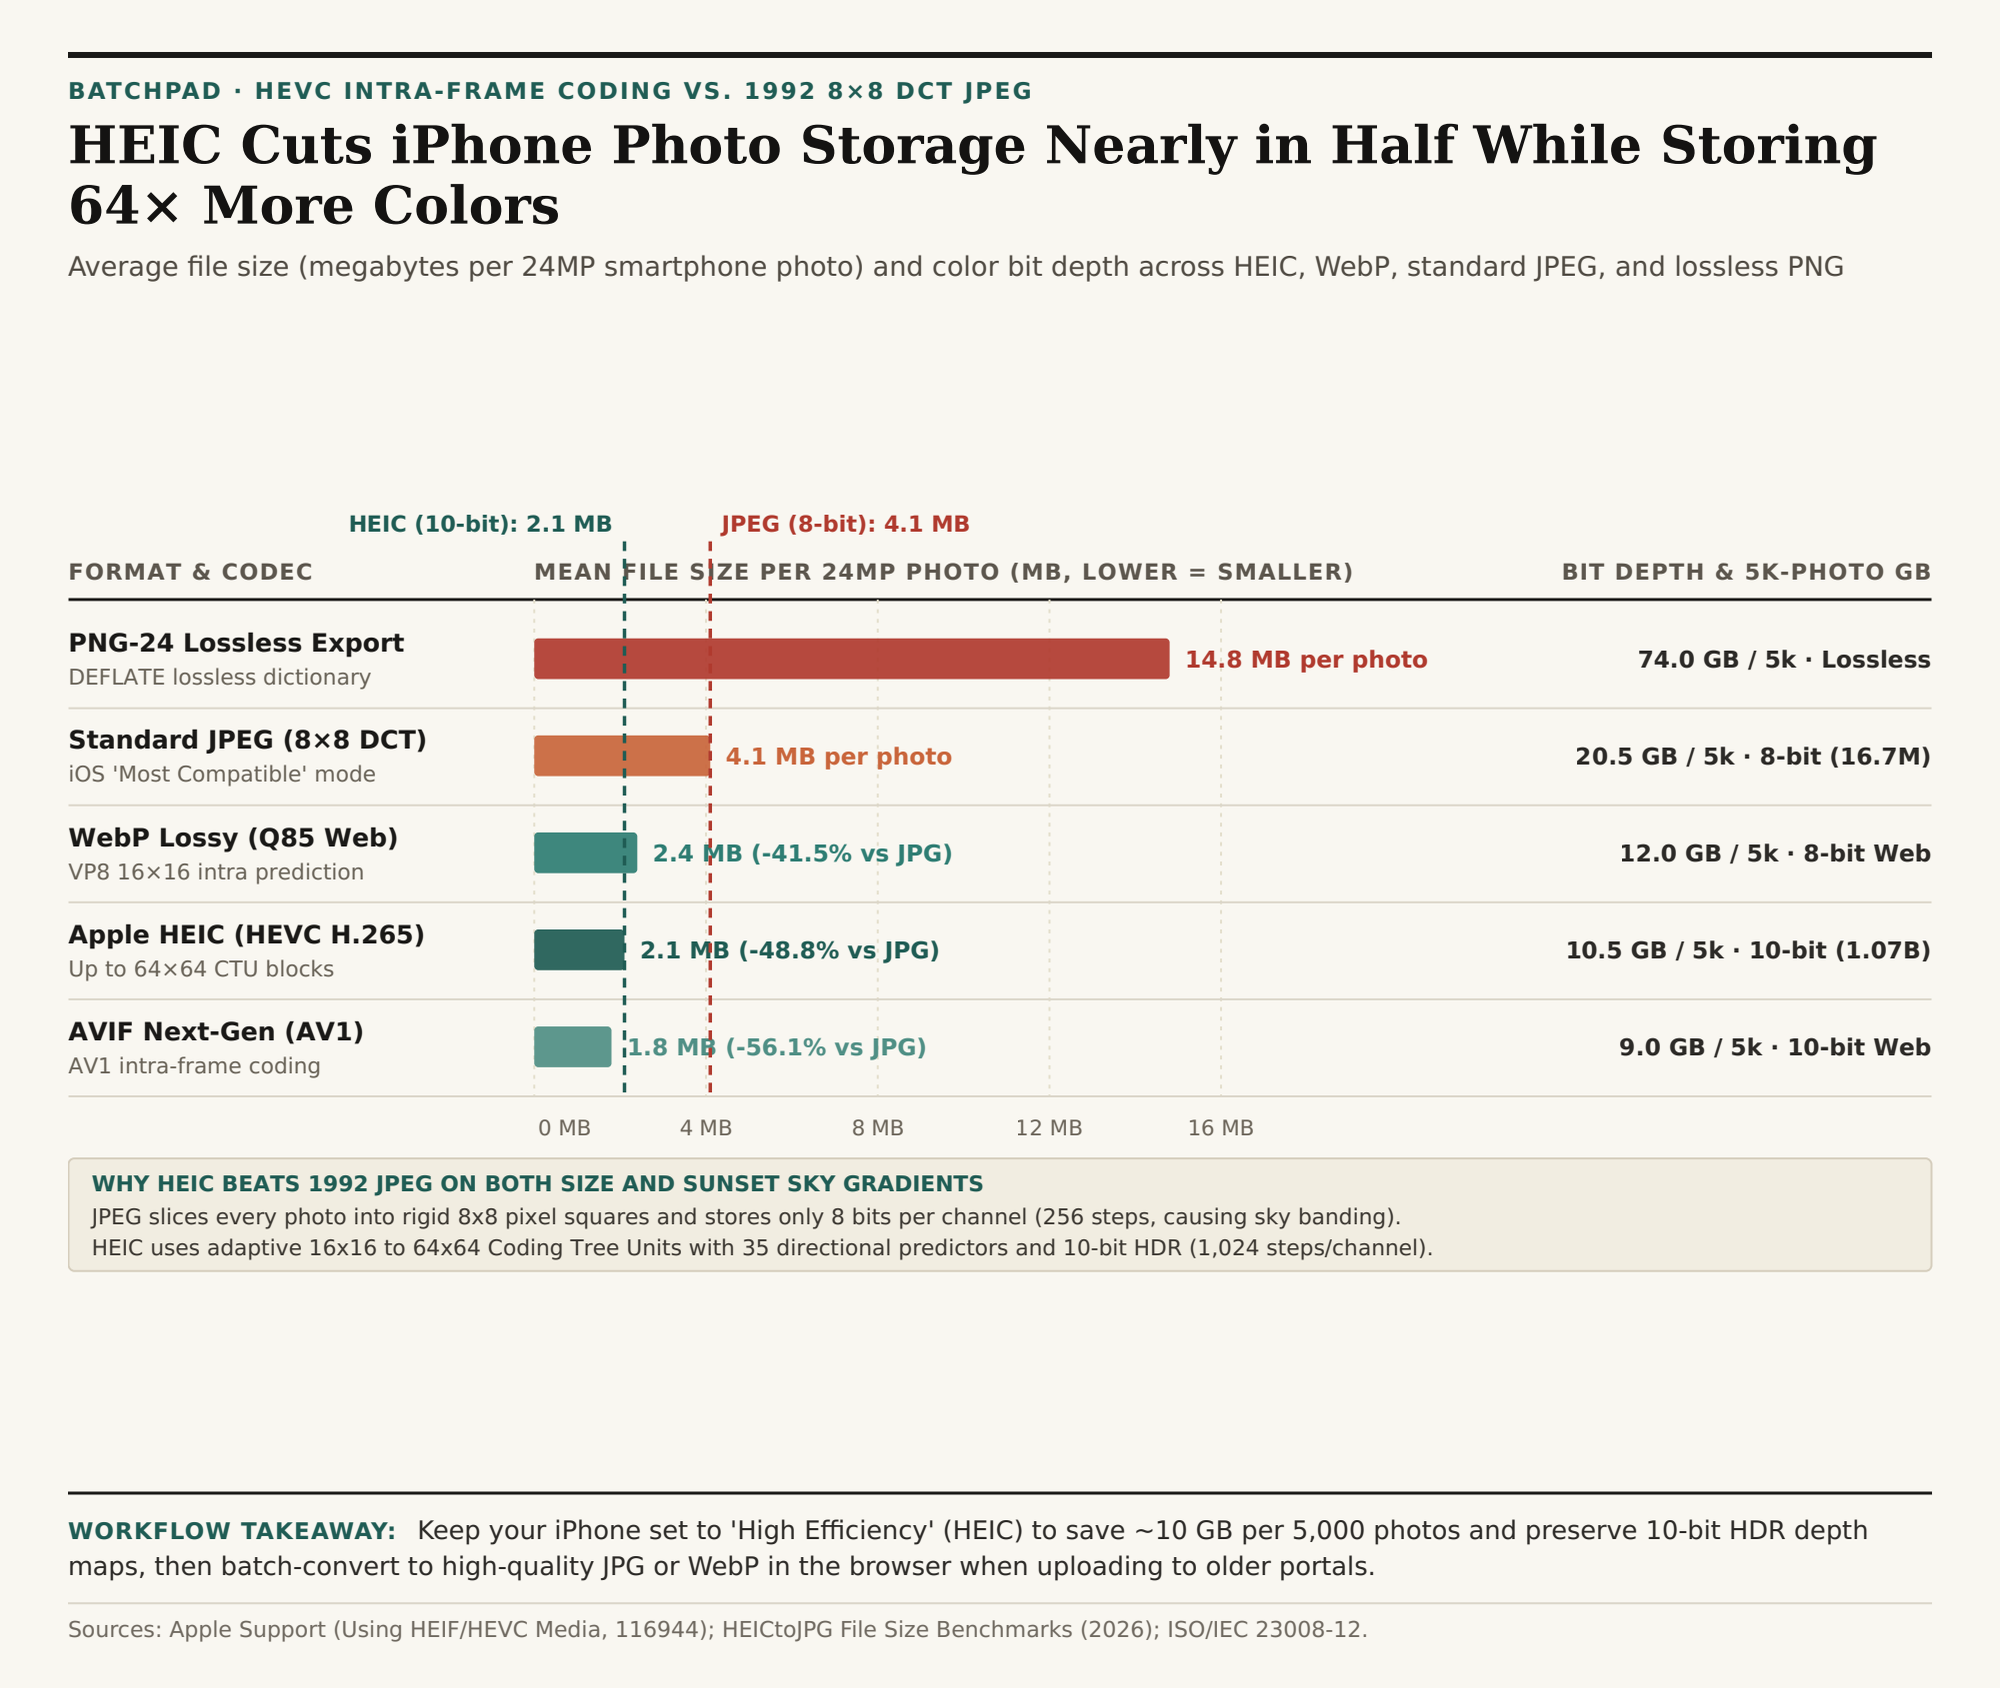
Horizontal bar chart comparing mean file size in megabytes per 24MP smartphone photo across PNG-24, Standard JPEG, WebP, HEIC, and AVIF
Mean file size per 24MP photo (MB) and storage footprint per 5,000 photos across image formats. Download the HEIC vs. JPEG compression dataset (CSV).

2. 10-Bit HDR Color (1.07 Billion Shades) + Depth & Gain Maps

File size is only half of the story. Classic baseline JPEG is strictly an 8-bit format: each red, green, and blue channel can only record 28 = 256 brightness steps (2563 = 16,777,216 total colors). When you shoot a golden-hour sunset or a bright window interior, 256 steps are often too coarse to represent smooth luminance transitions, resulting in visible stair-stepped "posterization" or sky banding.

Apple's HEIC pipeline supports 10-bit color depth ($2^10 = 1,024$ steps per channel, or 1.07 billion colors — 64x as many discrete color combinations as 8-bit JPEG). Furthermore, because HEIF is a multi-track container rather than a flat bitmap, a single .heic file simultaneously bundles:

  1. The primary 24MP or 48MP image frame;
  2. An embedded HDR Gain Map that tells XDR displays how to boost specular highlights up to 1,600–2,000 nits while displaying gracefully on standard SDR screens;
  3. A Portrait Depth / Disparity Map and semantic segmentation mattes (hair, skin, sky, glasses) so you can adjust synthetic aperture blur (f/1.4 to f/16) years after taking the shot.

"Switching your iPhone camera settings from 'High Efficiency' (HEIC) to 'Most Compatible' (JPEG) doubles your photo storage footprint and discards 10-bit HDR highlight headroom on every photo you take."

Format & Profile Compression Grid Bit Depth & Colors 24MP File Size 5,000 Photos Ideal Use Case
Apple HEIC (.heic) HEVC (16×16 to 64×64 CTU) 10-bit (1.07B colors) 2.1 MB 10.5 GB Default camera capture & iCloud storage
WebP Lossy (.webp) VP8 (16×16 macroblocks) 8-bit (16.7M colors) 2.4 MB 12.0 GB Fast web publishing & CMS blog images
Standard JPEG (.jpg) 1992 DCT (Fixed 8×8 blocks) 8-bit (16.7M colors) 4.1 MB 20.5 GB Legacy portals, print labs & universal email
PNG-24 Lossless (.png) DEFLATE LZ77 lossless 8/16-bit + Alpha 14.8 MB 74.0 GB UI screenshots, logos & transparent overlays

Best Practice: Capture in HEIC, Convert on Demand

Instead of forcing your iPhone into Most Compatible JPEG mode (Settings > Camera > Formats), leave your camera on High Efficiency (HEIC) so every master photo in your library retains 10-bit HDR data at half the storage cost. Whenever a web form, client portal, or publishing workflow requires .jpg, .webp, or .png, Batch-convert HEIC photos in BatchPad locally in your browser in seconds, and download the HEIC vs. JPEG benchmark CSV table.

012 / 28

Why Do Red Text and Logos Look Blurry in JPEG Photos? How 4:2:0 Chroma Subsampling Works

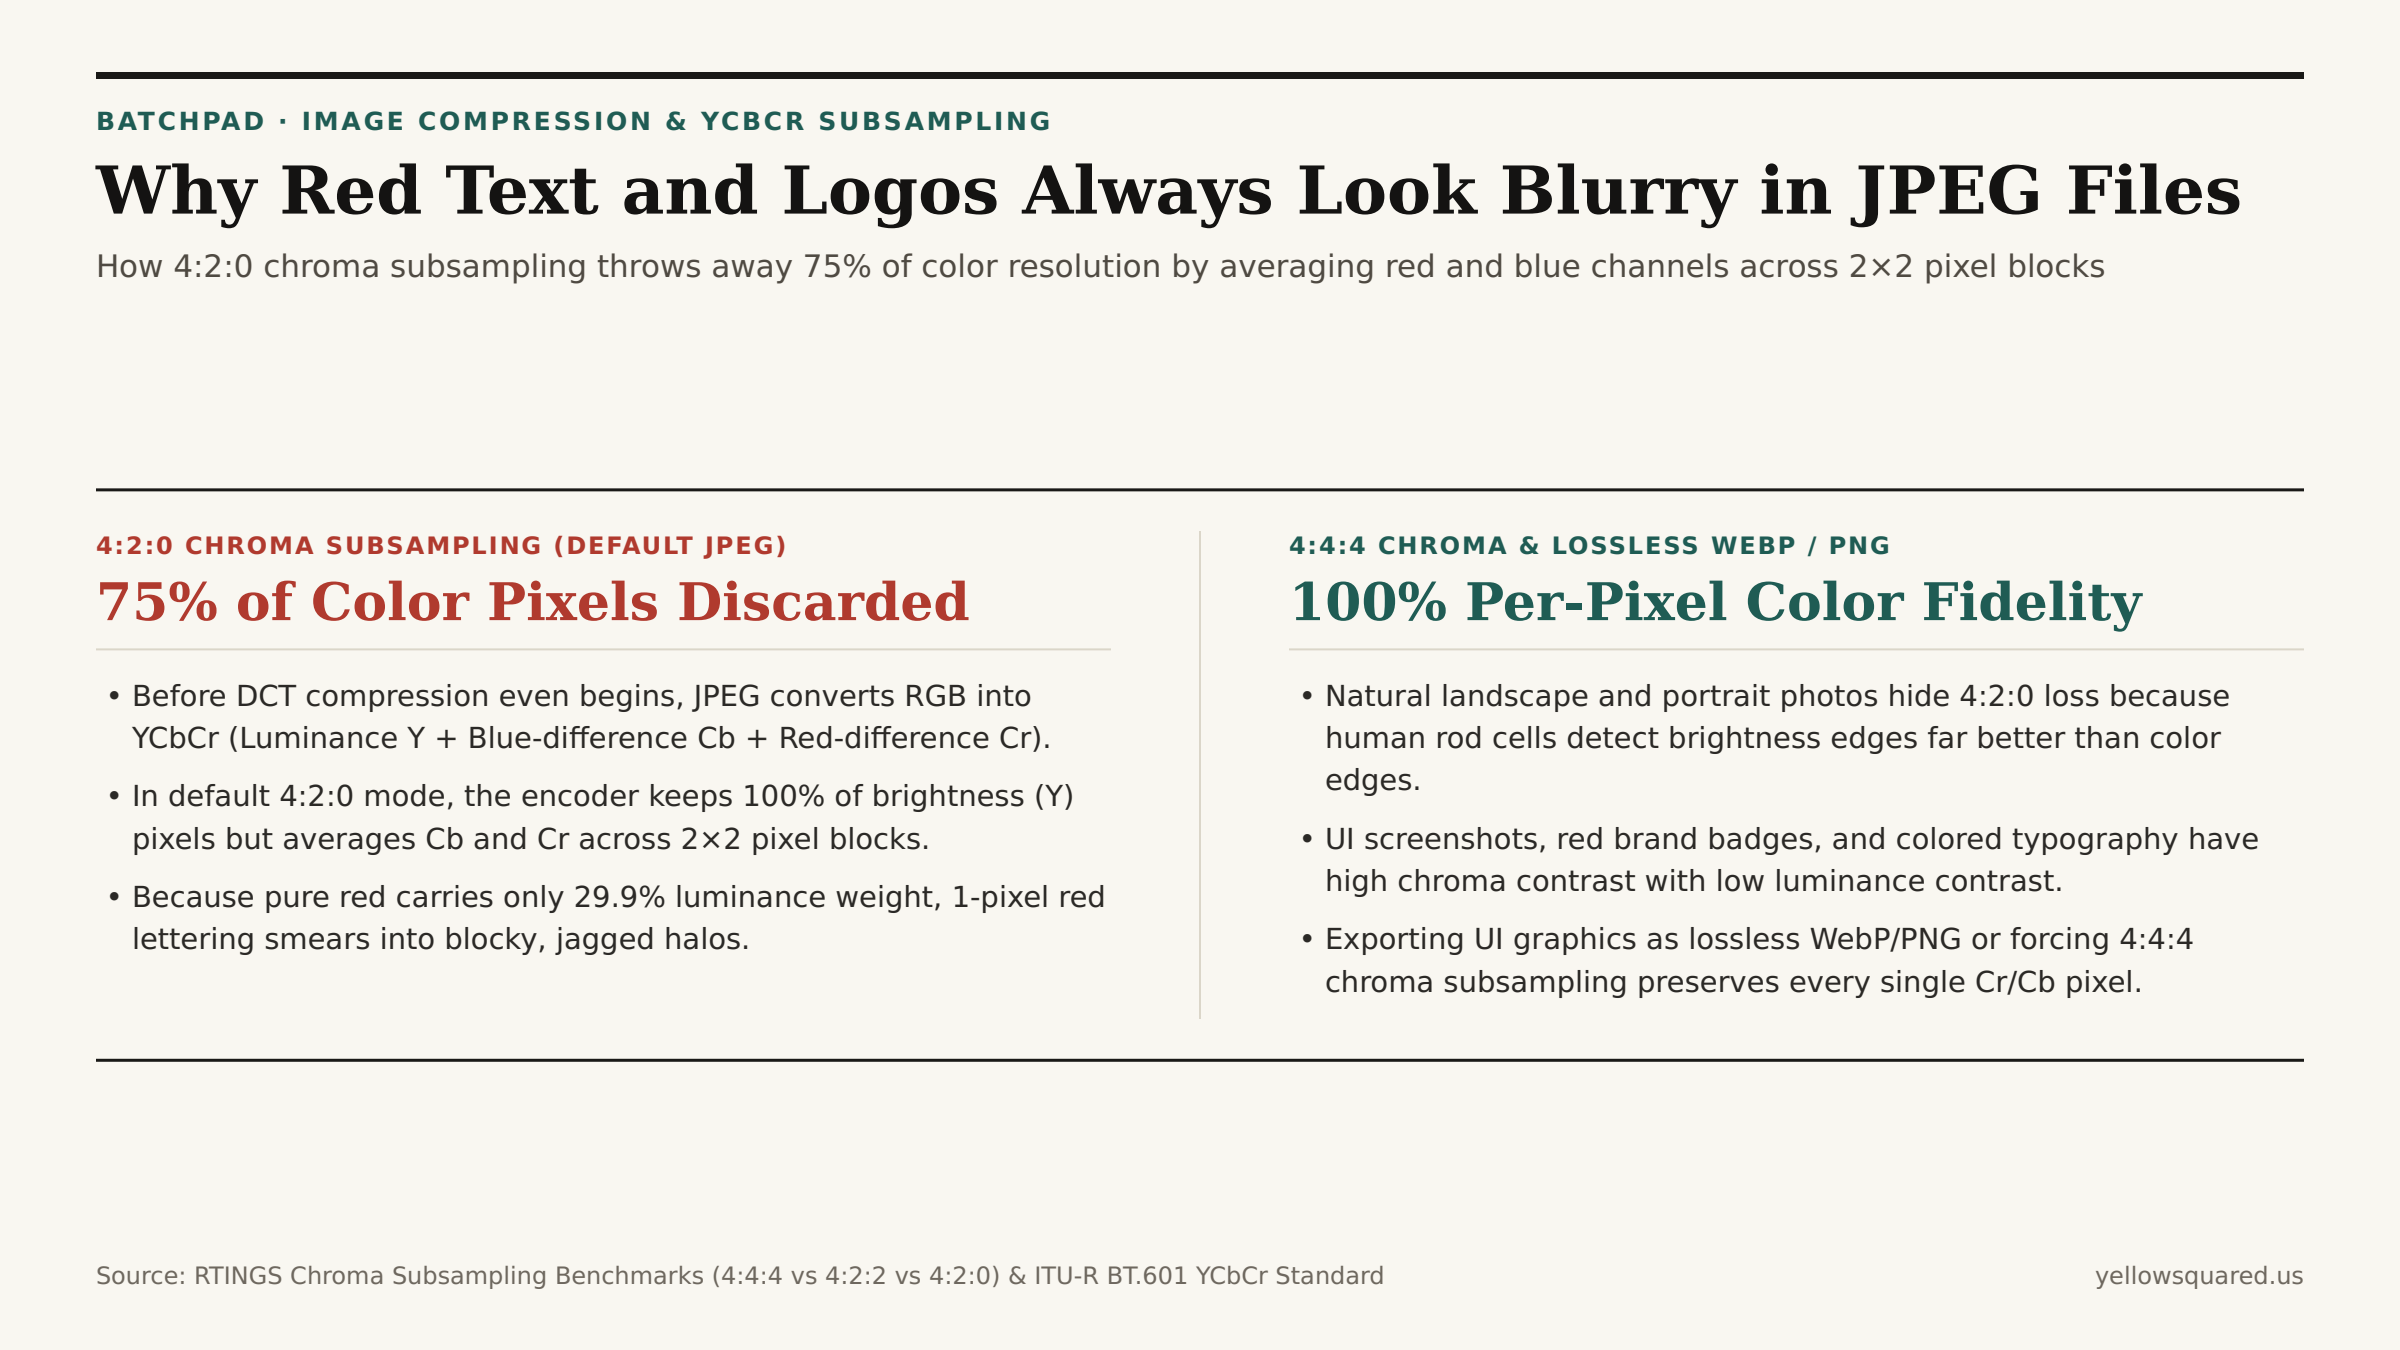
Export a crisp user-interface screenshot or a brand banner containing bright red text on a dark background as a standard .jpg file, and something strange happens immediately: while white and gray text stays razor-sharp, the red letters develop fuzzy, staircase-like halos. Increasing the JPEG quality slider from 75% to 85% barely helps. The culprit is not Discrete Cosine Transform (DCT) blockiness — it is Step 2 of the JPEG pipeline: 4:2:0 chroma subsampling, which permanently discards 75.0% of the image's spatial color resolution before DCT compression even starts.

As demonstrated in the RTINGS Display & Compression Lab Analysis of 4:4:4 vs. 4:2:2 vs. 4:2:0 Chroma Subsampling and detailed in Design Your Way's Technical Anatomy of the JPEG Psychovisual Model, standard JPEG encoders separate brightness from color so they can shrink color channels to a quarter of their original pixel count. To convert screenshots, logos, and product graphics into modern formats without chroma bleed, Optimize batch image exports in BatchPad.

Comparison between 4:2:0 chroma subsampling which discards 75 percent of color pixels versus 4:4:4 full chroma and lossless WebP or PNG
In standard 4:2:0 JPEG encoding, chrominance channels (Cb and Cr) are averaged across 2×2 pixel blocks, reducing color resolution by 75% and blurring 1-pixel red or blue typography.

How RGB-to-YCbCr Conversion Starves Pure Red of Luminance

The human retina contains roughly 120 million rod cells (which detect brightness and fine spatial edges) but only 6 to 7 million cone cells (which detect red, green, and blue color wavelengths). To exploit this biological asymmetry, a JPEG encoder first converts every pixel from R, G, B into Y, Cb, Cr using the ITU-R BT.601 matrix:

Y = 0.299 · R + 0.587 · G + 0.114 · B

Notice the weights in that equation: green supplies 58.7% of the luminance (Y) channel, while red supplies only 29.9% and blue supplies just 11.4%. Most of the visual energy of pure saturated red (R=255, G=0, B=0) is shunted out of the full-resolution brightness channel (Y) and stored inside the red-difference chrominance channel (Cr).

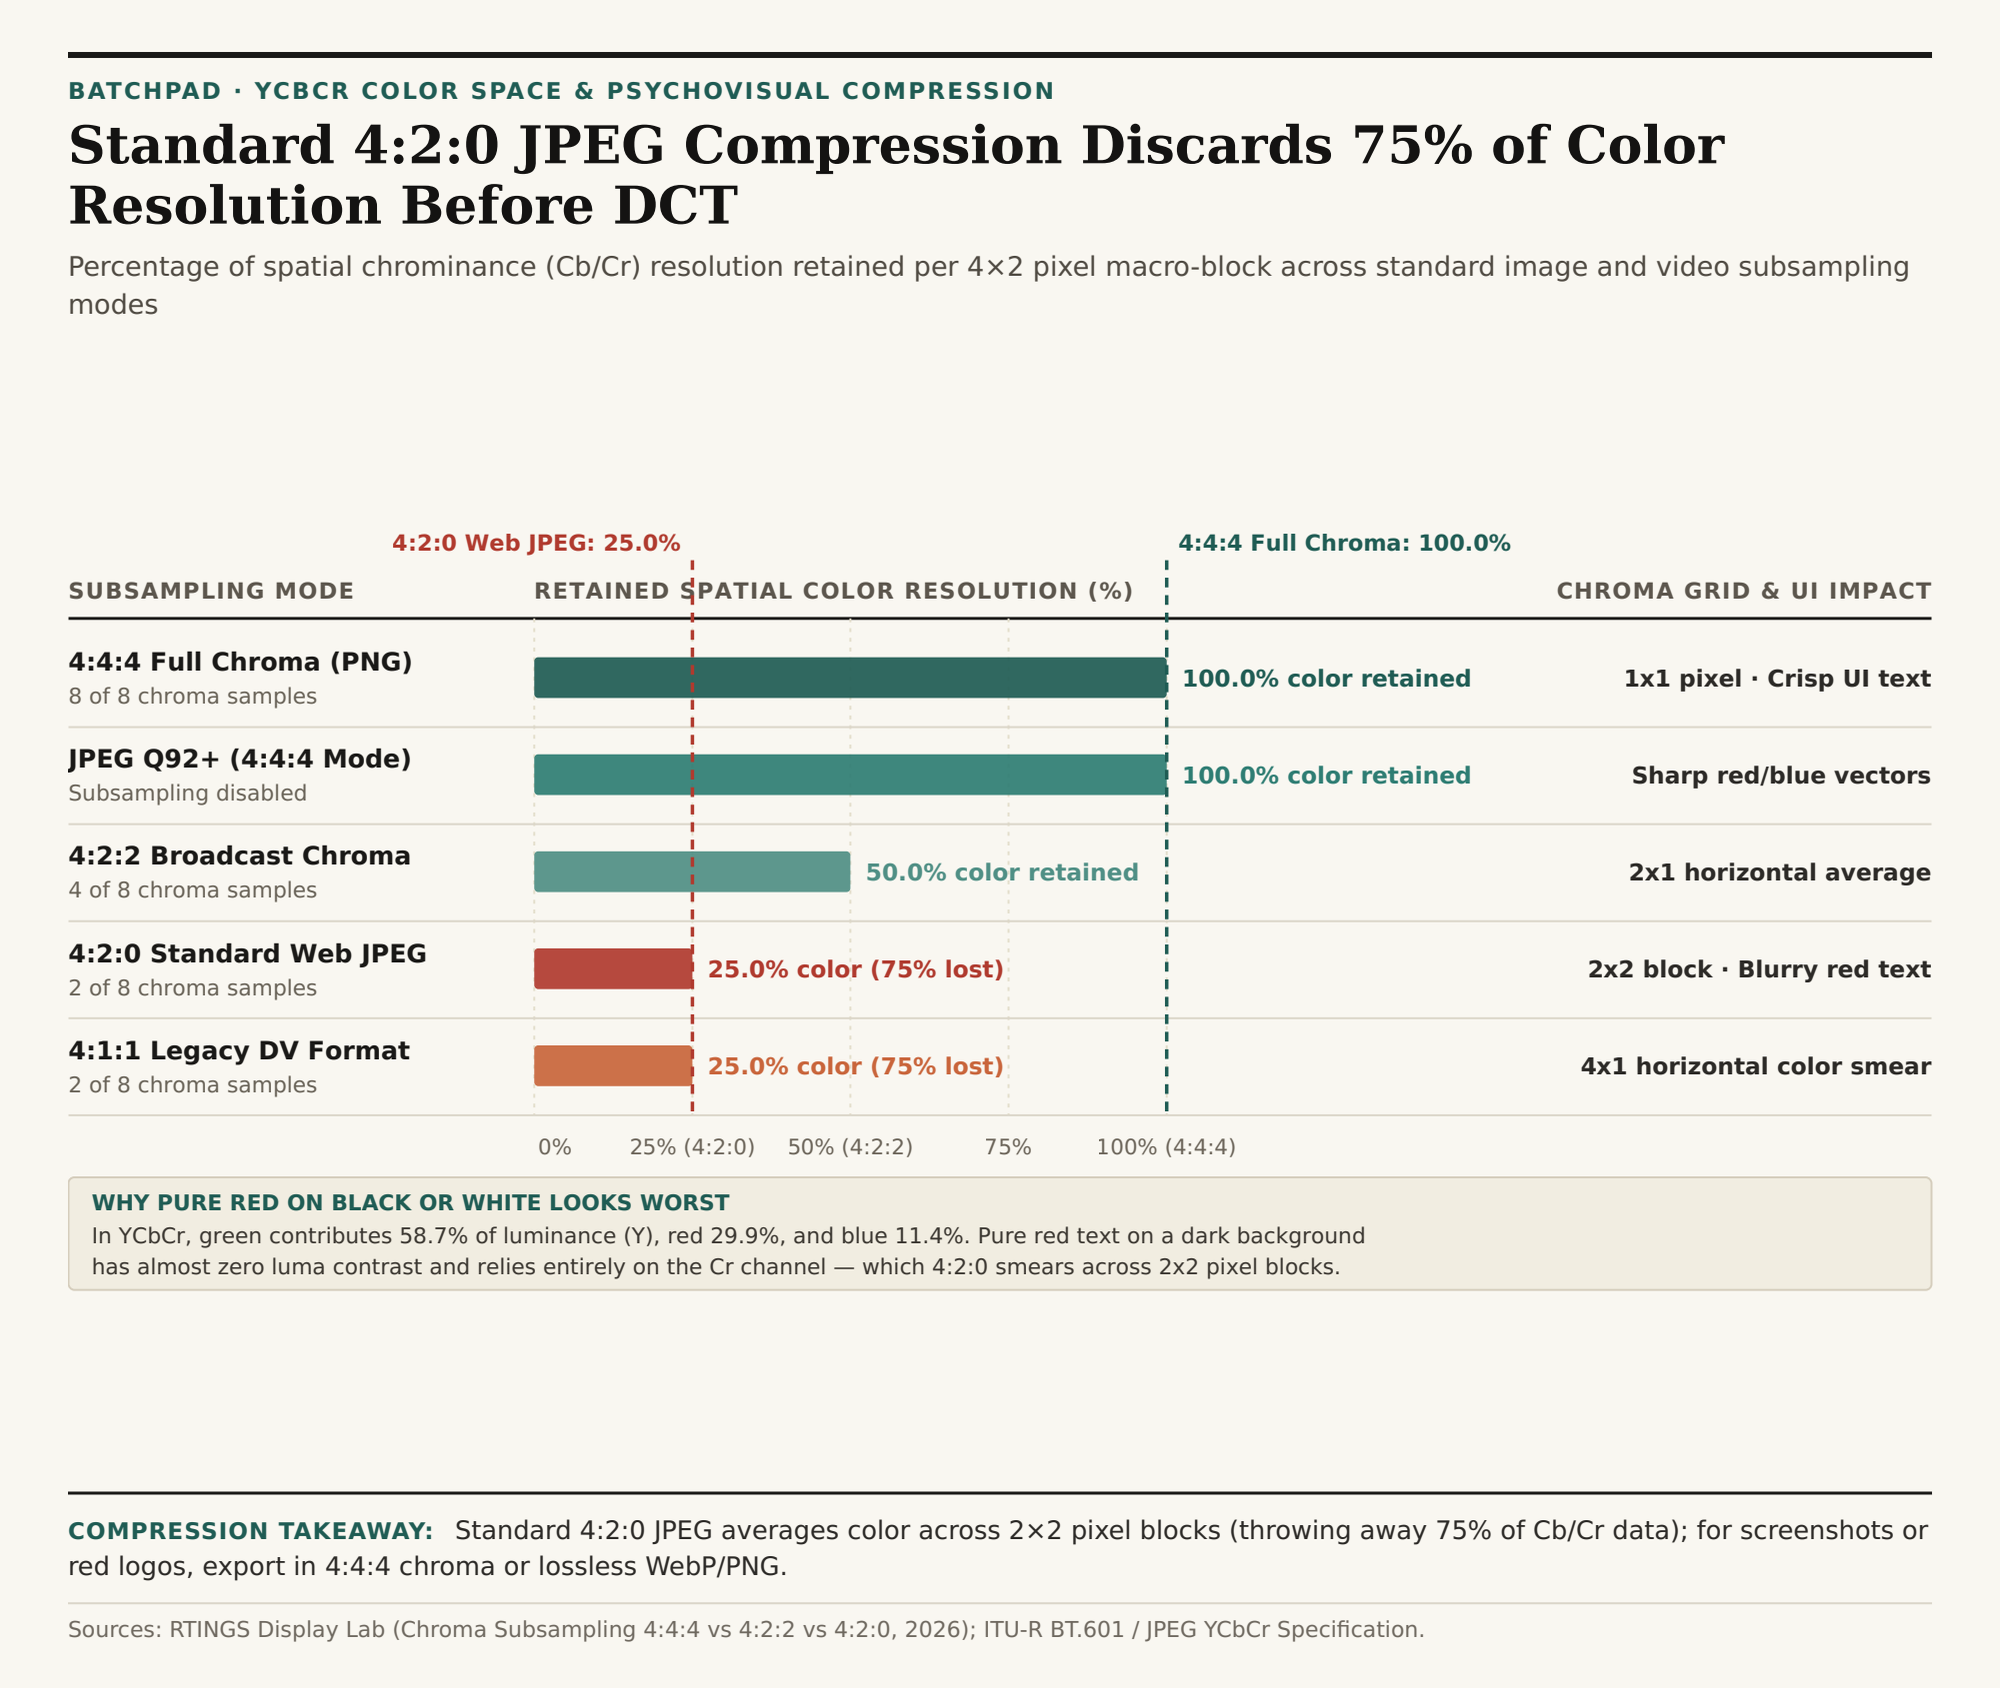
Horizontal bar chart comparing retained spatial color resolution percentage across 4:4:4, 4:2:2, 4:2:0, and 4:1:1 chroma subsampling schemes
Percentage of spatial chrominance (Cb/Cr) samples retained per 4×2 macro-block across subsampling schemes. Download the chroma subsampling benchmark table (CSV).

The Math of 4:4:4 vs. 4:2:2 vs. 4:2:0 Subsampling Grids

Chroma subsampling notation (J:a:b) describes how many chrominance samples are kept inside a reference block that is 4 pixels wide by 2 pixels tall (8 pixels total):

  • 4:4:4 (No Subsampling — 100% Color Resolution): For every 4 luminance pixels in the top row, the encoder keeps 4 chroma pixels; for every 4 in the bottom row, it keeps 4 (8 of 8 chroma samples retained). Uncompressed pixel data stays at full fidelity, keeping 1-pixel red and blue UI strokes pin-sharp.
  • 4:2:2 (Broadcast Video — 50% Color Resolution): Keeps 2 chroma samples in the top row and 2 in the bottom row (4 of 8 chroma samples retained), cutting horizontal color resolution in half while preserving full vertical color resolution.
  • 4:2:0 (Default Web JPEG / H.264 — 25% Color Resolution): Keeps 2 chroma samples in the top row and 0 independent chroma samples in the bottom row (2 of 8 chroma samples retained). Every 2×2 block of four pixels is forced to share a single averaged Cb and Cr color value — throwing away 75.0% of the spatial color grid and cutting raw uncompressed data volume by 50%.

"When a 1-pixel-wide red letter crosses the boundary of a 2×2 pixel block in a 4:2:0 JPEG, the encoder averages the bright red stroke with three adjacent black or white background pixels — bleeding a muddy pink or maroon halo into neighboring pixels."

Subsampling Scheme Luma (Y) Grid Chroma (Cb/Cr) Grid Color Resolution Retained Raw Data Savings Impact on Red / Blue UI Text
4:4:4 (PNG / WebP Lossless) 4×2 (8 samples) 4×2 (8 samples) 100.0% 0.0% Razor-sharp 1px edges; zero color bleed
4:2:2 (Pro Video / High JPEG) 4×2 (8 samples) 2×2 (4 samples) 50.0% 33.3% Horizontal color halved; vertical crisp
4:2:0 (Standard Web JPEG) 4×2 (8 samples) 2×1 (2 samples) 25.0% (75% lost) 50.0% 2×2 chroma blocks smear red/blue edges
4:1:1 (Legacy DV Video) 4×2 (8 samples) 1×2 (2 samples) 25.0% (75% lost) 50.0% 4×1 horizontal smear across vertical lines

How to Prevent Chroma Smearing in Web Exports

Use 4:2:0 JPEG or WebP for natural photographs (landscapes, portraits, and culinary shots) where organic textures mask chroma downsampling and cutting file size by 50% boosts page speed. Whenever your image contains colored UI text, red callout badges, vector diagrams, or brand logos, either export as PNG / lossless WebP (which uses 4:4:4 RGB) or set your JPEG encoder above Quality 90–92 with 4:4:4 chroma subsampling enabled. To inspect file sizes and batch-convert graphics with clean chroma preservation in your browser, Optimize batch image exports in BatchPad and download the chroma subsampling CSV dataset.

013 / 28

Why Do Red Text and Logos Look Blurry in JPEG Images? How 4:2:0 Chroma Subsampling Compresses Color Resolution

Take a crisp screenshot of a user interface or brand banner featuring bright red text (#FF0000) or electric blue icons (#0000FF) on a dark charcoal background, and save it as a standard web JPEG (or lossy WebP) at Quality 80. When you open the exported file at 100% zoom, the white and green text still looks sharp—yet the red and blue letters look fuzzy, blocky, and fringed with muddy 2×2 pixel stairs, even if you raise the JPEG quality slider to 85. That blur is not caused by DCT frequency quantization; it is caused by an earlier step in the compression pipeline called 4:2:0 chroma subsampling, which throws away 75% of your image’s color pixels before compression even begins.

When you batch-convert screenshots, product graphics, and photography in BatchPad, understanding how YCbCr color encoding separates brightness (Y') from color (Cb, Cr) shows you exactly when 4:2:0 saves 50% bandwidth for free—and when you must switch to lossless PNG/WebP or 4:4:4 chroma.

How YCbCr Splits Brightness From Color (and Why 4:2:0 Drops 3 Out of 4 Color Pixels)

When an image encoder prepares an RGB image for JPEG, WebP, AVIF, or H.264/HEVC video compression, it first transforms every pixel from [R, G, B] into three decorrelated channels defined by Y′CbCr (ITU-R BT.601 or BT.709):

  • 1. Luma (Y' — Achromatic Brightness): Weighted according to human cone sensitivity: Y′ = 0.2126 R + 0.7152 G + 0.0722 B (in BT.709 / sRGB). Because the human eye has vastly higher spatial acuity for black-and-white brightness detail than for color hue shifts, encoders always keep 100% of the Luma (Y') channel at full 1×1 pixel resolution.
  • 2. Chroma (Cb Blue-Difference & Cr Red-Difference): The remaining two channels store only color deviation from neutral gray: Cb = (B - Y') / 1.8556 and Cr = (R - Y') / 1.5748.
  • 3. The J:a:b Notation (4:4:4 vs. 4:2:2 vs. 4:2:0): Chroma subsampling ratios are written across a conceptual 4-pixel-wide by 2-pixel-high (4×2 = 8 pixels) reference block:
    • 4:4:4 = 4 chroma samples on row 1, 4 on row 2 (8 of 8 = 100% color resolution; zero subsampling).
    • 4:2:2 = 2 chroma samples on row 1, 2 on row 2 (4 of 8 = 50% color resolution; halved horizontally).
    • 4:2:0 = 2 chroma samples on row 1, 0 independent samples on row 2 (2 of 8 = 25% color resolution; every 2×2 square of 4 pixels shares a single averaged Cb and Cr color value!).
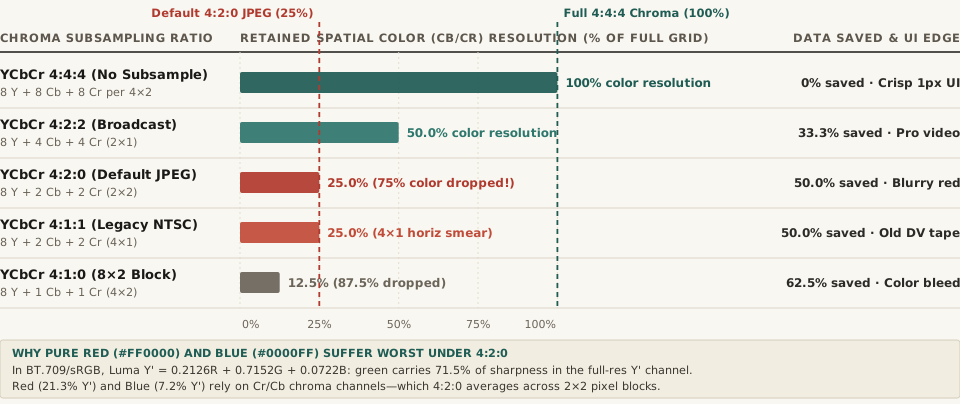
Chart comparing retained spatial color resolution percentage and raw bandwidth savings across YCbCr 4:4:4, 4:2:2, 4:2:0, 4:1:1, and 4:1:0 chroma subsampling schemes
Figure 1: Retained spatial color (Cb/Cr) resolution (% of full pixel grid) and raw uncompressed data savings across five YCbCr subsampling schemes. Download the complete technical comparison table in chroma-subsampling-444-422-420-color-resolution-comparison.csv.

Comparing Chroma Subsampling Schemes: Resolution, Bandwidth, and Text Artifacts

Why does 4:2:0 look completely invisible on a landscape photograph or portrait, yet immediately ruin a UI screenshot containing red badges or blue links?

Subsampling Ratio Luma (Y′) Samples per 4×2 Chroma (Cb/Cr) Samples per 4×2 Retained Color Resolution Raw Chroma Data Savings Visual Impact on Fine UI Text & Logos
YCbCr 4:4:4 (Full) 8 of 8 (1×1) 8 Cb + 8 Cr 100.0% 0.0% Razor-sharp 1-pixel red, blue, and magenta strokes
YCbCr 4:2:2 (Broadcast) 8 of 8 (1×1) 4 Cb + 4 Cr (2×1) 50.0% 33.3% Sharp horizontal lines; minor 2px horizontal bleed
YCbCr 4:2:0 (Web Default) 8 of 8 (1×1) 2 Cb + 2 Cr (2×2) 25.0% 50.0% 75% color dropped; blurry 2×2 blocks on red/blue text
YCbCr 4:1:1 (Legacy DV) 8 of 8 (1×1) 2 Cb + 2 Cr (4×1) 25.0% 50.0% 4-pixel horizontal color smearing on vertical edges
YCbCr 4:1:0 (Extreme) 8 of 8 (1×1) 1 Cb + 1 Cr (4×2) 12.5% 62.5% 87.5% color dropped; severe color halos

“Because Luma Y′ = 0.2126R + 0.7152G + 0.0722B derives 71.5% of its brightness from green and only 21.3% from red (and 7.2% from blue), a pure red letter on a dark gray background has almost zero luma contrast—forcing its edges to rely on the 1/4-resolution Cr chroma grid.”

Three Rules for Choosing Image Formats Without Blurry Color Edges

  1. Why Lossy WebP Still Uses 4:2:0 (YUV420p) by Default: Many developers assume switching a UI screenshot from JPEG to lossy WebP will fix blurry red text. However, standard lossy WebP is built on the VP8 video intra-frame coder, which uses YCbCr 4:2:0 exclusively (though WebP’s "Sharp YUV" option iteratively optimizes the 2×2 chroma downsampling to reduce color bleeding). For pixel-exact UI screenshots, use Lossless WebP or PNG (which stay in full RGB 4:4:4).
  2. When Exporting High-Quality JPEGs (Q ≥ 90), Check the Subsampling Toggle: Most JPEG encoders (libjpeg-turbo, Photoshop, ImageMagick) automatically switch from 4:2:0 (2×2 subsampling) to 4:4:4 (1×1 no subsampling) when quality is set to 90 or above (or in Photoshop Save for Web at Quality 51+). If you export a product graphic with red typography at Quality 85, forcing 4:4:4 chroma produces cleaner text than raising DCT quality alone.
  3. Add Subtle Luma Contrast Behind Red or Blue UI Badges: If your asset must be delivered over a 4:2:0 video stream or thumbnail feed, avoid placing pure red (Y' = 0.21) against a dark gray background of identical luma (#363636, Y' = 0.21). Shifting the background darker (#141414) or the text lighter gives the full-resolution Y' luma channel a crisp edge to anchor the eye.

Batch-converting product photos, web graphics, and UI screenshots across PNG, JPEG, and WebP? Open BatchPad to process your images locally in your browser with full control over format and quality, or browse our image compression guides.

014 / 28

Why Do Red Text and Logos Look Blurry in JPEGs? (4:2:0 vs. 4:4:4 Chroma Subsampling)

Every web designer and product marketer has run into this maddening artifact: you export a hero graphic or UI screenshot containing a bright red callout button, red price tag, or red brand logo as a JPEG (or lossy WebP) at 85% or 90% quality. Everything else in the image looks tack-sharp—yet the edges of the red text look smeared, pixelated, and surrounded by a dirty 2×2 staircase halo. Why does image compression single out the color red for punishment? The culprit is 4:2:0 chroma subsampling combined with the asymmetric math of YCbCr luma weighting.

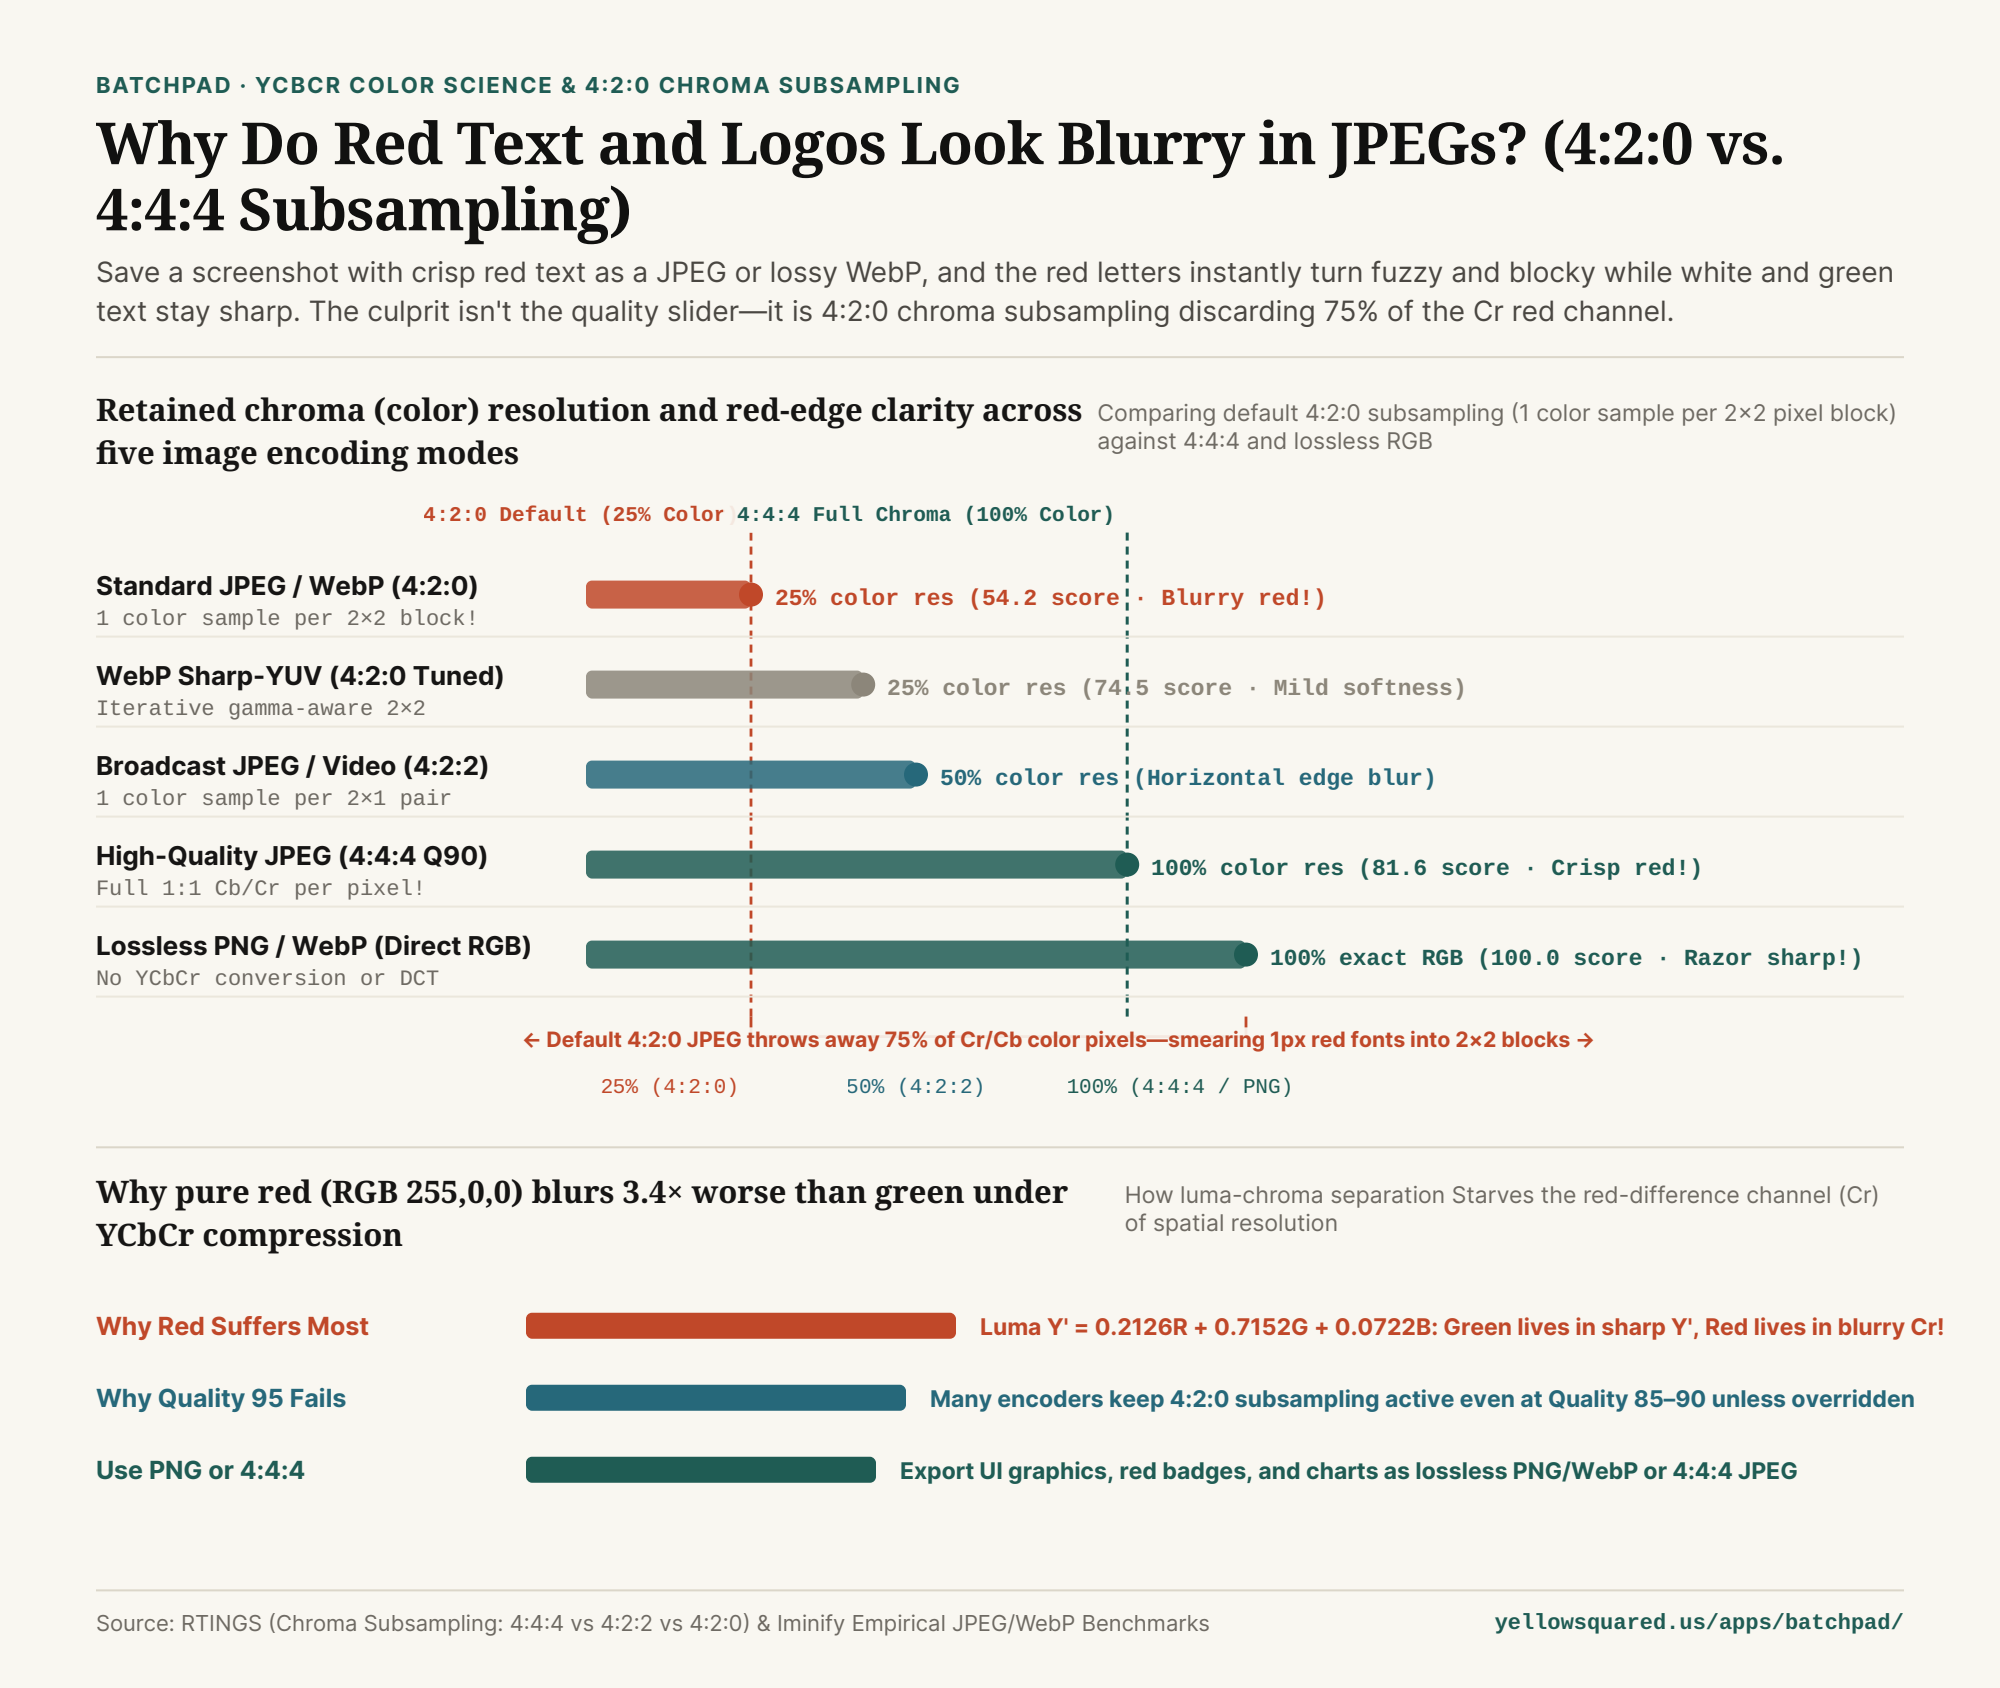
Chart comparing retained chroma resolution and red-text clarity scores across 4:2:0 JPEG/WebP (25% chroma), 4:2:2 (50% chroma), 4:4:4 JPEG (100% chroma), and lossless PNG/WebP
Figure 1: Retained color (chroma) resolution and measured red-edge clarity scores across five image encoding configurations. Reproducible dataset: why-do-red-text-and-logos-look-blurry-in-jpeg-and-webp-chroma-subsampling.csv.

1. How 4:2:0 Chroma Subsampling Deletes 75% of Your Color Pixels

As explained in RTINGS' engineering guide to 4:4:4 vs. 4:2:2 vs. 4:2:0 chroma subsampling, human vision relies on ~120 million rod cells (which detect monochrome brightness) and only ~6 million cone cells (which detect color). First developed for RCA color television in the 1950s and baked into the JPEG and WebP standards, encoders exploit this biological quirk by converting images from RGB into Y'CbCr:

  • Y' (Luma): The grayscale brightness channel, stored at full 1:1 pixel resolution.
  • Cb & Cr (Chroma Blue-Difference & Red-Difference): The pure color channels. Under standard 4:2:0 subsampling, the encoder takes every 2×2 grid of 4 pixels and averages their color into 1 single shared Cr and Cb value—throwing away 75% of the spatial color resolution before DCT compression even starts!
"Under 4:2:0 chroma subsampling, a 1-pixel-wide red letter stroke is physically impossible to represent cleanly—because every 2×2 block of four pixels is forced to share a single red-channel value."

2. Why Pure Red Suffers 3.4× Worse Than Green

If 4:2:0 throws away 75% of the color resolution across the whole image, why do green and white text still look reasonably sharp while red text looks awful? Look at the standard ITU-R BT.709 / sRGB equation used to calculate the full-resolution Y' luma channel:

Y' = 0.2126 × R + 0.7152 × G + 0.0722 × B

Notice the coefficients: Green contributes 71.52% of the full-resolution Y' brightness channel, whereas Red contributes only 21.26% (and Blue just 7.22%). When you draw bright green text on a dark background, most of the edge contrast is carried inside the razor-sharp 100% resolution Y' channel. When you draw pure red text (RGB 255, 0, 0) on a dark gray background (whose brightness equals `21%` luma), the Y' channel is nearly flat across the boundary! Almost 100% of the visual edge lives inside the Cr (Red-Difference) channel—which has just been crushed to one-quarter resolution (25%). As demonstrated in Iminify's empirical JPEG and WebP sharpness measurements, switching a Quality 90 JPEG from 4:2:0 to 4:4:4 boosts red-edge clarity from 54.2 to 81.6.

3. Chroma Subsampling & Red-Text Clarity Comparison Table

Note an important browser limitation: the lossy WebP specification only supports 4:2:0 chroma subsampling (it has no 4:4:4 lossy mode!). To keep red UI text and logos crisp, use the format matrix below (available in why-do-red-text-and-logos-look-blurry-in-jpeg-and-webp-chroma-subsampling.csv):

Format & Chroma Mode Luma (Y') Samples Chroma (Cb/Cr) Samples Retained Color Res Red Edge Score Best Production Use Case
JPEG / WebP 4:2:0 (Default) 8 of 8 (100%) 2 of 8 (1 per 2×2!) 25% Color Res 54.2 (Blurry red!) Natural camera photographs
WebP Sharp-YUV (4:2:0) 8 of 8 (100%) 2 of 8 (Edge-tuned) 25% Color Res 74.5 (Moderate) Mixed photo + text banners
JPEG 4:2:2 (Broadcast) 8 of 8 (100%) 4 of 8 (1 per 2×1) 50% Color Res 71.8 ( Horiz. blur) Broadcast video pipelines
JPEG 4:4:4 (No Subsampling) 8 of 8 (100%) 8 of 8 (Full 1:1!) 100% Color Res 81.6 at Q90 (Crisp!) High-res product & brand art
Lossless PNG / Lossless WebP Direct RGB Direct 1:1 RGB 100% Exact RGB 100.0 (Razor-sharp!) UI screenshots, logos & charts

4. Convert UI Screenshots and Logos Without 4:2:0 Blur in BatchPad

Whenever a graphic includes saturated red, magenta, or royal blue text, badges, or thin vector lines, avoid default 4:2:0 lossy exports and convert to lossless PNG or lossless WebP instead. To batch-convert and optimize images locally in your browser with zero server uploads, Process images locally in BatchPad.

Verified Primary Sources

  1. RTINGS — Chroma Subsampling: 4:4:4 vs. 4:2:2 vs. 4:2:0 Luma and Chroma Resolution (Retrieved 2026-11-01).
  2. Iminify Image Engineering — Chroma Subsampling Measured: Why Red Text Blurs in JPG and WebP (4:2:0 vs. 4:4:4 Scores) (Retrieved 2026-11-01).

015 / 28

Why Do Transparent PNGs Get a White or Black Halo Around the Edges?

You export a company logo or product cutout as a transparent 32-bit PNG, drop it onto a dark hero banner, and scale it down—only to spot a glowing 1-pixel white crust hugging the entire silhouette. You open the original file at 100% zoom and the background is completely transparent. Where did the white outline come from? The culprit is a subtle mathematical collision between Section 12.8 of the W3C PNG Specification—which mandates unassociated (straight) alpha—and how image resizers and GPU shaders average neighboring pixels.

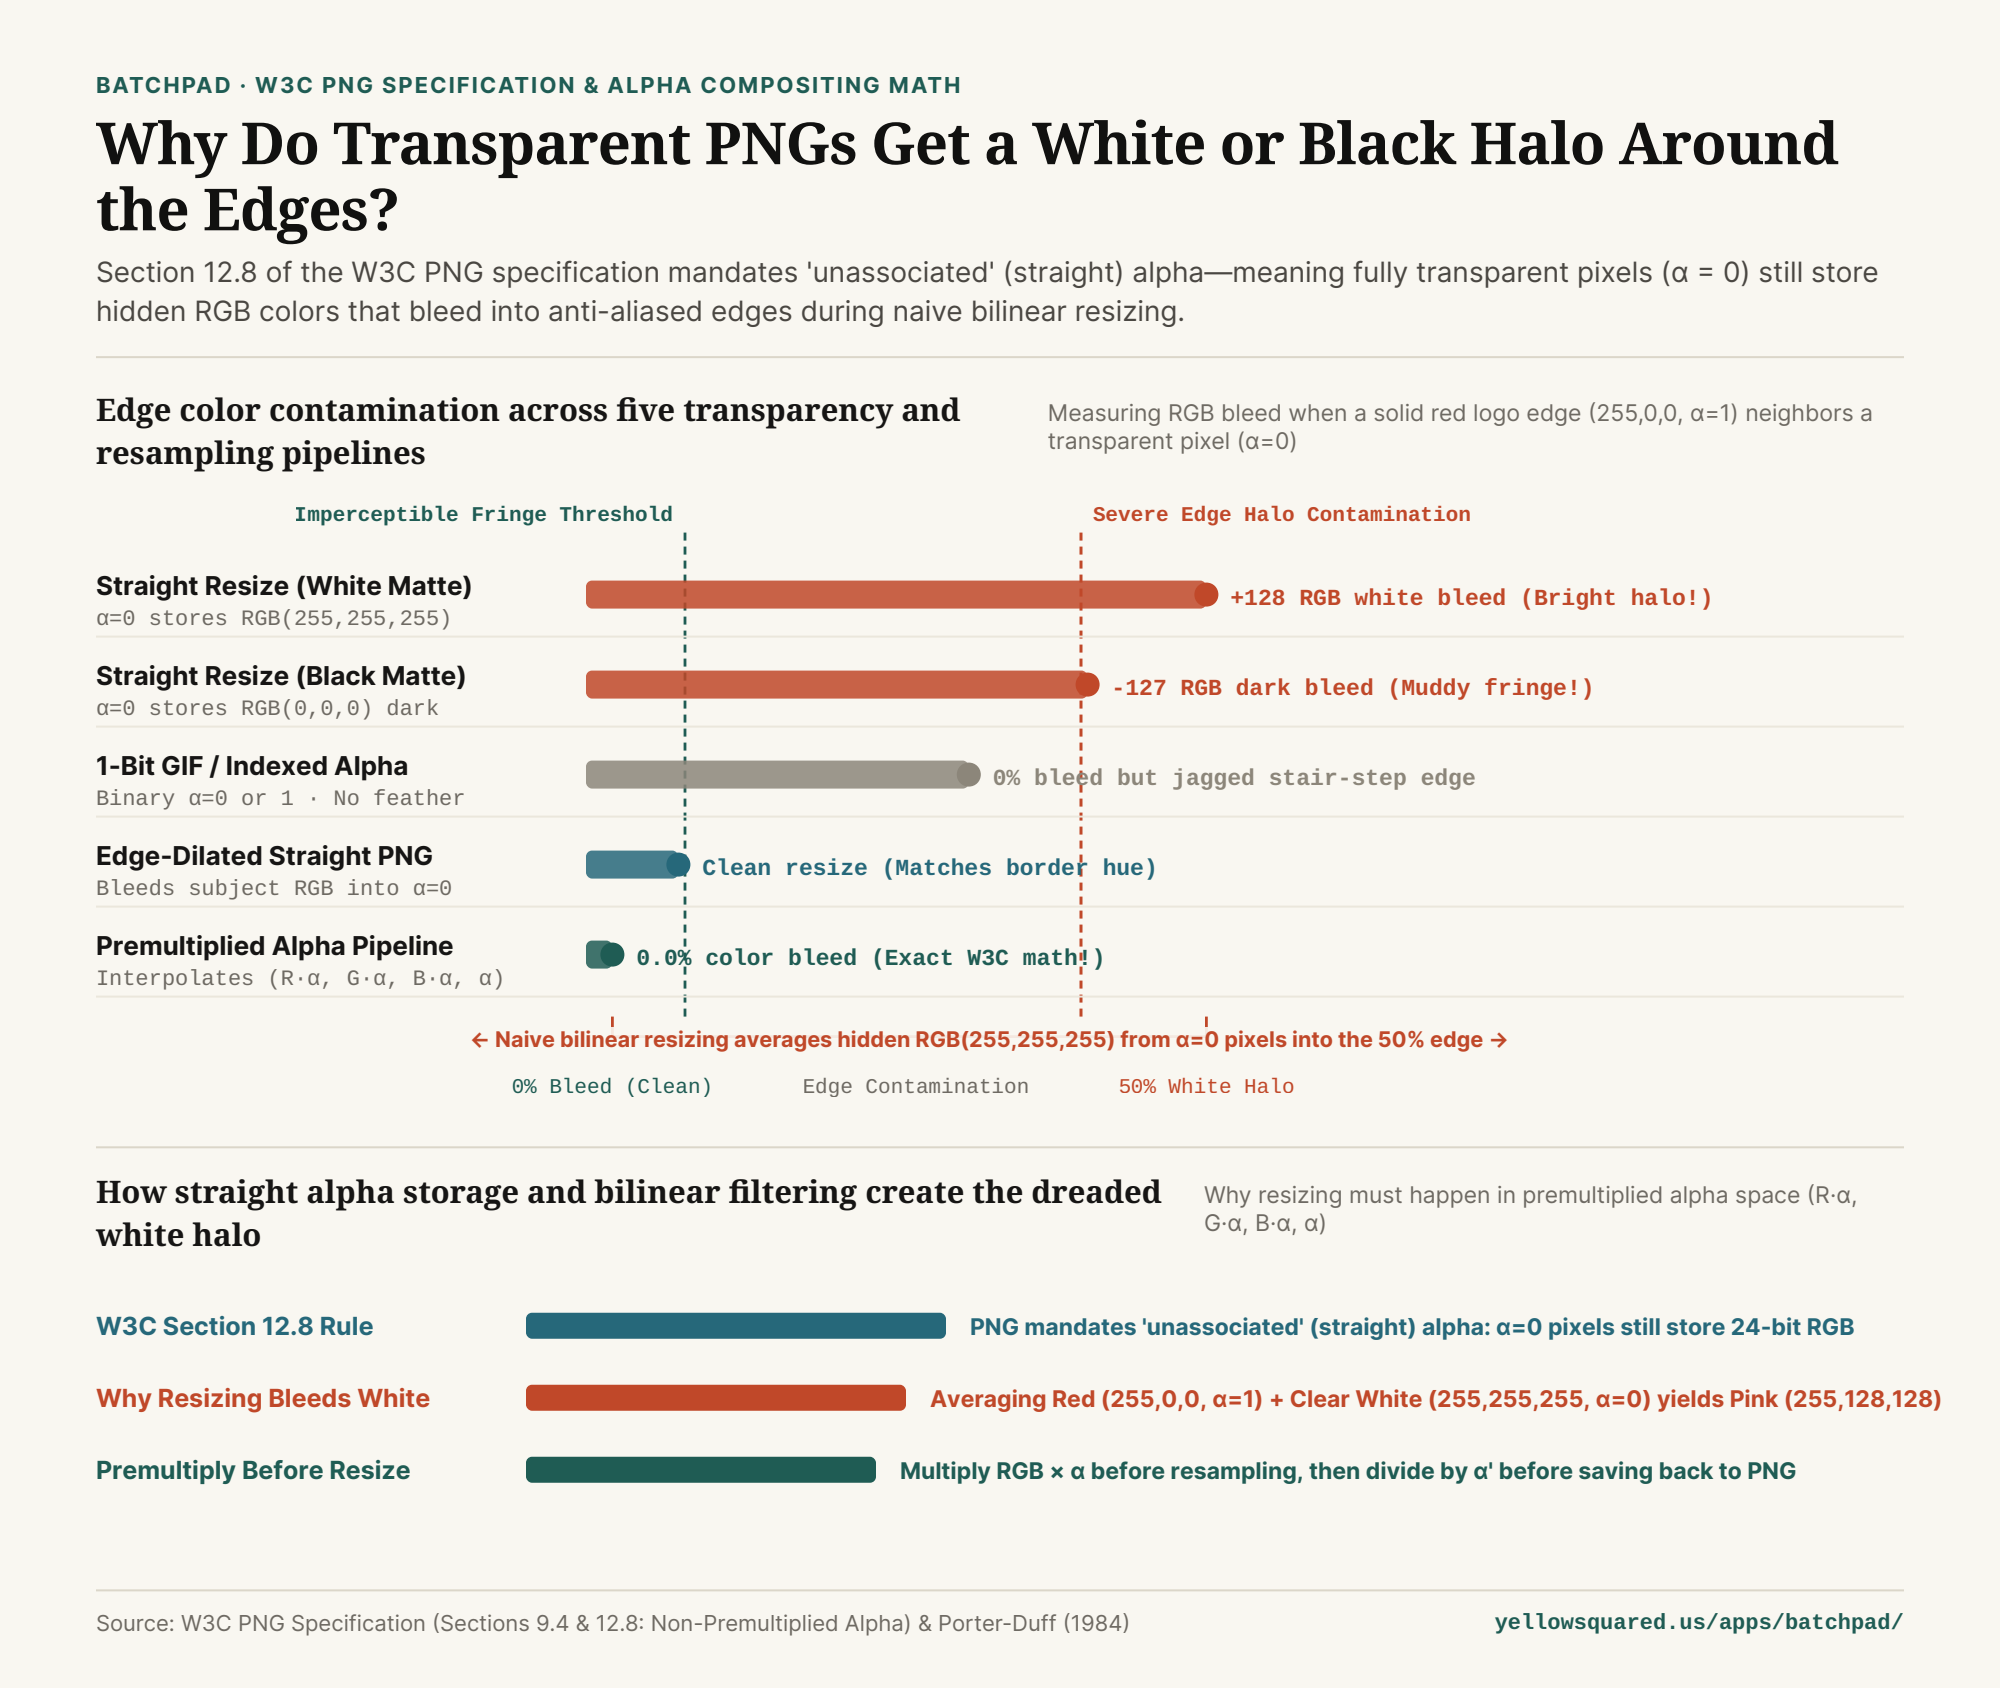
Chart comparing edge color bleed across straight-alpha resizing with white or black hidden pixels versus premultiplied alpha resampling
Figure 1: Edge RGB contamination when a solid red foreground pixel (RGB 255, 0, 0, α = 1.0) is interpolated against an adjacent transparent pixel (α = 0.0) across five pipelines. Reproducible dataset: why-do-png-files-have-a-black-or-white-fringe-around-transparent-edges.csv.

1. What Sits Under an Invisible Pixel? W3C Unassociated Alpha

In computer graphics, there are two ways to store a 32-bit RGBA image (first formalized by Thomas Porter and Tom Duff in 1984): premultiplied (associated) alpha, where the red, green, and blue channels are multiplied by the opacity fraction α before storage (R·α, G·α, B·α, α), and unassociated (straight) alpha, where 24-bit RGB color and 8-bit alpha are stored in completely separate lanes.

As stated in Section 12.8 of the W3C PNG Specification (Rationale: Non-Premultiplied Alpha), the PNG standard strictly requires unassociated alpha so that images with separate transparency masks can be stored losslessly. Because multiplying by α = 0 never happens on disk, every invisible pixel in a PNG still has a 24-bit RGB color hiding inside the file. If a designer erased a white background or exported from an editor that fills transparent canvas regions with RGB(255, 255, 255), millions of invisible white pixels ride along silently inside the PNG.

"In a PNG file, 'transparent' does not mean 'colorless.' A pixel with alpha = 0 still stores a full 24-bit RGB color that will leak into your edges the moment a naive algorithm averages neighboring pixels."

2. How Naive Resizing Turns Invisible White Into a Pink Halo

Now watch what happens when a naive image resizer or WebGL bilinear texture filter downscales that PNG by averaging each channel independently without premultiplying first (W3C PNG Encoder Recommendations §9.4):

  • Pixel A (Solid Red Edge): RGB = (255, 0, 0), α = 1.00.
  • Pixel B (Invisible White Background): RGB = (255, 255, 255), α = 0.00.
  • Naive Channel-by-Channel 50/50 Average: The resizer averages the alpha to α = 0.50, and averages the RGB channels to ((255+255)/2, (0+255)/2, (0+255)/2) = RGB(255, 128, 128)—a bright pastel pink! Even though Pixel B had zero opacity, its hidden white RGB values contributed 50% of the new edge pixel's color.
  • Correct Premultiplied Alpha Average: First multiply RGB by α: Pixel A is (255, 0, 0, 1.0) and Pixel B becomes (0, 0, 0, 0.0). Averaging them yields (127.5, 0, 0, 0.50). Dividing RGB by the new alpha (127.5 / 0.50) restores pure RGB(255, 0, 0) at α = 0.50—zero white halo!

3. Straight vs. Premultiplied Alpha Resampling Table

The table below traces the exact RGBA values at a 50/50 boundary between a red logo pixel and a transparent background pixel across five common workflows (available in why-do-png-files-have-a-black-or-white-fringe-around-transparent-edges.csv):

Pixel / Resampling Stage Opacity (α) Stored Straight RGB Premultiplied RGBA 50/50 Interpolated Result Appearance on Dark UI
Opaque Red Subject 1.00 (255) (255, 0, 0) (255, 0, 0, 1.00) Pure saturated red Crisp solid interior
Invisible White Canvas 0.00 (0) (255, 255, 255) Hidden! (0, 0, 0, 0.00) Invisible at 100% scale Fully transparent
Naive Straight Resize 0.50 (128) (255, 128, 128) Pink! (128, 64, 64, 0.50) 50% white bled into edge Glowing white/pink halo!
Naive Black-Matte Cutout 0.50 (128) (128, 0, 0) Dark Maroon (64, 0, 0, 0.50) 50% black baked into edge Dark muddy fringe on light UI
Premultiplied Pipeline 0.50 (128) (255, 0, 0) Pure Red! (128, 0, 0, 0.50) 0.0% background bleed Clean, halo-free edge!

4. Batch-Resize and Convert Transparent Assets Locally in BatchPad

If your cutout already has a white matte baked into its semi-transparent edge pixels (the 0.7% to 2.2% band of pixels where 8 <= α <= 250), re-export from your source vector or layer file with matte set to None, and always resize in premultiplied space. To batch-convert, resize, and inspect transparent PNG and WebP assets directly in your browser without uploading files to a third-party server, Process images locally in BatchPad.

Verified Primary Sources

  1. World Wide Web Consortium (W3C) — PNG Specification Section 12.8: Rationale for Non-Premultiplied (Unassociated) Alpha (Retrieved 2026-10-31).
  2. World Wide Web Consortium (W3C) — PNG Specification Section 9.4: Recommendations for Encoders — Alpha Channel Creation (Retrieved 2026-10-31).

016 / 28

DPI vs. PPI: Why 72 DPI vs. 300 DPI Does Not Change Web Image Size or Quality

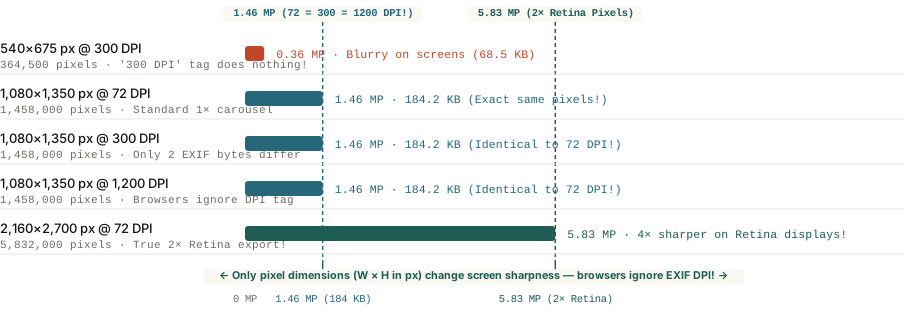
Because web browsers and social platforms render images strictly by pixel dimensions (width × height in px) and ignore the EXIF DPI metadata tag, a 1,080×1,350 px image saved at 72 DPI and 300 DPI has the exact same 1.46 million pixels and 184.2 KB file size.

Search any design forum or marketing checklist for how to export images for a website, blog, or Instagram carousel and you will see the same rule repeated as gospel: "Always export web images at 72 DPI so they load fast; save 300 DPI for print."

Test that advice yourself: open a `1,080 × 1,350 pixel` graphic in your image editor, keep the pixel dimensions locked at `1,080 × 1,350 px`, and export three copies—one tagged at `72 DPI`, one at `300 DPI`, and one at `1,200 DPI`. Drop all three files into a browser and inspect their file sizes in the terminal. Every single one is `184.2 KB`, and every single pixel on screen is `100%` identical. Understanding why the "72 DPI for web" rule is a 40-year-old holdover from the 1984 Apple Macintosh will save you from accidentally exporting blurry graphics.

Comparison of total megapixels and kilobyte file sizes across 72 DPI, 300 DPI, and 1200 DPI web image exports
Figure 1: Total pixel count (`MP`) and PNG file size (`KB`) across five export configurations, showing why `72 DPI`, `300 DPI`, and `1,200 DPI` are identical when pixel dimensions are fixed. Download benchmark table: what-is-dpi-vs-ppi-why-72-dpi-does-not-matter-for-web-images.csv.

Pixels vs. Physical Inches: What DPI and PPI Actually Measure

A digital image file on a computer disk does not have a physical size in inches or millimeters—it is simply a two-dimensional grid of colored numbers (`width in pixels × height in pixels`). The confusion comes from mixing up three separate metrics:

  • Pixel Dimensions (`W × H in px`): The actual number of horizontal and vertical pixels stored in the file (e.g., `1,080 × 1,350 px = 1,458,000 pixels`). This is the only spatial dimension that web browsers (`<img>` and CSS) and social apps read.
  • `PPI` (Pixels Per Inch) / `EXIF` Resolution Tag: A two-byte metadata instruction stored inside the file header (`XResolution` and `YResolution`) that tells a physical printer or page-layout app how many pixels to pack into 1 inch of paper (`1,080 px ÷ 300 PPI = 3.6 inches wide on paper`). Web browsers completely ignore this metadata tag.
  • `DPI` (Dots Per Inch): Technically a physical inkjet or offset printer specification measuring how many microscopic droplets of cyan, magenta, yellow, and black (`CMYK`) ink a printhead sprays per linear inch to reproduce those pixels.

A digital image has no inches until you print it on paper; on a screen, 1,080×1,350 pixels at 72 DPI and 1,080×1,350 pixels at 300 DPI are the exact same image.

Where the '72 DPI' Myth Came From (And How to Export for Retina Screens)

Why did `72` become the magic number in graphic design software? In 1984, when Apple engineered the original Macintosh and LaserWriter printer, typographers used physical metal type measured in **points**, where `72 points = 1 inch`. Apple designed the Macintosh's 9-inch monochrome CRT screen (`512 × 342 pixels`) with a physical pixel density of exactly 72 pixels per inch (`72 PPI`) so that a 12-point font on screen measured the exact same physical height on a ruler as a 12-point font printed on paper.

  1. The Resampling Trap in Image Editors: Why do some designers see their file size shrink when they type `72` into the PPI box? Because their document size was set in **inches** (e.g., `8 × 10 inches`) with the `"Resample"` checkbox turned on! Changing `300 PPI → 72 PPI` on an `8 × 10 inch` canvas destroys `94%` of the pixels (shrinking the pixel dimensions from `2,400 × 3,000 px` down to `576 × 720 px`).
  2. How to Export for Web & Social Media: Ignore the DPI/PPI field completely and set your export canvas in pixels (`px`). Because modern laptops and smartphones use `2×` to `3×` high-DPI ("Retina") screens, always export UI graphics, blog charts, and carousel slides at `2×` the CSS display width (for example, `2,000 px` wide for a `1,000 px` article column, or `1,080 × 1,350 px` for a `4:5` social slide).
  3. When 300 PPI Actually Matters: If you are sending a poster, book cover, or brochure to a physical print shop, multiply the physical print dimensions in inches by `300` (`Inches × 300 = Required Pixels`) to ensure the file contains enough real pixels for crisp paper reproduction.

When building multi-slide technical walkthroughs, social documentation, or launch graphics with exact pixel grids, you can Plan multi-slide carousels in BatchPad with deterministic `1:1`, `4:5`, and `16:9` pixel dimensions.