YellowSquared  /  Field notes

Notes from the workshop

60 posts, newest first. Choose an app to narrow the feed.

041 / 60

Why Supermarket Mushrooms Turn Slimy in Plastic but Keep in Paper

Grocery store mushrooms become slimy and turn dark brown when sealed in plastic wrap because mushrooms are living fungi that respire at exceptionally high rates, trapping transpired water vapor against their cell walls to create an anaerobic breeding ground for surface bacteria. According to postharvest physiology research from the University of California Davis Postharvest Technology Center and postharvest standards in USDA Agricultural Handbook 66, harvested button, cremini, and portobello mushrooms (Agaricus bisporus) lack a protective waxy cuticle and respire at 100 to 200 milligrams of carbon dioxide per kilogram per hour under refrigeration. In a sealed plastic container, liquid condensation pools on the fungal surface within 48 to 72 hours, allowing native Pseudomonas fluorescens bacteria to multiply past the critical threshold of 7.5 log CFU per gram, where bacterial enzymes dissolve exterior chitin and generate sticky brown slime.

Shoppers often assume that mushrooms spoil in the refrigerator due to thermal decay and try to preserve them by sealing them tighter in airtight food containers or plastic produce bags. Unlike true vegetables, mushrooms are fungi whose cell walls are reinforced with chitin - the same resilient polysaccharide found in crab and insect shells - rather than plant cellulose and pectin. Chitin does not dissolve in water or collapse easily under heat, which is why mushrooms retain their structure when cooked. The vulnerability of mushrooms lies in surface moisture: transferring mushrooms from commercial plastic trays into a simple, breathable brown paper bag allows excess moisture to evaporate safely while maintaining adequate humidity, extending crisp shelf life from three days to ten days.
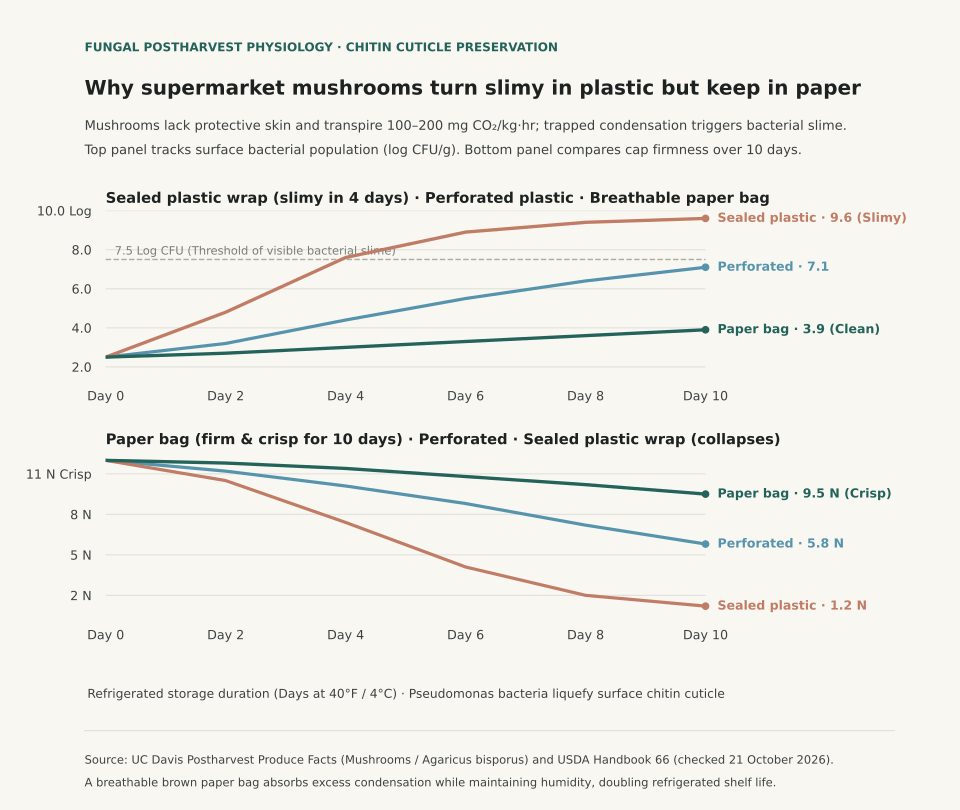
Two-panel chart showing surface bacterial growth over 10 days in sealed plastic versus breathable paper alongside mushroom cap firmness retention curves.
Panel A illustrates surface bacterial population growth (log CFU/g) over ten days of refrigerated storage at 40°F (4°C): mushrooms sealed in plastic wrap cross the 7.5 log slime threshold by Day 4 (9.6 log on Day 10), while mushrooms stored in a breathable brown paper bag stay clean at 3.9 log CFU/g. Panel B tracks cap firmness (load in Newtons): paper bag storage retains 9.5 N of crispness across ten days, while sealed plastic specimens collapse to 1.2 N into liquefied mush. Reproducible dataset: mushroom-postharvest-storage-respiration.csv.

The Biology of Sliming: Respiration, Condensation, and Pseudomonas

Unlike leafy greens or root vegetables, commercial mushrooms have no roots, vascular xylem, or protective stomatal cuticles. The entire fungal fruiting body consists of compressed hyphal filaments exposed directly to the surrounding atmosphere. Harvested mushrooms have one of the highest respiration rates in the entire produce aisle, consuming oxygen and releasing large volumes of water vapor as metabolic byproducts.

When packaged in commercial plastic-wrapped foam trays, moisture cannot escape. As refrigerator compressor cycles warm and cool the container by two to three degrees, water vapor condenses against the plastic film and drips onto the mushroom caps. Native psychrotrophic bacteria - principally Pseudomonas tolaasii and Pseudomonas fluorescens - thrive in standing moisture films at 4°C. These bacteria secrete extracellular proteases and lipases that digest the outer fungal hyphae, creating the distinctive slick, foul-smelling slime that ruins pre-packaged mushrooms. The table below compares commercial storage materials across moisture, bacterial growth, and culinary shelf life:

Postharvest quality indicators for white button and cremini mushrooms across refrigerated packaging methods (sources: UC Davis Postharvest Center and USDA Handbook 66).
Packaging Method Surface Moisture Behavior Day 4 Quality Status Day 10 Quality Status Bacterial Count (Day 10) Usable Refrigerated Lifespan
Sealed Plastic Wrap (Store Tray) Heavy pooling condensation Yellow-brown spots; sticky film Liquefied cap; pungent rot 9.6 log CFU/g (Spoiled) 3 to 4 days
Perforated Plastic Bag Moderate condensation droplets Dry cap; slight gill darkening Shrunken; rubbery fibrous stem 7.1 log CFU/g (Borderline) 5 to 6 days
Breathable Brown Paper Bag Moisture absorbed and vented Pristine white cap; dry surface Slight desiccation; crisp interior 3.9 log CFU/g (Fresh) 8 to 12 days
Airtight Plastic Container Severe anaerobic moisture pool Rapid decomposition Complete structural collapse 9.8 log CFU/g (Spoiled) 2 to 3 days

The Paper Bag Protocol for Refrigerator Storage

To keep mushrooms crisp and firm for over a week at home, follow three simple storage steps upon returning from the supermarket:

First, immediately remove and discard the commercial plastic stretch film. If the mushrooms are sold in a plastic punnet or foam tray, take them out of the container completely.

Second, place the unwashed mushrooms into a standard brown paper lunch bag. Fold the top of the bag over once or twice to prevent loose debris from entering while leaving the seam unsealed. The porous cellulose fibers of the paper act as a moisture buffer: they absorb excess humidity when condensation forms and release moisture back to the air without allowing liquid droplets to pool on the mushroom caps.

Third, store the paper bag on a middle refrigerator shelf rather than inside a sealed high-humidity vegetable crisper drawer. Never wash or rinse mushrooms until seconds before cooking: rinsing introduces water into the porous hyphal network that cannot evaporate in cold air, diluting flavor and accelerating browning during sautéing. For related food biochemistry and produce storage rules, read Why Sliced Apples Turn Brown and How Chloride Ions Stop Oxidation and explore Sprouted Garlic Chemistry: Higher Antioxidants Alongside a Bitter Green Germ.

Redberi (In Season) catalogs produce respiration rates, proper refrigerator storage zones, and seasonal harvest calendars for hundreds of culinary fruits, vegetables, and fungi. Open Redberi in your browser, Download Redberi for iPhone, or Get Redberi on Android.
042 / 60

Is Sprouted Garlic Safe to Eat? How to Use It

Sprouted garlic is usually fine to eat. If the green center tastes sharp or bitter, slice the clove open and pull it out.

For a raw sauce or dressing, remove the green shoot if its flavor bothers you. In a long-cooked soup or braise, you can leave it in. There's no need to fuss with every clove.

A green shoot is a sign the garlic has started growing. It does not mean the clove has become poisonous. The clove may taste less fresh or feel a little dry, so check it and discard it if it is moldy, mushy, or smells off.

Keep garlic from sprouting so quickly

Store whole, unpeeled garlic in a dry, well-ventilated spot away from direct sunlight. A small basket or paper bag works. Avoid a sealed plastic bag, which can trap moisture.

Garlic can sprout faster in a cool, damp place, including some refrigerators. If you keep yours in the fridge, use it when you notice a shoot. For other produce storage notes, see which fruits and vegetables to store apart and why potatoes turn green.

I built Redberi to keep these small produce decisions in one place, including storage and ripeness tips.

Source: Utah State University Extension’s garlic guide.

043 / 60

Why Citrus Never Ripens on the Counter and Green Skin Is Not Sour

Citrus fruits cease accumulating sugars the instant they are clipped from the orchard tree because they are non-climacteric and contain zero starch reserves to convert into sucrose, glucose, or fructose post-harvest. According to postharvest standards established by the University of Florida IFAS Citrus Research and Education Center and mandatory maturity thresholds in the Florida Citrus Code (Chapter 20-61), citrus ripens fully on the branch. While leaving oranges, grapefruits, or lemons on the counter at room temperature can cause their rinds to soften or turn from green to orange, that color change reflects chlorophyll degradation, not an increase in internal sweetness.

Shoppers frequently evaluate citrus using stone fruit or banana assumptions, placing green-tinged oranges or pale grapefruits on kitchen counters in hopes they will sweeten over several days. The internal chemistry of citrus is fixed at harvest: total soluble solids (measured in degrees Brix) remain flat throughout commercial storage, while citric acid gradually breaks down through respiration at approximately 0.5% to 1.0% per week. A tart lemon or sour orange will never become sweet on your counter; it simply becomes slightly less acidic as moisture evaporates from the peel.

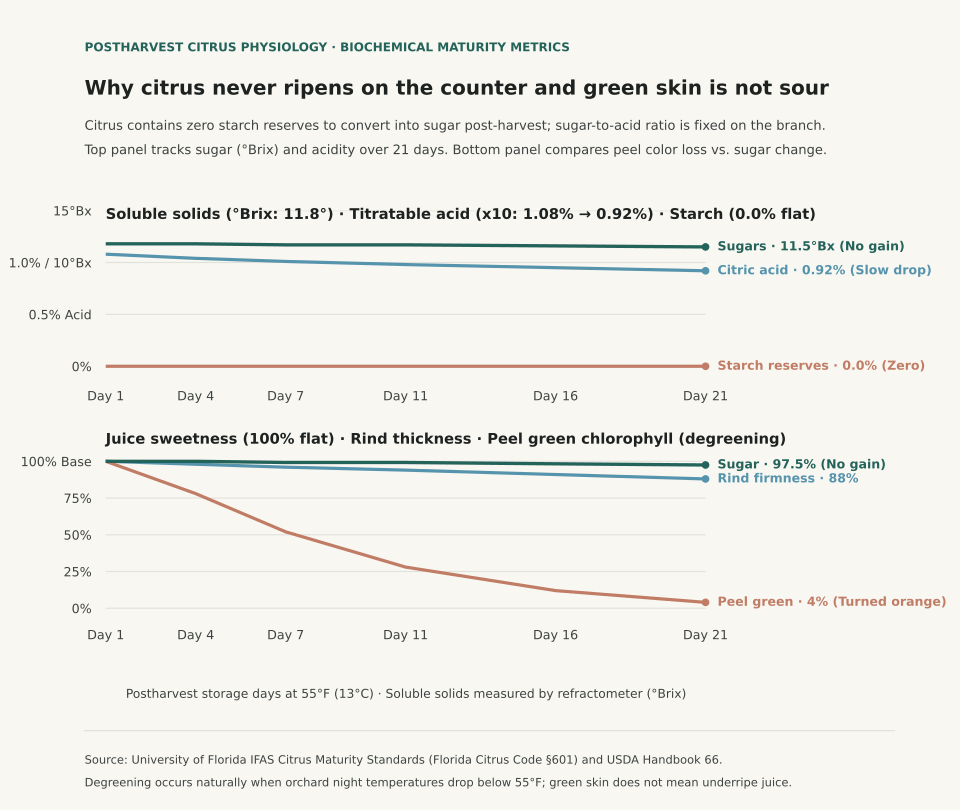
Two-panel chart showing postharvest citrus sugar and acidity stability over 21 storage days alongside peel chlorophyll loss (degreening) comparing peel color to internal juice sweetness.
Panel A tracks biochemical maturity metrics over 21 days of storage at 55°F: soluble solids (°Brix) remain flat at 11.5°–11.8°, titratable acidity declines slowly from 1.08% to 0.92%, and starch reserves remain at 0.0%. Panel B compares peel degreening against juice sweetness, showing that while chlorophyll drops from 100% to 4% (turning the peel bright orange), internal sugar levels experience zero post-harvest increase. Reproducible dataset: citrus-postharvest-maturity-metrics.csv.

The Biochemistry of Citrus: The Missing Starch Reserve

Climacteric fruits like bananas, apples, and pears store large reserves of insoluble starch (often 10% to 15% of fruit weight) during development on the plant. Upon harvesting, a surge of ethylene gas stimulates amylase enzymes that hydrolyze starch into soluble sugars, transforming a starchy green banana into a sweet yellow fruit. Citrus fruit stores no starch: all sugar delivered to the juice vesicles is synthesized via tree photosynthesis and transported through the phloem during growth. Once severed from the branch, the juice sac has no internal mechanism to generate additional carbohydrates.

Commercial maturity regulations in Florida and California dictate that citrus cannot be legally harvested until it meets minimum statutory Brix-to-acid ratios. For Florida oranges, the minimum ratio is typically 10.0:1 (or 10.5:1 for early-season Hamlin varieties), ensuring sufficient sweetness before fruit enters supermarket distribution. The table below traces postharvest compositional changes in fresh navel oranges over three weeks of typical household storage:

Postharvest compositional changes in navel oranges stored at 55°F (sources: UF IFAS Citrus Research and Florida Citrus Code).
Storage Duration Soluble Solids (°Brix) Titratable Acidity (%) Brix / Acid Ratio Starch Reserves (%) Peel Chlorophyll Content Physical Quality Status
Day 1 (Harvest) 11.8° Bx 1.08% 10.9 : 1 0.0% 100% (Greenish-yellow) Crisp, firm, peak internal juice volume
Day 4 11.8° Bx 1.04% 11.3 : 1 0.0% 78% (Mottled green) Taut rind; no measurable sugar change
Day 7 11.7° Bx 1.01% 11.6 : 1 0.0% 52% (Yellow-orange) Degreening underway; slight acidity decline
Day 11 11.7° Bx 0.98% 11.9 : 1 0.0% 28% (Pale orange) Peel loses firmness; interior remains sweet
Day 16 11.6° Bx 0.95% 12.2 : 1 0.0% 12% (Full orange) Transpirational moisture loss in outer rind
Day 21 11.5° Bx 0.92% 12.5 : 1 0.0% 4% (Deep orange) Mildly flat taste; risk of mold development

Why Green Skin Does Not Indicate Underripe Citrus

The familiar bright orange color of supermarket citrus is a temperature response, not a maturity signal. In commercial orchards, peel chlorophyll degrades when autumn night temperatures dip below 55°F (13°C), unmasking underlying carotenoid pigments (orange and yellow). In tropical or warm subtropical regions like Florida or South Texas where early autumn nights remain warm, fully mature, sweet oranges and grapefruits retain a greenish peel. Commercial packinghouses expose early-season fruit to low concentrations of ethylene gas (1 to 5 ppm) in warm "degreening" rooms solely to break down exterior chlorophyll without altering juice quality.

When selecting citrus in the produce aisle, prioritize specific gravity and skin texture over exterior color. Pick up multiple fruits of identical diameter and select the one that feels noticeably heavy in your hand; heavy density indicates swollen, juice-filled vesicles rather than thick, spongy pith. For complementary produce storage guidelines, read Why Ethylene Producers Accelerate Spoilage in Sensitive Crops and consult How to Read Fruit PLU Codes: 4-Digit vs. 9-Digit Organic Stickers.

Redberi (In Season) catalogs produce maturity standards, seasonal harvest calendars, and proper refrigerator storage zones for hundreds of fruits and vegetables. Open Redberi in your browser, Download Redberi for iPhone, or Get Redberi on Android.
044 / 60

Which Fruits and Vegetables Should You Store Apart?

Keep apples and ripe bananas away from leafy greens and carrots. Some fruit gives off ethylene, a gas that can make nearby produce ripen or age faster.

You don't need to measure the gas or buy a special container. Give fruit and sensitive vegetables separate bags or drawers when you can. If your fridge has one crisper, keep the bags apart.

What to separate

Keep togetherKeep apart when possible
Apples, pears, ripe bananasLeafy greens, broccoli, herbs
Ripe peaches, plums, avocadosCarrots, cucumbers, green beans

This is a useful rule of thumb, not a guarantee that produce will last a set number of days. Temperature, bruises, moisture, and how ripe the food was when you bought it all matter too.

I built Redberi's storage notes around simple choices like this: what goes on the counter, what belongs in the fridge, and which items are better stored apart. See the Redberi produce guide or read how to store berries.

Sources: UC Davis Postharvest Research and Extension Center and USDA Agriculture Handbook 66.

045 / 60

Pomegranate Ripeness Indicators: Why Round Pomegranates Are Underripe

Unlike bananas, apples, and avocados, pomegranates are non-climacteric fruit that cease developing sugars and flavor compounds the moment they are clipped from the orchard tree. According to postharvest handling research from the University of California Davis Postharvest Technology Center and the University of Florida IFAS Extension, pomegranates ripen fully on the branch, accumulating soluble solids (sugars) between 16% and 18% Brix before harvest. Once picked, starch reserves do not convert to sugars; an underripe pomegranate displayed in a supermarket bin will never soften, sweeten, or improve on your kitchen counter.

Shoppers frequently evaluate pomegranates using citrus or melon heuristics, searching for a smooth, spherical sphere with uniform crimson blush. In a produce aisle, a perfectly round, spherical pomegranate is often an indicator of underripe fruit that was harvested prematurely before the inner arils fully expanded against the outer rind. Learning the physical indicators of tree-ripened fruit ensures you select sweet, juicy arils rather than pale, tart seed pods.

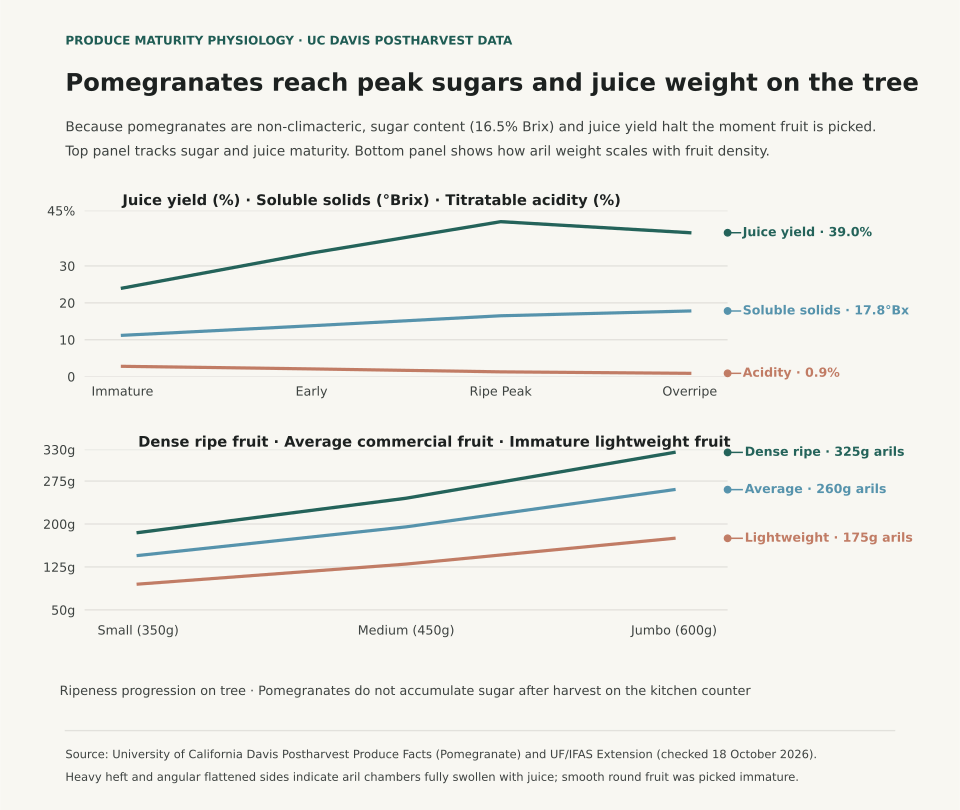
Two-panel chart showing how pomegranate sugar levels plateau at harvest while aril expansion creates flattened angular rind ridges, alongside physical ripeness cues.
Panel A illustrates postharvest physiological metrics: soluble solids content (°Brix) plateaus between 16° and 18° Brix on the tree with zero postharvest sugar accumulation, while titratable acidity gradually declines. Panel B summarizes physical supermarket selection indicators: flattened angular sides, heavy density, and dull taut skin. Reproducible dataset: pomegranate-ripeness-metrics.csv.

The Three Physical Ripeness Tests in the Supermarket Aisle

To pick a ripe pomegranate that is ready to open immediately, use three sensory cues documented in commercial postharvest standards:

First, examine the shape for flattened, angular sides. As pomegranate arils reach peak maturity, they swell with juice and press firmly outward against the interior locular membranes and the outer pericarp (rind). This internal pressure causes the fruit to transition from a smooth sphere into an octagonal or hexagon-like shape with distinct flattened facets and subtle vertical ridges.

Second, judge heft and weight relative to size. A ripe pomegranate consists of over 50% juice by aril weight. When comparing two fruits of identical diameter, select the one that feels noticeably heavy in your palm. A light pomegranate has either dried out in cold storage or was harvested before juice accumulation finished.

Third, inspect rind texture rather than exterior color. Color is an unreliable ripeness metric: cultivars like 'Wonderful' develop deep crimson skin, while varieties like 'Eversweet' or 'Sirenevyi' remain pale pink or greenish-tan even at peak 18° Brix sweetness. Look for skin that is taut, matte, and slightly leathery rather than glossy. If the rind yields slightly to gentle thumb pressure without bruising, the arils beneath are plump and tender.

Comparison of physical characteristics in tree-ripened versus prematurely picked pomegranates (sources: UC Davis Postharvest Center and UF IFAS Extension).
Physical Indicator Tree-Ripe (Ready to Eat) Underripe (Picked Too Early) Why It Matters
Rind Shape Hexagonal or flattened angular sides with ridges Smooth, perfectly spherical globe Arils expand with juice, pushing out against rind
Density / Heft Feels surprisingly heavy for its physical volume Feels lightweight, hollow, or airy in palm Juice content comprises >50% of ripe aril mass
Skin Texture Taut, matte, leathery surface Slick, glossy, hard, porcelain-smooth skin Matte finish signals natural cuticle wax maturation
Tap Sound Deep, resonant, solid metallic thud Hollow, dull, or high-pitched clatter Dense fluid volume transmits vibration solidly
Counter Behavior Ready immediately; keeps 2 weeks at 45–50°F Never ripens; dries out into sour seed pods Non-climacteric fruit lacks starch for conversion

Home Storage and Chilling Injury Prevention

Whole pomegranates stored at standard room temperature (68–72°F) remain in good condition for approximately one to two weeks away from direct sunlight. For longer storage up to two months, hold whole pomegranates at 45°F to 50°F (7°C to 10°C) with 90% to 95% relative humidity. Avoid storing whole pomegranates in home refrigerators set below 41°F (5°C) for more than a few days, as commercial studies show pomegranates are susceptible to chilling injury, which causes brown internal skin discoloration and pitting.

Once you extract the arils from the rind, refrigerate them in an airtight container lined with a dry paper towel, where they will maintain crisp texture and sweet flavor for five to seven days. For detailed produce storage advice and seasonal availability charts, see How to Read Fruit PLU Codes: 4-Digit vs. 9-Digit Organic Stickers and the Supermarket Produce Ripeness Guide.

Redberi (In Season) provides variety profiles, seasonal ripeness indicators, and cold-storage guidelines for hundreds of fruits and vegetables. Open Redberi in your browser, Download Redberi for iPhone, or Get Redberi on Android.
046 / 60

How to Read Fruit PLU Codes: 4-Digit Conventional vs. 5-Digit Organic Stickers

A four-digit Price Look-Up (PLU) sticker in the 3000 or 4000 range identifies conventionally grown bulk produce, while a five-digit code starting with 9 identifies the organic version of that same item. A standard yellow Cavendish banana carries PLU 4011; an organically grown Cavendish banana carries 94011. In the International Federation for Produce Standards (IFPS) database, which administers more than 1,500 global produce codes, the five-digit 83000 and 84000 series are reserved for routine conventional expansion as four-digit numbers fill up. They do not indicate genetically modified (GMO) fruit.

Supermarkets introduced standardized PLU stickers in 1990 so cashiers and self-checkout scales could price loose produce accurately without guessing varieties at the register. When you pick up an apple or an avocado in the aisle, the sticker answers a specific retail question: whether a small Hass avocado (4046) rings up at a different per-piece price than a large Hass avocado (4225), or whether a large Fuji apple is conventional (4131) or organic (94131). That number identifies the cultivar, size tier, and growing method recorded for checkout. It does not measure when the fruit was harvested, where it was grown, or whether it is ripe enough to eat tonight.

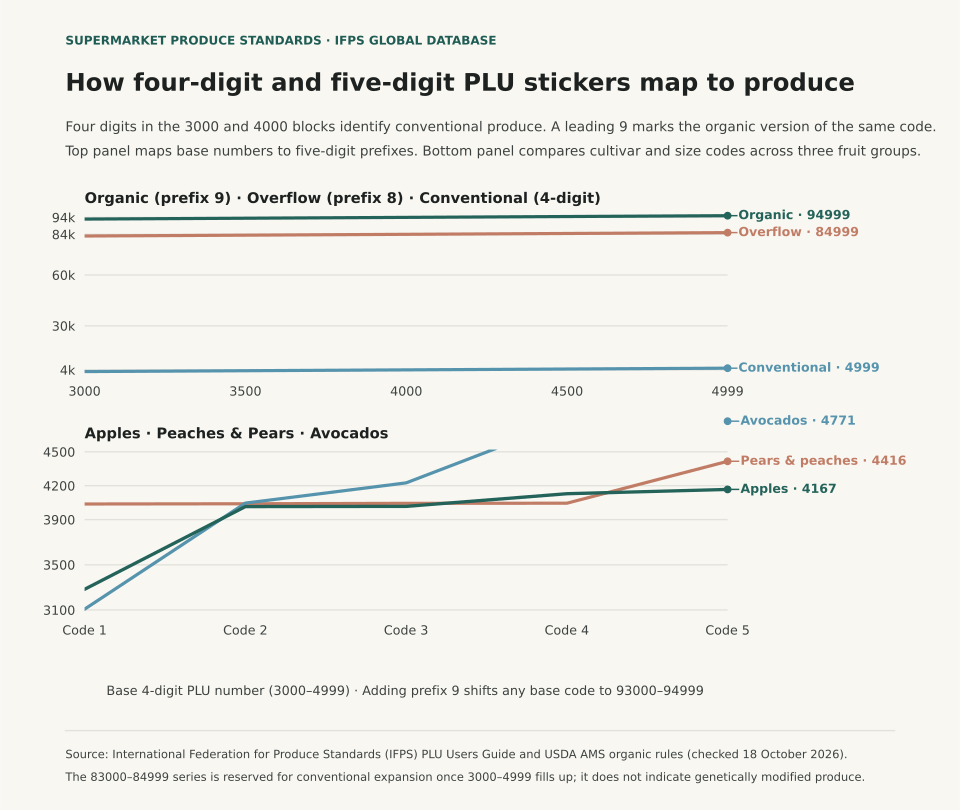
Diagram showing how four-digit 3000 to 4999 PLU codes identify conventional produce, a leading 9 prefix marks organic produce, and 83000 to 84999 serves as conventional overflow alongside cultivar and size examples.
How the International Federation for Produce Standards assigns four-digit conventional codes, five-digit organic codes (prefix 9), and the 83000–84999 expansion series. Imagine every four-digit sticker as a base catalog card: adding a 9 in front keeps the exact same fruit and size tier while switching the register to the organic price. Reproducible table inputs: plu-code-reference-examples.csv.

How the Four-Digit and Five-Digit Series Are Assigned

In 2001, national produce associations formed the IFPS to harmonize PLU assignments across countries. Participation is voluntary rather than mandated by a government regulator, and retailers use the shared list to keep bulk inventory and checkout pricing consistent. Within the four-digit 3000 and 4000 blocks, IFPS assigns numbers randomly as applications are approved. Aside from the leading 9 on five-digit organic stickers, individual digits inside the four-digit core carry no embedded code: a 3000-series apple such as 3283 is just as conventional as a 4000-series Granny Smith (4017).

Because every five-digit organic PLU is built by placing a 9 in front of the four-digit conventional code, the IFPS master catalog lists only the four-digit base numbers. Once you know that 4038 is a yellow-fleshed peach and 4044 is a white-fleshed peach, you also know that 94038 and 94044 are their organic counterparts.

A persistent grocery rumour claims that a five-digit PLU starting with 8 warns shoppers that a fruit is genetically engineered. IFPS had originally set aside the 8 prefix for genetically modified produce, but growers and supermarkets never adopted that sticker convention at retail. As recorded in the IFPS PLU Users Guide and retail ERP documentation, IFPS retired the unused GMO prefix and reopened the 83000–84999 ranges for ordinary produce as the 3000 and 4000 series approach capacity. Shoppers looking for organic verification in the United States should check for the 9-prefix PLU alongside the regulated seal defined under the USDA Agricultural Marketing Service (AMS) organic labeling rules, which prohibit genetic engineering, ionizing radiation, and sewage sludge in certified organic crops.

Why One Fruit Carries Multiple Base Codes in the Aisle

A single fruit species often appears under several different four-digit numbers because supermarkets separate small and large fruit or distinguish cultivars that look similar in a bin. Checking the four-digit base code tells you which variety and size class you are holding before you test for ripeness:

Common conventional and organic PLU codes across supermarket fruit aisles (sources: IFPS and PLU Code Directory).
Produce Item Cultivar or Size Tier Conventional PLU Organic PLU What the Code Separates in the Aisle
Banana Yellow Cavendish 4011 94011 Standard yellow banana vs. plantain (4235) or red banana (4236)
Avocado Hass, Small 4046 94046 Smaller per-piece or per-pound Hass tier vs. large Hass (4225)
Avocado Hass, Large 4225 94225 Large Hass vs. green-skinned Florida or West Indian varieties (3107)
Apple Granny Smith 4017 94017 Firm, tart green baking apple vs. Golden Delicious (4136)
Apple Fuji, Large 4131 94131 Large sweet red-blushed Fuji vs. Gala (4129) or Red Delicious (4015)
Peach Yellow Flesh 4038 94038 Traditional yellow peach vs. lower-acid white peach (4044)
Pear Bartlett 4045 94045 European pear that softens off the tree vs. Bosc (4416)
Melon Cantaloupe / Muskmelon 4031 94031 Netted cantaloupe vs. smooth-skinned honeydew (4050)

Knowing the cultivar code helps you apply the right selection and storage rule at home. A pear labeled 4045 is a European Bartlett that softens on the counter after harvest, whereas an Asian pear stays crisp when ripe and should be chosen ready to eat (see Why Asian Pears Stay Crisp: When to Eat, Wait or Refrigerate). Once you know which variety is in your basket, use physical cues - such as stem-end yield, background color, and aroma - from the Supermarket Produce Ripeness Guide rather than relying on the sticker alone. Note also that under USDA AMS exemptions, small farms marketing less than $5,000 of organic produce annually are not required to carry formal certification (though they must follow organic production rules and cannot use the USDA seal), and farmers-market fruit rarely carries IFPS stickers. In addition, IFPS reserves blocks of "Retailer Assigned" numbers that individual grocery chains map to local specialties, so a store-assigned number at one chain can refer to a different regional variety across town.

When a bin sign is missing or two apple varieties look alike under grocery lighting, Redberi (In Season) lets you match PLU numbers to variety profiles, check counter-versus-refrigerator storage rules, and look up USDA nutrition reference values per 100 grams offline. Open Redberi in your browser, Download Redberi for iPhone, or Get Redberi on Android.

047 / 60

Can You Refrigerate Tomatoes? Whole, Ripe and Cut Fruit Differ

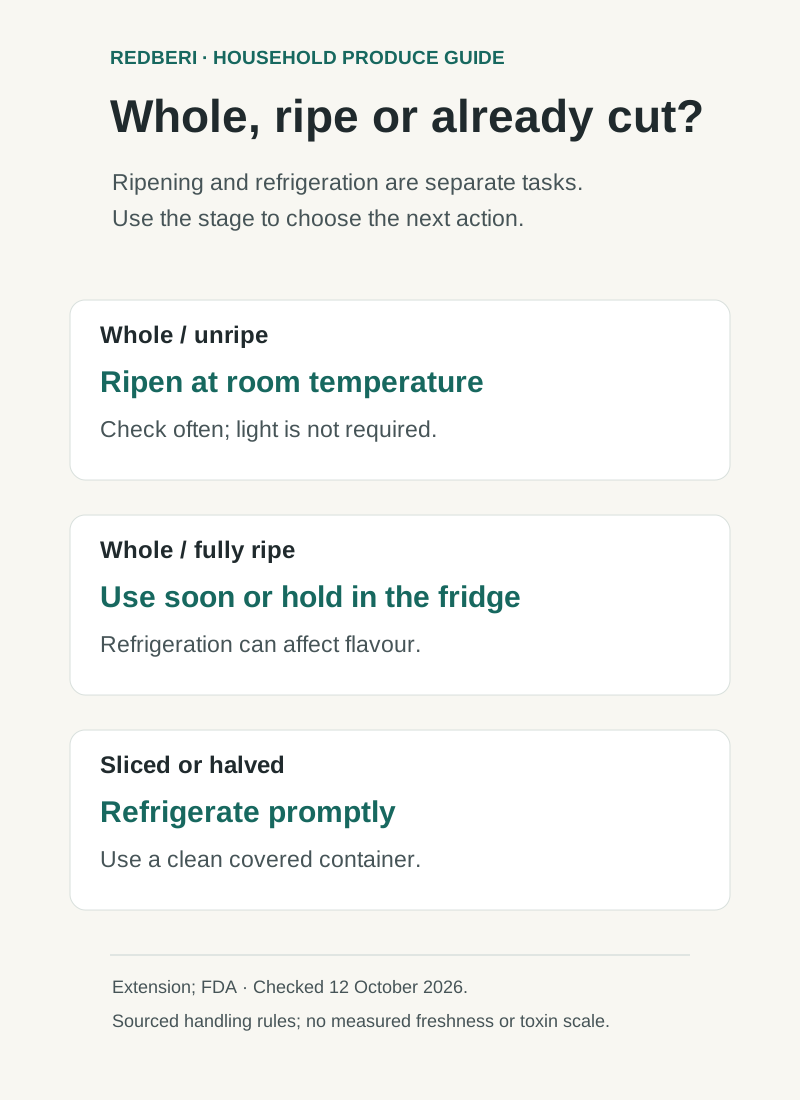
Let an unripe whole tomato ripen at room temperature. Once it is fully ripe, refrigeration can be a holding option, with a possible flavour trade-off. After cutting, refrigerate it. A single “never put tomatoes in the fridge” rule misses the difference between ripening whole fruit and storing a prepared food.

Start with the tomato's condition and your next meal. Fruit for tonight's salad, fruit that still needs to ripen and half a tomato left after lunch belong in different groups.

Tomato storage decisions: ripen whole unripe fruit on the counter; consider refrigeration for fully ripe fruit you need to hold; refrigerate cut fruit.
Whole-fruit quality guidance and cut-produce safety guidance apply at different stages. No storage experiment or fixed shelf-life estimate is shown. Download the sourced chart categories (JSON).

Whole and not ripe: allow room-temperature ripening

University of Minnesota Extension recommends storing unripe tomatoes in a single layer at room temperature, separated from one another. Light is not required for ripening. Check the fruit regularly rather than assuming a sunny windowsill or a set number of days will produce the result you want. Read Minnesota Extension's harvest and storage guidance.

Maturity at harvest still matters. The same guide distinguishes fully developed mature-green fruit from tomatoes picked so immature that good flavour is unlikely. “Green” can describe different starting points; counter time does not repair every poor harvest decision.

Fully ripe: decide how soon you will use it

A ripe whole tomato can go into the refrigerator when you need to hold it. An Ask Extension storage response describes refrigeration of fully ripe tomatoes while noting a loss of colour and flavour. Minnesota's household produce guide also includes room-temperature storage away from direct sunlight and refrigerator storage options. See the Extension storage response and Minnesota's tomato guide.

Those sources do not establish that refrigeration changes every cultivar by the same amount, or that a particular tomato will last a certain number of days in your kitchen. We have not run a taste comparison. Choose according to its condition, the meal you have planned and whether you need a holding option.

For example, if two sound tomatoes are already ripe, one might become today's salad while the other is refrigerated for a later meal. That is a planning example, not a promise that the second tomato will retain the same texture or flavour.

Cut tomatoes: use the refrigerator

Once you slice or halve a tomato, refrigerate the remainder promptly in a clean covered container. The FDA recommends refrigerating produce purchased pre-cut and keeping foods that need refrigeration at 40°F (4°C) or below. Its room-temperature limit is two hours, reduced to one hour above 90°F (32°C). These are handling limits rather than a freshness guarantee. FDA produce guidance and food-storage guidance explain the precautions.

Use a stage, not an absolute slogan

Redberi organises produce details around selection and storage stages, which helps connect a purchase to the next kitchen action. Its general whole-tomato advice should not be treated as a rule for cut fruit. The distinctions above come from the linked Extension and FDA guidance.

For the broader ripening pattern, read which fruits ripen on the counter. Our cut-melon guide applies the preparation and cold-storage distinction to another common leftover.

Household guidance; starting maturity, variety and previous handling affect quality.

048 / 60

Why Potatoes Turn Green and What to Do

Potatoes turn green after exposure to light. The green color is chlorophyll, but it can appear alongside higher levels of natural glycoalkaloids such as solanine.

Keep potatoes in a cool, dark, well-ventilated spot. A cupboard or paper bag works better than a sunny counter. I check the potatoes when I bring them home and move any green ones out of the batch.

For a small green patch, cut it away generously. Throw away potatoes that are green over much of the surface or taste bitter. Do not rely on cooking to make a heavily green potato safe; the amount of glycoalkaloids cannot be judged by color alone.

The FDA’s food-safety reference notes that light can increase potato glycoalkaloids, which are concentrated most in sprouts, peels, and green areas.